Salta al contenuto principale

LG Escape (p870) Rear Camera Replacement

Cosa ti serve

  1. LG Escape (p870) Rear Camera Replacement, Battery: passo 1, immagine 1 di 2 LG Escape (p870) Rear Camera Replacement, Battery: passo 1, immagine 2 di 2
    • Turn the device over and pull the back plastic cover off by inserting your fingernail into the opening at the bottom of the phone and gently pulling.

  2. LG Escape (p870) Rear Camera Replacement: passo 2, immagine 1 di 2 LG Escape (p870) Rear Camera Replacement: passo 2, immagine 2 di 2
    • With your finger and from the bottom edge, lift the battery out of the phone and set it aside.

    • You now have access to:

    • Your SD card

    • Your SIM card

    • Your device's serial numbers

  3. LG Escape (p870) Rear Camera Replacement, Loudspeaker Assembly: passo 3, immagine 1 di 1
    • Remove the 4 Phillips 00 screws securing the speaker assembly to the phone housing.

  4. LG Escape (p870) Rear Camera Replacement: passo 4, immagine 1 di 2 LG Escape (p870) Rear Camera Replacement: passo 4, immagine 2 di 2
    • Carefully insert a small flathead screwdriver between the speaker assembly and the rear housing

    • Pry the speaker assembly out of the phone and set it aside

  5. LG Escape (p870) Rear Camera Replacement, Rear Camera: passo 5, immagine 1 di 1
    • Remove the remaining 6 screws securing the plastic frame to the back housing

  6. LG Escape (p870) Rear Camera Replacement: passo 6, immagine 1 di 3 LG Escape (p870) Rear Camera Replacement: passo 6, immagine 2 di 3 LG Escape (p870) Rear Camera Replacement: passo 6, immagine 3 di 3
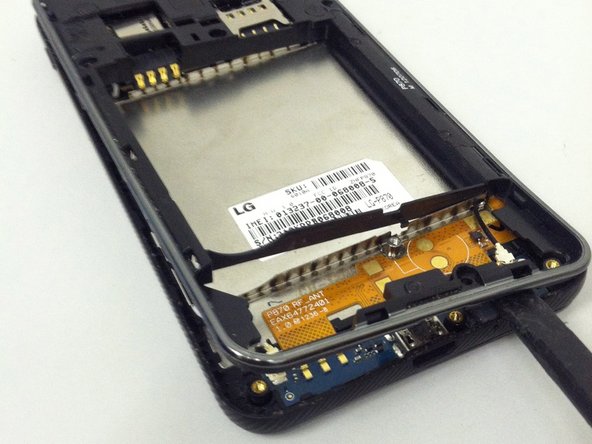
    • Insert a black plastic spudger or a small flathead screwdriver between the back silver bezel and the black area and begin prying the bezel away from the rest of the phone

    • Continue working your way around the phone, prying carefully with your prying tool

    • When you work the frame free, set it aside

  7. LG Escape (p870) Rear Camera Replacement: passo 7, immagine 1 di 1
    • Use a plastic spudger or safe-open pry tool to release the camera's flex cable from its connector

    • Remove the camera from the housing and set it aside

Conclusione

To reassemble your device, follow these instructions in reverse order.

Brad

Membro da: 08/12/12

1.908 Reputazione

10 Guide realizzate

0 Commenti

Aggiungi Commento

Visualizza Statistiche:

Ultime 24 Ore: 0

Ultimi 7 Giorni: 0

Ultimi 30 Giorni: 0

Tutti i Tempi: 434