Salta al contenuto principale

Questa guida ha delle modifiche più recenti. Passa all'ultima versione non verificata.

LG EnV VX9900 LCD Screen Replacement

Cosa ti serve

  1. LG EnV VX9900 LCD Screen Replacement, Battery: passo 1, immagine 1 di 1
    • Place the phone so the screen side is facing down.

    • Locate the latch at the end of the phone, opposite of the camera.

  2. LG EnV VX9900 LCD Screen Replacement: passo 2, immagine 1 di 1
    • Push/pull the latch away from the camera, causing the battery to pop out.

  3. LG EnV VX9900 LCD Screen Replacement: passo 3, immagine 1 di 1
    • Remove the battery.

  4. LG EnV VX9900 LCD Screen Replacement, Circuit Board and Full Key Board: passo 4, immagine 1 di 2 LG EnV VX9900 LCD Screen Replacement, Circuit Board and Full Key Board: passo 4, immagine 2 di 2
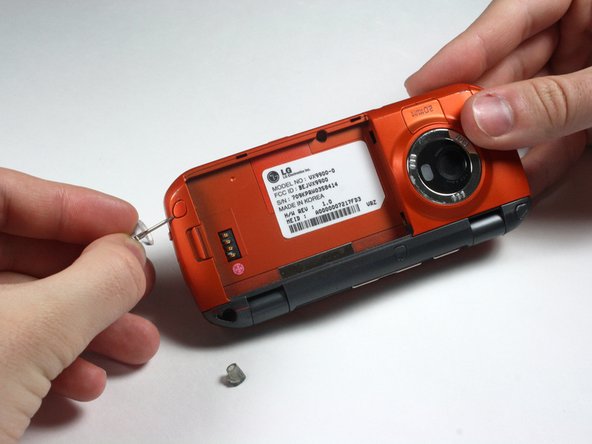
    • Remove the 5 screw covers on the back of the phone using a Push Pin.

  5. LG EnV VX9900 LCD Screen Replacement: passo 5, immagine 1 di 1
    • With a Phillips #00 Screwdriver, remove the five 3.44 mm screws that were under the screw covers.

    • Also with a Phillips #00 Screwdriver, remove the screw that was revealed once the battery was removed.

  6. LG EnV VX9900 LCD Screen Replacement: passo 6, immagine 1 di 2 LG EnV VX9900 LCD Screen Replacement: passo 6, immagine 2 di 2
    • Open the phone.

  7. LG EnV VX9900 LCD Screen Replacement: passo 7, immagine 1 di 2 LG EnV VX9900 LCD Screen Replacement: passo 7, immagine 2 di 2
    • Starting at the card slot or charger port for greater ease, pry off the colored casing from the back of the phone using the Plastic Pry Tool (or a finger nail may work).

    • Prying open the part just to the left of the right hinge can be difficult.

    • Remove the back colored casing and set it to the side.

  8. LG EnV VX9900 LCD Screen Replacement: passo 8, immagine 1 di 2 LG EnV VX9900 LCD Screen Replacement: passo 8, immagine 2 di 2
    • Gently pry and detach the connection located near the hinge with fingers.

  9. LG EnV VX9900 LCD Screen Replacement: passo 9, immagine 1 di 2 LG EnV VX9900 LCD Screen Replacement: passo 9, immagine 2 di 2
    • The circuit board and the key board will be attached, as shown in the second picture.

    • Lift them both out from the rest of the phone.

    • Do not try to the detach key board pad from the circuit board. They are replaced as a unit.

  10. LG EnV VX9900 LCD Screen Replacement, LCD Screen: passo 10, immagine 1 di 1
    • After removing the circuit board and key board, separate the top part with the screen from the bottom part by detaching the hinges.

  11. LG EnV VX9900 LCD Screen Replacement: passo 11, immagine 1 di 1
    • Careful! The paint is easy to scratch.

    • Remove the 4 screw covers from top piece of phone by using a Push Pin.

  12. LG EnV VX9900 LCD Screen Replacement: passo 12, immagine 1 di 1
    • Remove the four 3.44 mm screws that were under the covers using a Phillips #00 Screwdriver.

  13. LG EnV VX9900 LCD Screen Replacement: passo 13, immagine 1 di 3 LG EnV VX9900 LCD Screen Replacement: passo 13, immagine 2 di 3 LG EnV VX9900 LCD Screen Replacement: passo 13, immagine 3 di 3
    • Be careful while breaking the adhesive connecting the speaker and the casing in the following sub step so that you do not tear any wires.

    • Pry open the colored casing using the Plastic Pry Tool.

    • Remove the number pad and place it to the side.

  14. LG EnV VX9900 LCD Screen Replacement: passo 14, immagine 1 di 2 LG EnV VX9900 LCD Screen Replacement: passo 14, immagine 2 di 2
    • Because the Number Keypad is attached on one side and on top of the outer screen, open its metal casing, in a "door-opening" manner.

  15. LG EnV VX9900 LCD Screen Replacement: passo 15, immagine 1 di 1
    • The pieces connected by wires are magnets and are removable.

    • Remove the LCD Screen.

Conclusione

To reassemble your device, follow these instructions in reverse order.

Altre 2 persone hanno completato questa guida.

Team

Cal Poly, Team 15-15, Forte Spring 2012 Membro di Cal Poly, Team 15-15, Forte Spring 2012

CPSU-FORTE-S12S15G15

5 Membri

8 Guide realizzate

0 Commenti

Aggiungi Commento

Visualizza Statistiche:

Ultime 24 Ore: 0

Ultimi 7 Giorni: 0

Ultimi 30 Giorni: 3

Tutti i Tempi: 1,267