Salta al contenuto principale

Kodak EasyShare Z1015 IS Back Cover Replacement

Cosa ti serve

  1. Kodak EasyShare Z1015 IS Back Cover Replacement, Battery: passo 1, immagine 1 di 2 Kodak EasyShare Z1015 IS Back Cover Replacement, Battery: passo 1, immagine 2 di 2
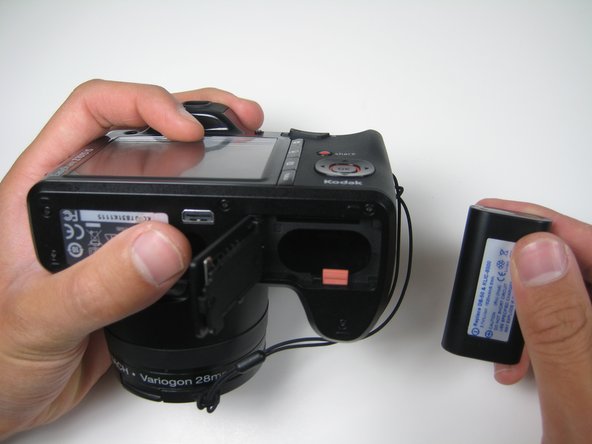
    • Begin by sliding the switch towards the open symbol. Release your finger from the switch and the battery case will pop open.

  2. Kodak EasyShare Z1015 IS Back Cover Replacement: passo 2, immagine 1 di 1
    • Next, press down on the red lever which holds the battery in place.

  3. Kodak EasyShare Z1015 IS Back Cover Replacement: passo 3, immagine 1 di 2 Kodak EasyShare Z1015 IS Back Cover Replacement: passo 3, immagine 2 di 2
    • Once the battery has popped out of the compartment, simply pull it out of the camera.

  4. Kodak EasyShare Z1015 IS Back Cover Replacement, Back Cover: passo 4, immagine 1 di 3 Kodak EasyShare Z1015 IS Back Cover Replacement, Back Cover: passo 4, immagine 2 di 3 Kodak EasyShare Z1015 IS Back Cover Replacement, Back Cover: passo 4, immagine 3 di 3
    • Make sure that the lens cover is on the Kodak EasyShare whenever working with one of these guides.

    • Also, make sure to keep track of the screws you remove throughout these step by step guides. Losing a screw could inhibit the ability to reassemble the camera.

    • Begin by removing the first screw located on the back of the camera.

  5. Kodak EasyShare Z1015 IS Back Cover Replacement: passo 5, immagine 1 di 2 Kodak EasyShare Z1015 IS Back Cover Replacement: passo 5, immagine 2 di 2
    • Next, remove the two screws located on the right side of the camera.

  6. Kodak EasyShare Z1015 IS Back Cover Replacement: passo 6, immagine 1 di 2 Kodak EasyShare Z1015 IS Back Cover Replacement: passo 6, immagine 2 di 2
    • After removing the screws located on the right side, remove the six screws located on the bottom of the camera.

  7. Kodak EasyShare Z1015 IS Back Cover Replacement: passo 7, immagine 1 di 2 Kodak EasyShare Z1015 IS Back Cover Replacement: passo 7, immagine 2 di 2
    • Lastly, remove the two screws located on the left side of the camera.

  8. Kodak EasyShare Z1015 IS Back Cover Replacement: passo 8, immagine 1 di 3 Kodak EasyShare Z1015 IS Back Cover Replacement: passo 8, immagine 2 di 3 Kodak EasyShare Z1015 IS Back Cover Replacement: passo 8, immagine 3 di 3
    • Once all eleven screws have been removed, use Plastic Opening Tools to take off the back cover.

    • Insert the plastic opening tool and apply leverage on each side of the camera. The recommended spots to apply leverage are shown in these pictures.

  9. Kodak EasyShare Z1015 IS Back Cover Replacement: passo 9, immagine 1 di 3 Kodak EasyShare Z1015 IS Back Cover Replacement: passo 9, immagine 2 di 3 Kodak EasyShare Z1015 IS Back Cover Replacement: passo 9, immagine 3 di 3
    • Apply pressure on the left and right side of the camera and pull the back cover away from the device.

    • Once the back cover has been successfully removed, you should have a total of eleven screws as well as the bottom cover separated from the camera.

Conclusione

To reassemble your device, follow these instructions in reverse order.

Altre 2 persone hanno completato questa guida.

katie newman

Membro da: 10/28/10

30 Reputazione

3 Guide realizzate

Team

Cal Poly, Team 5-16, Maness Fall 2010 Membro di Cal Poly, Team 5-16, Maness Fall 2010

CPSU-MANESS-F10S5G16

4 Membri

11 Guide realizzate

0 Commenti

Aggiungi Commento

Visualizza Statistiche:

Ultime 24 Ore: 0

Ultimi 7 Giorni: 2

Ultimi 30 Giorni: 3

Tutti i Tempi: 1,391