Salta al contenuto principale

KitchenAid KHM512ER Motor Replacement

Cosa ti serve

  1. KitchenAid KHM512ER Motor Replacement, Motor: passo 1, immagine 1 di 2 KitchenAid KHM512ER Motor Replacement, Motor: passo 1, immagine 2 di 2
    • Insert the back of a plastic opening tool into one of the beater holes

    • Apply force to pull the circular plastic part off.

    • If necessary, use the other side of the plastic opening tool to pry the circular plastic part off.

  2. KitchenAid KHM512ER Motor Replacement: passo 2, immagine 1 di 2 KitchenAid KHM512ER Motor Replacement: passo 2, immagine 2 di 2
    • Use a Phillips 2 screwdriver to remove the two 20mm screws holding the bottom plastic piece in place.

    • Remove the bottom plastic piece using a plastic opening tool.

    • Your screwdriver may not be long or narrow enough to reach the screws in these holes. If that's the case, use another screwdriver.

  3. KitchenAid KHM512ER Motor Replacement: passo 3, immagine 1 di 2 KitchenAid KHM512ER Motor Replacement: passo 3, immagine 2 di 2
    • Using a Phillips 2 screwdriver, remove the three 20mm screws holding the motor assembly in place.

    • Use your hands to remove the motor assembly and circuit board.

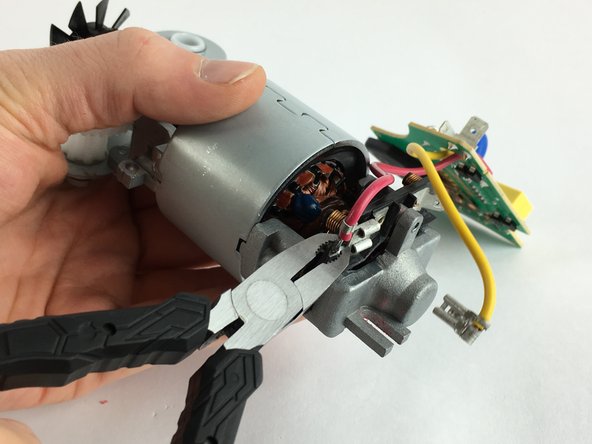
  4. KitchenAid KHM512ER Motor Replacement: passo 4, immagine 1 di 3 KitchenAid KHM512ER Motor Replacement: passo 4, immagine 2 di 3 KitchenAid KHM512ER Motor Replacement: passo 4, immagine 3 di 3
    • Firmly grip the motor in your hand. Using pliers, pull the connectors off the motors.

    • Some force may be required. Be careful not to cut yourself on any electrical components.

Conclusione

To reassemble your device, follow these instructions in reverse order.

Un'altra persona ha completato questa guida.

[deleted]

Membro da: 02/10/16

122 Reputazione

1 Guida realizzata

0 Commenti

Aggiungi Commento

Visualizza Statistiche:

Ultime 24 Ore: 3

Ultimi 7 Giorni: 7

Ultimi 30 Giorni: 36

Tutti i Tempi: 4,175