Salta al contenuto principale

Kindle Fire HD 2013 USB and Aux Port Replacement

Cosa ti serve

  1. Kindle Fire HD 2013 USB and Aux Port Replacement, USB and Aux Port: passo 1, immagine 1 di 3 Kindle Fire HD 2013 USB and Aux Port Replacement, USB and Aux Port: passo 1, immagine 2 di 3 Kindle Fire HD 2013 USB and Aux Port Replacement, USB and Aux Port: passo 1, immagine 3 di 3
    • Open up the device by using a plastic opening tool in order to avoid damaging the device.

    • To do so, find the seam along the outer edge of the device and use the plastic tool to pry the back panel up. Doing so may take some force and patience.

    • The USB port is located at the top of the device.

    • The Aux port is located at the bottom of the device.

  2. Kindle Fire HD 2013 USB and Aux Port Replacement: passo 2, immagine 1 di 2 Kindle Fire HD 2013 USB and Aux Port Replacement: passo 2, immagine 2 di 2
    • Locate the battery's power ribbon.

    • Use a nylon spudger to disconnect the ribbon from the motherboard.

  3. Kindle Fire HD 2013 USB and Aux Port Replacement: passo 3, immagine 1 di 1
    • After locating the USB port at the top of the device, remove the (2) 3mm T4 Torx screws.

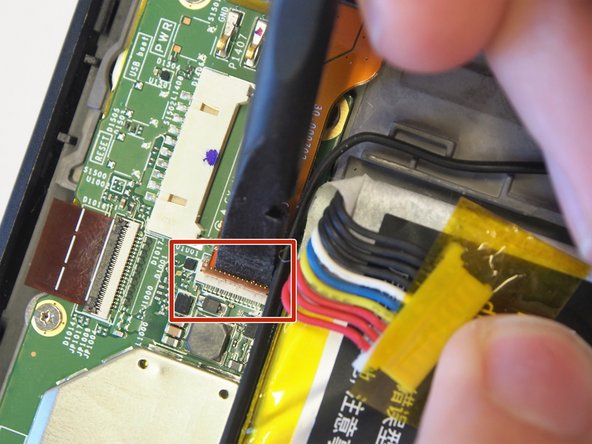
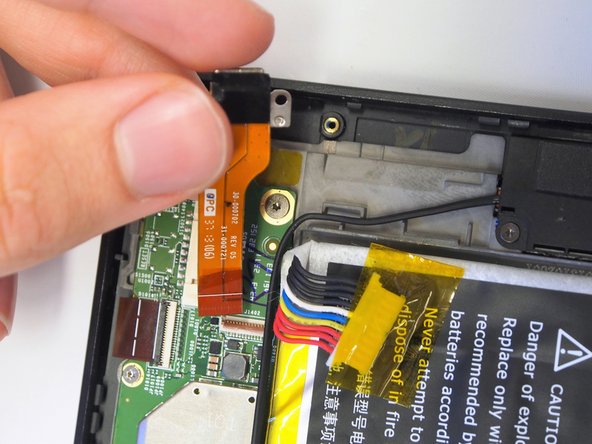
  4. Kindle Fire HD 2013 USB and Aux Port Replacement: passo 4, immagine 1 di 3 Kindle Fire HD 2013 USB and Aux Port Replacement: passo 4, immagine 2 di 3 Kindle Fire HD 2013 USB and Aux Port Replacement: passo 4, immagine 3 di 3
    • After removing the screws, follow the ribbon to where it connects to the main device.

    • There is a small tab here that must be lifted up in order to allow the ribbon to be removed without damaging it.

    • Once the tab has been opened, gently pull the ribbon out and away. The USB port should now be detached completely.

  5. Kindle Fire HD 2013 USB and Aux Port Replacement: passo 5, immagine 1 di 1
    • After locating the Aux port at the bottom of the device, remove the (2) 3mm T4 Torx screws.

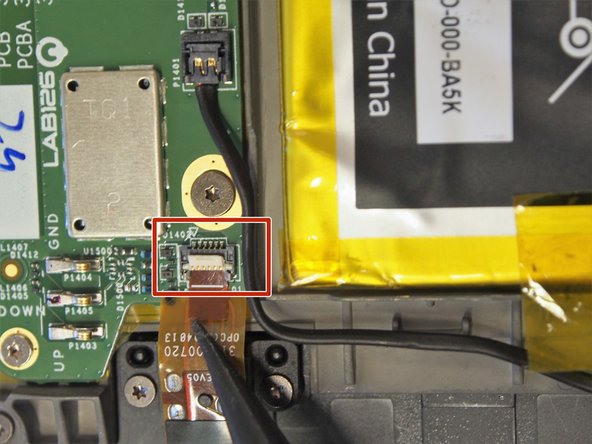
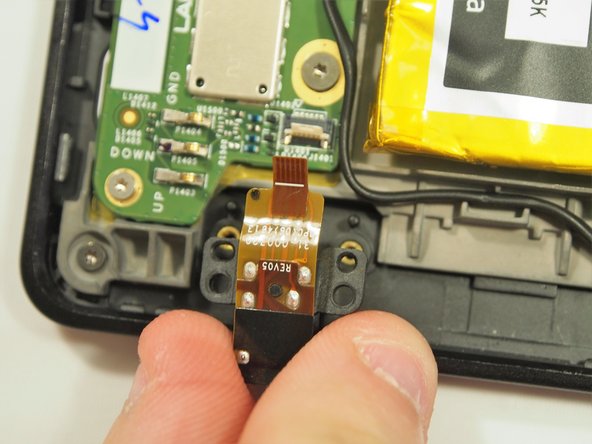
  6. Kindle Fire HD 2013 USB and Aux Port Replacement: passo 6, immagine 1 di 3 Kindle Fire HD 2013 USB and Aux Port Replacement: passo 6, immagine 2 di 3 Kindle Fire HD 2013 USB and Aux Port Replacement: passo 6, immagine 3 di 3
    • After removing the screws, follow the ribbon to where it connects to the main device.

    • There is a tab here that must be opened before the part can be removed. Use the nylon spudger or a finger nail to lift the tab open.

    • Once the tab is open, gently remove the ribbon. The Aux port should now be detached completely.

Conclusione

To reassemble your device, follow these instructions in reverse order.

Altre 2 persone hanno completato questa guida.

aaa

Membro da: 10/06/16

733 Reputazione

5 Guide realizzate

Team

USF Tampa, Team 2-3, Sullivan Fall 2016 Membro di USF Tampa, Team 2-3, Sullivan Fall 2016

USFT-SULLIVAN-F16S2G3

4 Membri

6 Guide realizzate

0 Commenti

Aggiungi Commento

Visualizza Statistiche:

Ultime 24 Ore: 0

Ultimi 7 Giorni: 2

Ultimi 30 Giorni: 4

Tutti i Tempi: 986