Salta al contenuto principale

Kids Digital Watch Battery Replacement

Cosa ti serve

  1. Kids Digital Watch Battery Replacement, Remove Watch Bands: passo 1, immagine 1 di 2 Kids Digital Watch Battery Replacement, Remove Watch Bands: passo 1, immagine 2 di 2
    • Using a twisting and pulling motion, remove the straps from the watch.

  2. Kids Digital Watch Battery Replacement, Unscrew Backplate: passo 2, immagine 1 di 1
    • Remove the four (4) screws on the backside of the watch with the small Philips head screwdriver.

  3. Kids Digital Watch Battery Replacement, Remove Backplate: passo 3, immagine 1 di 1
    • Remove the backplate carefully using your hands.

  4. Kids Digital Watch Battery Replacement, Remove Circuit Protector Plate: passo 4, immagine 1 di 1
    Attrezzo utilizzato in questo passaggio:
    Tweezers
    $4.99
    Compra
    • Remove using tweezers the circuit protector plate that is uncovered once the backplate is removed.

  5. Kids Digital Watch Battery Replacement, Removing Screw Near the Blue Component: passo 5, immagine 1 di 2 Kids Digital Watch Battery Replacement, Removing Screw Near the Blue Component: passo 5, immagine 2 di 2
    • With the tiny Philips head screwdriver, unscrew and remove the screw closest to the blue component.

  6. Kids Digital Watch Battery Replacement, Removing Screw Near the Yellow Component: passo 6, immagine 1 di 1
    • Now remove the screw on the other side of the battery near the yellow circuit component.

  7. Kids Digital Watch Battery Replacement, Remove the Battery Protector Plate: passo 7, immagine 1 di 2 Kids Digital Watch Battery Replacement, Remove the Battery Protector Plate: passo 7, immagine 2 di 2
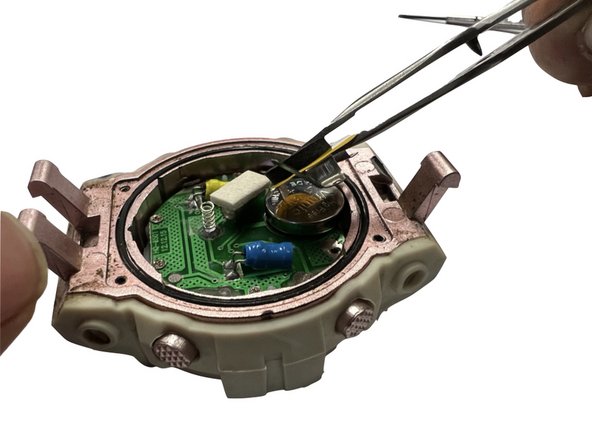
    • Using tweezers carefully remove the battery protector plate.

  8. Kids Digital Watch Battery Replacement, Remove Battery: passo 8, immagine 1 di 1
    • Remove the old battery from your watch.

  9. Kids Digital Watch Battery Replacement, Insert New Battery: passo 9, immagine 1 di 1
    • Insert your new battery onto the circular component with your tweezers.

    • Ensure the positive and negative sides of your battery are oriented correctly.

Conclusione

To reassemble your device, follow these instructions in reverse order.

Un'altra persona ha completato questa guida.

Amelia S

Membro da: 03/14/23

194 Reputazione

1 Guida realizzata

Team

ENGR_COMM_FIXERS Membro di ENGR_COMM_FIXERS

Community

3 Membri

1 Guida realizzata

0 Commenti

Aggiungi Commento

Visualizza Statistiche:

Ultime 24 Ore: 2

Ultimi 7 Giorni: 9

Ultimi 30 Giorni: 66

Tutti i Tempi: 712