Salta al contenuto principale
Unisciti alla Community delle riparazioni - Crea un account
Keyboard Replacement guide

Keyboard Replacement guide

Steven Park

Steven Park e 3 altri collaboratori

Ultimo aggiornamento il April 27, 2019

15 minuti
Moderato

Introduzione

Vai al passo 1

This guide deomonstrates how to safely remove and replace a Gateway LT2104u laptop key board in order to preserve the function of the device.

Cosa ti serve

Ricambi

Strumenti

  • Spudger
    Spudger
  • iFixit Opening Tool
    iFixit Opening Tool

Mostra di più…

  1. Keyboard Replacement guide, Keyboard: passo 1, immagine 1 di 1
    • Locate the button right above the F8 key.

  2. Keyboard Replacement guide: passo 2, immagine 1 di 2 Keyboard Replacement guide: passo 2, immagine 2 di 2
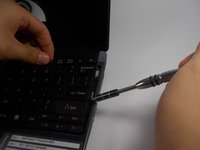
    • Use a spudger or plastic opening tool to push the button away from you.

  3. Keyboard Replacement guide: passo 3, immagine 1 di 3 Keyboard Replacement guide: passo 3, immagine 2 di 3 Keyboard Replacement guide: passo 3, immagine 3 di 3
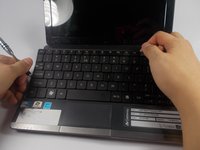
    • Insert the spudger under the keyboard and slide it along the length of the keyboard.

  4. Keyboard Replacement guide: passo 4, immagine 1 di 1
    • Do not attempt to remove the keyboard. It is still attached to the laptop by a ribbon cable.

  5. Keyboard Replacement guide: passo 5, immagine 1 di 1
    • Remove the ribbon cable from the connector.

Conclusione

To reassemble your device, follow these instructions in reverse order.

Steven Park

Membro da: 03/09/16

420 Reputazione

3 Guide realizzate

Team

0Commenti sulla guida

Aggiungi Commento

Visualizza Statistiche:

Ultime 24 Ore: 2

Ultimi 7 Giorni: 2

Ultimi 30 Giorni: 10

Tutti i Tempi: 1,105