Salta al contenuto principale

Keurig B70 Platinum Check Valve Replacement

Cosa ti serve

  1. Keurig B70 Platinum Check Valve Replacement, Check Valve: passo 1, immagine 1 di 2 Keurig B70 Platinum Check Valve Replacement, Check Valve: passo 1, immagine 2 di 2
    • Lift up the top lid.

    • Remove the two screws with a Phillips #0 screwdriver.

  2. Keurig B70 Platinum Check Valve Replacement: passo 2, immagine 1 di 2 Keurig B70 Platinum Check Valve Replacement: passo 2, immagine 2 di 2
    • Push down on the lid.

    • Lift up and remove the lid.

  3. Keurig B70 Platinum Check Valve Replacement: passo 3, immagine 1 di 2 Keurig B70 Platinum Check Valve Replacement: passo 3, immagine 2 di 2
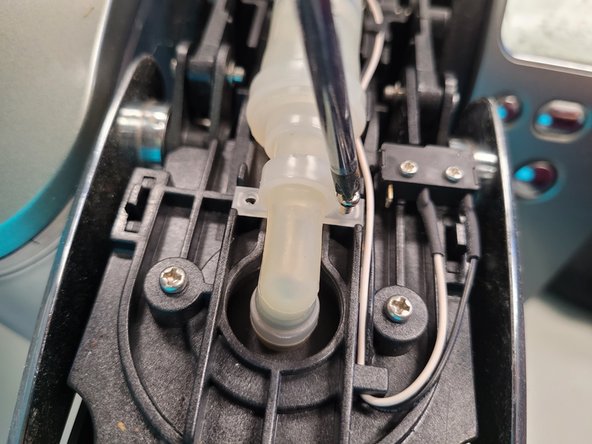
    • Using the Phillips #0 screwdriver, remove the two screws holding the tubing to the puncture needle.

  4. Keurig B70 Platinum Check Valve Replacement: passo 4, immagine 1 di 3 Keurig B70 Platinum Check Valve Replacement: passo 4, immagine 2 di 3 Keurig B70 Platinum Check Valve Replacement: passo 4, immagine 3 di 3
    • Twist and pull to disconnect the valve on that side.

  5. Keurig B70 Platinum Check Valve Replacement: passo 5, immagine 1 di 2 Keurig B70 Platinum Check Valve Replacement: passo 5, immagine 2 di 2
    • On the other side, cut the one zip tie closest to the valve.

  6. Keurig B70 Platinum Check Valve Replacement: passo 6, immagine 1 di 2 Keurig B70 Platinum Check Valve Replacement: passo 6, immagine 2 di 2
    • Twist and pull to disconnect valve on the other side.

  7. Keurig B70 Platinum Check Valve Replacement: passo 7, immagine 1 di 2 Keurig B70 Platinum Check Valve Replacement: passo 7, immagine 2 di 2
    • Reassemble the valve in place.

    • Resecure it with a zip tie.

    • Trim the excess plastic off of the zip tie.

Conclusione

To reassemble your device, follow these instructions in reverse order.

Un'altra persona ha completato questa guida.

0 Commenti

Aggiungi Commento

Visualizza Statistiche:

Ultime 24 Ore: 3

Ultimi 7 Giorni: 10

Ultimi 30 Giorni: 49

Tutti i Tempi: 2,152