Introduzione
Here we are teaching our audience how to safely and efficiently replace the motherboard inside our JLab Pro 7. We provide comprehensive step by step guides that will show the user the best way to replace the motherboard, while minimizing any damage to your tablet.
Cosa ti serve
-
-
The tools needed in order to complete this task are above in the tools section.
-
Grab your tablet and have your tools ready in order to open it and fix the components inside.
-
-
-
Now grab your iFixit prying tool and try to carefully pry off the back casing.
-
The back doesn't want to dislodge easily so make sure the end of your pry tool is underneath the screen in order to get enough leverage to start popping off the back case from the screen.
-
Be careful when prying the edge of your tablet! Avoid snapping the volume and lock buttons. Also try not to dig into the tablet too deep with your prying tool so you don't damage any components inside.
-
-
-
-
Once the back has been taken off you will find the motherboard at the top of the rear panel of your tablet.
-
The red box shows where your motherboard is
-
-
-
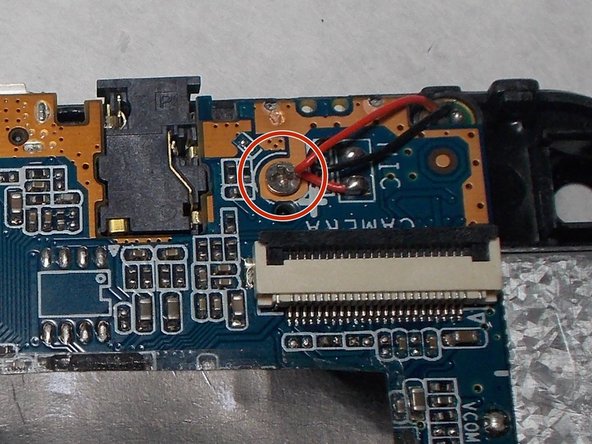
Now you you have to melt the solder joints in order to disconnect the wires holding the motherboard in.
-
The solder joints on the bottom middle of the motherboard is out in the open but the solder joints in the top right corner are covered by the ribbon connectors.
-
Disconnecting the ribbon connectors needs to be done anyway to take off the motherboard. That will be shown in the next step.
-
-
-
Here are the other ribbon connectors that are on the motherboard
-
These ribbon connectors can be removed the same way as the fist ribbon connector at the bottom of the motherboard.
-
Once all three ribbon connectors are disconnected then you can move onto removing the solder joints with a soldering iron.
-
-
-
Allow your soldering iron to heat up before attempting to remove solder
-
Once your soldering iron is sufficiently warm place the tip near the solder joints that are circle in red
-
These solder joints should melt rather quickly. Once they have been melted and the wires can be safely removed.
-


To reassemble your device, follow these instructions in reverse order.
To reassemble your device, follow these instructions in reverse order.
Team

UMass Dartmouth, Team S2-G3, Isaacson Spring 2017 Membro di UMass Dartmouth, Team S2-G3, Isaacson Spring 2017
UMASSD-ISAACSON-S17S2G3
3 Membri
12 Guide realizzate