Salta al contenuto principale

JBL Charge Speaker Replacement

Cosa ti serve

  1. JBL Charge Speaker Replacement, Disassembling JBL Charge Casing: passo 1, immagine 1 di 3 JBL Charge Speaker Replacement, Disassembling JBL Charge Casing: passo 1, immagine 2 di 3 JBL Charge Speaker Replacement, Disassembling JBL Charge Casing: passo 1, immagine 3 di 3
    • Make sure the device is powered off before you begin to disassemble the speaker.

    • Remove the trim from the speaker using a jimmy or metal spudger.

  2. JBL Charge Speaker Replacement: passo 2, immagine 1 di 2 JBL Charge Speaker Replacement: passo 2, immagine 2 di 2
    • Use the PH1 screwdriver to remove all five of the 6 mm screws from the battery cover.

    • Remove the battery cover and set the cover aside.

  3. JBL Charge Speaker Replacement: passo 3, immagine 1 di 2 JBL Charge Speaker Replacement: passo 3, immagine 2 di 2
    • Use a spudger to carefully remove the liquid electrical tape that holds the battery inside the battery compartment.

    • Be careful not to puncture the battery, or damage the battery wire underneath the liquid electrical tape.

    This is NOT liquid Electrical tape! I recommend using 3M adhesive silicone. If you are doing this repair then you can find the 3m adhesive silicone at automotive stores. Liquid tape hardens and 3M adhesive remains mailable vs the rock hardening effect of liquid tape.

    Liz Ramirez - Replica

  4. JBL Charge Speaker Replacement: passo 4, immagine 1 di 2 JBL Charge Speaker Replacement: passo 4, immagine 2 di 2
    • Use a spudger to lift the battery out of the device.

    • Lift the end of the battery that does not have the wire connection and remove the 16 mm PH2 screw underneath the battery.

    • Notice the wire that is connecting the battery to the device. Attempting to remove the battery completely could cause damage to the wire. Do not use a metal spudger to remove the battery, this could cause damage.

  5. JBL Charge Speaker Replacement: passo 5, immagine 1 di 2 JBL Charge Speaker Replacement: passo 5, immagine 2 di 2
    • Remove the four 16 mm screws from the white plastic casing using the PH2 screwdriver.

    The two screws on the right side (side with the USB port) are too long to extract with the iFixit screwdriver in the basic kit. I needed to use a regular thin PH2 screwdriver to get them out.

    Matthew Poole - Replica

    I had this problem also, whenever putting the screws back in there were still air pockets in the side with smaller screws

    Kamden Runyon - Replica

  6. JBL Charge Speaker Replacement: passo 6, immagine 1 di 2 JBL Charge Speaker Replacement: passo 6, immagine 2 di 2
    • Starting in a corner of the device where the casing and the side meet, use a pointed metal spudger to pry the back casing off the speaker and the glue holding the seam together.

    • Slide the metal spudger along the seam to separate the back casing from the rest of the speaker.

  7. JBL Charge Speaker Replacement: passo 7, immagine 1 di 2 JBL Charge Speaker Replacement: passo 7, immagine 2 di 2
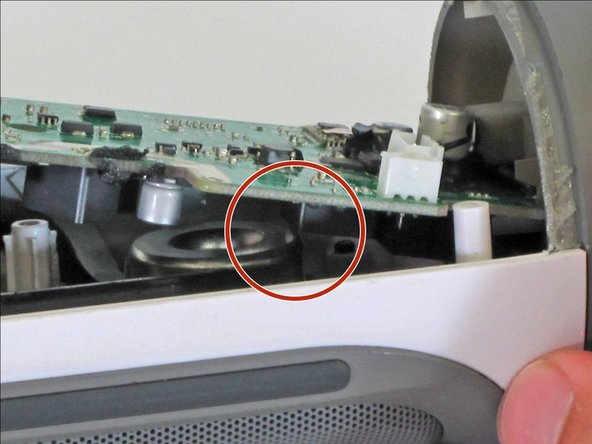
    • Once the back casing is open, disconnect the three white connectors from the motherboard.

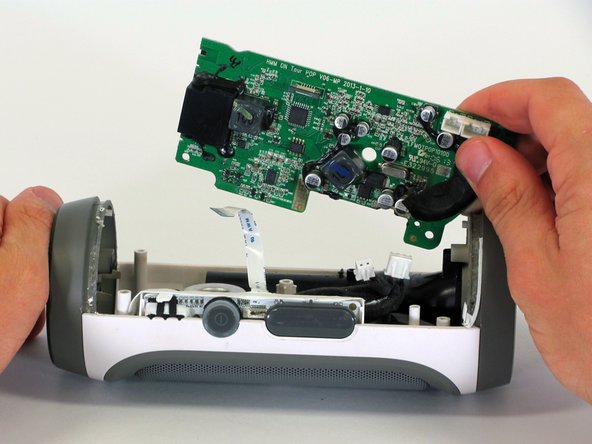
    • Remove the upper casing.

    Hi , Thanks a lot in my speacker i had broken plastic part which affect clear sound with your guide i open mine seasily and take it out now i have beand new sound which i had before. thanks again.

    kasravihasan - Replica

  8. JBL Charge Speaker Replacement, Motherboard: passo 8, immagine 1 di 1
    • Remove the 9 mm Phillips screw in the corner of the motherboard.

    There are 2 screws to remove, the other is under the barcode sticker

    Andrew Allman - Replica

    hey bru the scewdriver you useing what do you call it and where can you get the kit

    warren - Replica

  9. JBL Charge Speaker Replacement: passo 9, immagine 1 di 2 JBL Charge Speaker Replacement: passo 9, immagine 2 di 2
    • Remove the motherboard from the casing by lifting the corner of the board out of the device.

    • If the motherboard won't budge, be sure that the square component on the bottom of the motherboard clears the edge of the speaker.

    • During reassembly, make sure the motherboard is fully installed and not sticking up past its original position, as this could damage the motherboard.

  10. JBL Charge Speaker Replacement: passo 10, immagine 1 di 1
    • Disconnect the two white connectors from the bottom of the motherboard.

  11. JBL Charge Speaker Replacement: passo 11, immagine 1 di 2 JBL Charge Speaker Replacement: passo 11, immagine 2 di 2
    • Pull down on the black clip holding the ribbon cable in place.

    • Pull the ribbon cable from the connector using the blue tab.

    • Remove the motherboard from the device.

  12. JBL Charge Speaker Replacement, Speaker: passo 12, immagine 1 di 1
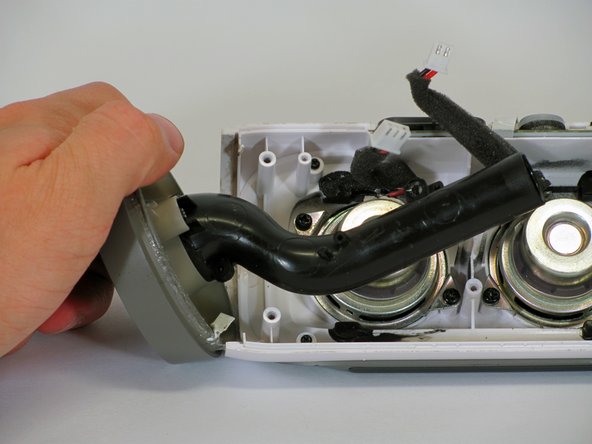
    • Using the PH1 screwdriver, remove the 9mm Phillips screw that connects the black tube to the device's interior.

  13. JBL Charge Speaker Replacement: passo 13, immagine 1 di 2 JBL Charge Speaker Replacement: passo 13, immagine 2 di 2
    • Slowly but firmly pull the grey cap off the device. This will provide complete access to the speakers.

  14. JBL Charge Speaker Replacement: passo 14, immagine 1 di 2 JBL Charge Speaker Replacement: passo 14, immagine 2 di 2
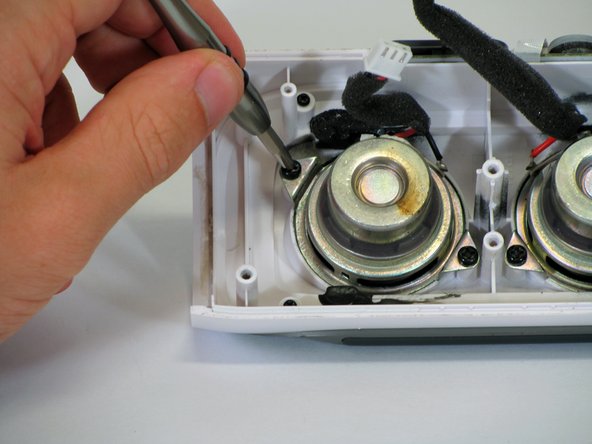
    • Each speaker is held in place with two 9mm Phillips screws. Remove the screws using the PH1 screwdriver head.

    • If you are replacing the left speaker, remove the screws and speaker on your right.

    • If you are replacing the right speaker, remove the screws and speaker on your left.

    Where do I find a replacement speaker?

    jessica.peterson2010 - Replica

    Same here. I am Looking for replacement speakers for the JBL charge 1

    Dilly -

  15. JBL Charge Speaker Replacement: passo 15, immagine 1 di 1
    • Pull the speaker out of the casing.

Conclusione

To reassemble your device, follow these instructions in reverse order.

Altre 14 persone hanno completato questa guida.

Team

Cal Poly, Team 12-4, Lancaster Spring 2015 Membro di Cal Poly, Team 12-4, Lancaster Spring 2015

CPSU-LANCASTER-S15S12G4

2 Membri

18 Guide realizzate

11 Commenti

Donde encuentro las bocinas no sirven la que tiene

feliper233 - Replica

Donde puedo conseguir las bocinas?

feliper233 - Replica

Where can I get gthe replacement speaker?

rohit jayendra - Replica

where can i get replaicment speaker?

tamaerocksxd - Replica

Where do I get the replacement speakers

Robert - Replica

did you ever find the replacement speakers?

Kenny Moncus -

Where to buy replacement speakers for JBL Charge 3?

Turker - Replica

you ever find the replacement speakers?

Kenny Moncus -

Hi All, I suggest looking to eBay for broken JBL Charge's to source parts from.

Joe Durand - Replica

Can the JBL charge power a single or bigger speaker and what is the ohm of the stock speaker

rohrbaughfabrication - Replica

I found the charger 3 replacement speaker on eBay

Omar - Replica

Aggiungi Commento

Visualizza Statistiche:

Ultime 24 Ore: 4

Ultimi 7 Giorni: 28

Ultimi 30 Giorni: 137

Tutti i Tempi: 81,628