Salta al contenuto principale

Sostituzione della scheda madre JBL Charge

Cosa ti serve

  1. Sostituzione della scheda madre JBL Charge, Smontaggio scocca JBL Charge: passo 1, immagine 1 di 3 Sostituzione della scheda madre JBL Charge, Smontaggio scocca JBL Charge: passo 1, immagine 2 di 3 Sostituzione della scheda madre JBL Charge, Smontaggio scocca JBL Charge: passo 1, immagine 3 di 3
    • Assicurati che il dispositivo sia spento prima di cominciare lo smontaggio.

    • Rimuovi la guarnizione dallo speaker usando uno spudger in metallo o un "Jimmy".

  2. Sostituzione della scheda madre JBL Charge: passo 2, immagine 1 di 2 Sostituzione della scheda madre JBL Charge: passo 2, immagine 2 di 2
    • Usa il cacciavite PH1 per rimuovere le cinque viti da 6 mm dalla cover della batteria.

    • Rimuovi la cover della batteria e mettila da parte.

  3. Sostituzione della scheda madre JBL Charge: passo 3, immagine 1 di 2 Sostituzione della scheda madre JBL Charge: passo 3, immagine 2 di 2
    • Usa uno spudger per rimuovere con attenzione il nastro isolante liquido che tiene la batteria ferma nel suo alloggiamento.

    • Fai estrema attenzione a non bucare la batteria, o danneggiare i cavi sottostanti il nastro isolante liquido.

    This is NOT liquid Electrical tape! I recommend using 3M adhesive silicone. If you are doing this repair then you can find the 3m adhesive silicone at automotive stores. Liquid tape hardens and 3M adhesive remains mailable vs the rock hardening effect of liquid tape.

    Liz Ramirez - Replica

  4. Sostituzione della scheda madre JBL Charge: passo 4, immagine 1 di 2 Sostituzione della scheda madre JBL Charge: passo 4, immagine 2 di 2
    • Usa uno spudger per alzare la batteria dal dispositivo.

    • Alza il lato della batteria che non ha i cavi attaccati e rimuovi la vite PH2 da 16 mm sotto la batteria

    • Nota che il cavo collega la batteria al dispositivo. Tentare di rimuovere completamente la batteria potrebbe danneggiare il cavo. Non usare uno spduger di metallo per rimuovere la batteria.

  5. Sostituzione della scheda madre JBL Charge: passo 5, immagine 1 di 2 Sostituzione della scheda madre JBL Charge: passo 5, immagine 2 di 2
    • Rimuovi le quattro viti da 16 mm dal case in plastica bianca con il cacciavite PH2.

    The two screws on the right side (side with the USB port) are too long to extract with the iFixit screwdriver in the basic kit. I needed to use a regular thin PH2 screwdriver to get them out.

    Matthew Poole - Replica

    I had this problem also, whenever putting the screws back in there were still air pockets in the side with smaller screws

    Kamden Runyon - Replica

  6. Sostituzione della scheda madre JBL Charge: passo 6, immagine 1 di 2 Sostituzione della scheda madre JBL Charge: passo 6, immagine 2 di 2
    • Partendo da un angolo del dispositivo dove il case e il lato si incontrano, usa uno spduger di metallo per allontanare le due parti, vincendo la forza adesiva della colla.

    • Fai scorrere lo spudger di metallo lungo il lato per separare il case posteriore dal resto dello speaker.

  7. Sostituzione della scheda madre JBL Charge: passo 7, immagine 1 di 2 Sostituzione della scheda madre JBL Charge: passo 7, immagine 2 di 2
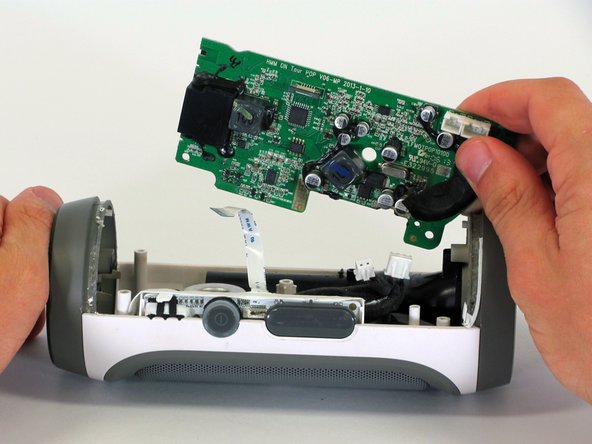
    • Quando il case posteriore si apre, disconnetti i tre cavi bianchi dalla scheda madre.

    • Rimuovi il case superiore.

    Hi , Thanks a lot in my speacker i had broken plastic part which affect clear sound with your guide i open mine seasily and take it out now i have beand new sound which i had before. thanks again.

    kasravihasan - Replica

  8. Sostituzione della scheda madre JBL Charge, Scheda Madre: passo 8, immagine 1 di 1
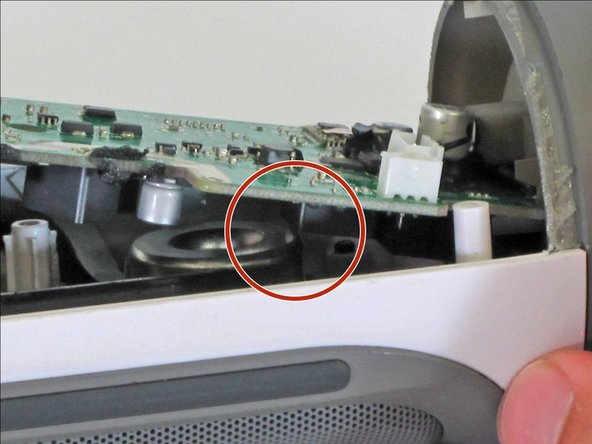
    • Rimuovi la vite Phillips da 9 mm nell'angolo della scheda madre.

    There are 2 screws to remove, the other is under the barcode sticker

    Andrew Allman - Replica

    hey bru the scewdriver you useing what do you call it and where can you get the kit

    warren - Replica

  9. Sostituzione della scheda madre JBL Charge: passo 9, immagine 1 di 2 Sostituzione della scheda madre JBL Charge: passo 9, immagine 2 di 2
    • Rimuovi la scheda madre dalla custodia sollevando l'angolo della scheda dal dispositivo.

    • Se la scheda madre non si muove, assicurati che il componente quadrato nella parte inferiore della scheda sia libero dal bordo dello speaker.

    • Durante il rimontaggio, assicurati che la scheda madre sia completamente installata e non sporga oltre la sua posizione originale, poiché ciò potrebbe danneggiare la scheda madre.

  10. Sostituzione della scheda madre JBL Charge: passo 10, immagine 1 di 1
    • Disconnetti i due connettori bianchi dalla parte inferiore della scheda madre.

  11. Sostituzione della scheda madre JBL Charge: passo 11, immagine 1 di 2 Sostituzione della scheda madre JBL Charge: passo 11, immagine 2 di 2
    • Tira verso il basso sulla clip nera che tiene il cavo a nastro in posizione.

    • Tira il cavo a nastro dal connettore utilizzando la linguetta blu.

    • Rimuovi la scheda madre dal dispositivo.

Conclusione

Per riassemblare il dispositivo, seguire queste istruzioni in ordine inverso.

Altre 7 persone hanno completato questa guida.

Un ringraziamento speciale a questi traduttori:

en it

100%

ToToMalux ci sta aiutando ad aggiustare il mondo! Vuoi partecipare?
Inizia a tradurre ›

Team

Cal Poly, Team 12-1, Lancaster Spring 2015 Membro di Cal Poly, Team 12-1, Lancaster Spring 2015

CPSU-LANCASTER-S15S12G1

5 Membri

11 Guide realizzate

14 Commenti

Hello I have 3 jbl speakers I bought that work only if plugged to the wall and aux cable... other than that it doesn't work at all .. Bluetooth or even the buttons don't function

hector - Replica

had same issue. fixed it by reconnecting the cable that conncts LEDs/ buttons

nyancatsarecute -

i have the same problem

Denny Berroa - Replica

Hello, mine doesn't emit any sound, bluetooth is connected, buttons are working, could it be that some audio cable inside is disconnected?

giubo - Replica

hello can i ask if how many pins in the flex for power button i accidentally damage when i fixed it

djcriztorey - Replica

Hello, I have the JBL Charge 2+ and the screws are not at the same places. I'm afraid :(

tmaxer - Replica

Do You have a SD cart slot there?

Marcin -

How much does the motherboard cost.

i have a pulse 2. Please tell me

arvind raj - Replica

I have two jbl charger 3 but doesnt Connect it for wifi, could be the problem.

chejotorres99 - Replica

Where can I get the ribbon cable …mine is broken

jibon jyoti gogoi - Replica

I think I may have gotten the buttons on top, volume & power, wet from my wet hand. After that it wouldn’t power on & off properly and would not connect to bluetooth. The power button will flash blue, and then red, and any combination of the 2, but doesn’t function properly. Won’t stay blue and doesn’t stay solid blue.

Do you think I damaged the mother board? I did remove the mother board as instructed, but I really don’t want to buy one unless I am reasonably sure that is what is up with it.

rockaf - Replica

i want new mother board

Vikash jacks - Replica

i want new mother board can u plz give me your number

Vikash jacks - Replica

I can play music but all the buttons of my JBL Flip6 aren’t working I can just turn on and turn off my speaker I even cannot pair to another device how can I fix it?🙏🙏

lowesley23 - Replica

Aggiungi Commento

Visualizza Statistiche:

Ultime 24 Ore: 0

Ultimi 7 Giorni: 12

Ultimi 30 Giorni: 66

Tutti i Tempi: 29,972