Introduzione
La batteria è necessaria per accendere e far funzionare correttamente la JBL Charge 4. Serve anche a caricare il tuo telefono quando è collegato alla porta USB. Se noti una durata della batteria ridotta, la tua batteria potrebbe essere esausta. Questa guida ti mostrerà come sostituire la batteria nella tua JBL Charge 4.
Cosa ti serve
-
-
Gira la tua cassa a testa in giù ed infila lo strumento di apertura in plastica nella fessura della griglia.
-
Fai leva lontano da te, verso il retro della cassa per rilasciare il gancio.
-
Ripeti questa procedura per il gancio dall'altro lato.
-
-
-
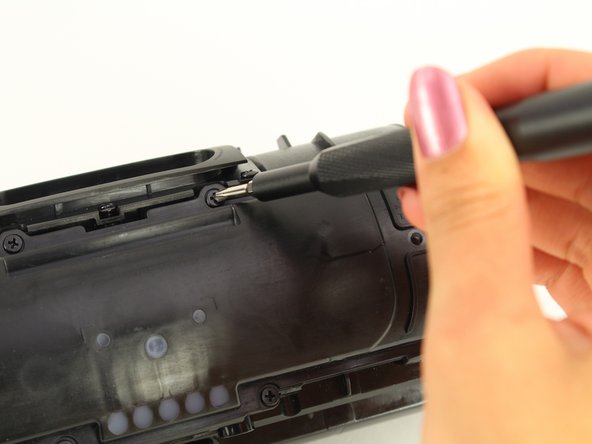
Svita le due viti a croce Phillips #0 da 8 mm dai bordi della griglia.
You have to remove the 8 mm screws before you try and Prius the other side. They are attached, and will break
-
-
-
Usando uno strumento di apertura in plastica, solleva l'aletta sopra la cassa per rilascia il radiatore dai ganci.
-
Ripeti questa procedura per gli altri ganci attorno al radiatore per rilasciarli dalla cornice.
There is absolutely no reason to remove the passive radiators if you want to replace the speaker only!
Just cut to step 6.
Also the difficulty level is way too high. I found it very easy to disassemble the unit.
-
-
-
-
Svita le due viti a croce Phillips #0 da 6 mm sul lato anteriore della copertura delle porte.
-
-
-
Rimuovi il nastro adesivo per esporre il connettore ZIF bianco del cavo a nastro.
-
Ruota verso l'alto l'aletta di bloccaggio nera sul connettore ZIF con la punta di uno spudger o con le unghie per rilasciare il cavo.
-
Rimuovi il cavo a nastro bianco dalla copertura della batteria e metti la copertura da parte.
Don't remove this white ribbon cable from the circuit board, it's almost impossible to plug it back. Instead of removing the cable, just remove the circuit board which is glued loosely to the plate. If you can get to the battery itself, you don't have to remove the circuit board neither.
-


Per rimontare il tuo dispositivo, segui le istruzioni in ordine inverso.
Per rimontare il tuo dispositivo, segui le istruzioni in ordine inverso.
Annulla: non ho completato questa guida.
Altre 20 persone hanno completato questa guida.
Un ringraziamento speciale a questi traduttori:
100%
Daniele Carminati ci sta aiutando ad aggiustare il mondo! Vuoi partecipare?
Inizia a tradurre ›
Team

Cal Poly, Team S1-G1, White Winter 2019 Membro di Cal Poly, Team S1-G1, White Winter 2019
CPSU-WHITE-W19S1G1
4 Membri
26 Guide realizzate
15 Commenti
Where do you buy a battery for a jbl Charge 4 ??
Probably just cut open the blue foil around the batteries and replace them by re-soldering the electronics onto new 18650 batteries.
correct me if I’m wrong here.
If you know how to handle them and have experience with soldering them that's a yes if not those batteries are really dangerous if you don't know how to do it correctly.
Hart80 -
Where in the !&&* do i get a battery for a bluetooth speaker. What happened to the jbl charge 4 that it even goes out???
My JBL charge 4 battery dead too. 9nly uses it for three months
How is the battery 6 pins? Any idea what the middle 2 wires do? The outer ones seems +and - 3.7v if the cells are in parallel. Can anyone shine a light on the configuration/wiring of the cells?
Middle connections are scl sda serial connections. For communication from battery board to main board.
Matt C -
Does the battery come charged already?
After replacement mine turns on and right off again any ideas
Did you ever solve this? Thinking of replacing a battery in my 4, but saw a few Reddit posts saying they had similar issues- new battery didn’t allow power up. One person put their original battery back in, and speaker worked, but old battery only.
I’m in the same boat. Replaced battery and speaker turns on then off. Doesn’t seem to be taking a charge.
You have to be an expert electronics technician to replace a battery! My JBL Charge 4 lasted one (1) battery charge cycle! Now I gotta go back to vocational school for a year to be able to listen to it for what, one more charge cycle???? Besides that Walmart won't exchange it because it was the 92nd day from the purchase date. WHAT A FREAKING JOKE!
I think there are just 3 18350 2600mah cells in parallel, I would just keep the genuine BMS and only raplace the cells. Good soldering iron and some serious skills are required.
My jbl charge 4 has heat problems and doesn't charge. The port and plug in the usb c get very hot and no charge what so ever. Will replacing the battery solve this issue. Plz help.
ich schaffe es nur auf der einen seite. Auf der anderen ist die abdeckung viel zu fest dran ? was kann ich machen ?
George Ziakos - Replica