Introduzione
Aggiornamento del disco rigido per un maggiore spazio di archiviazione.
Cosa ti serve
-
-
Allenta le due viti con testa a croce Phillips che fissano lo sportello di accesso all'iMac.
-
Rimuovi lo sportello di accesso.
-
-
-
Rimuovere le viti seguenti lungo il bordo inferiore dell'iMac:
-
Tre viti Torx T8 da 6 mm
-
Una vite Torx T8 da 8 mm (lato destro dello slot RAM nel modello 2105)
-
-
-
Inserire una scheda di plastica nell'angolo della fessura di ventilazione accanto alla parte superiore del case posteriore.
-
Premere la scheda verso la parte superiore dell'iMac per sganciare la chiusura della mascherina anteriore.
-
Rimuovere la mascherina anteriore dal case posteriore.
-
Ripetere la procedura per l'altro lato della mascherina anteriore.
-
Se la mascherina non si sgancia, provare a sollevare leggermente il bordo inferiore della mascherina anteriore dal case posteriore (l'operazione viene spiegata nei passaggi successivi) e ripetere la procedura di sgancio della chiusura.
I have never seen a pict of the bezel latch, I hope this picture link helps you to figure out what is inside that you need the cc to hit to release, I had a tough time making it work but managed just before I gave up! http://i209.photobucket.com/albums/bb35/...
the photo of latch is no longer there at Photobucket
Citazione da ReneBruce:
I have never seen a pict of the bezel latch, I hope this picture link helps you to figure out what is inside that you need the cc to hit to release, I had a tough time making it work but managed just before I gave up! http://i209.photobucket.com/albums/bb35/...
Thanks, your picture helped me.
Rather than through the vent at the back. Ease the bottom of the front bezel away from the screen and then in the gap created between the screen and the front bezel, insert your card here and push up to release the latch. This is especially the method to use, if you have already tried everything else above, as you may have bent the latches, and you'll never get them to relase the conventional way.
Good tip. I sort of did this out of desperation before reading this. Seem to work to get it apart. I'll have to see about getting it back together.
Wow, I really got stuck on the bezel. I tried a credit card, even a flexible metal scraper, nope nothing budged. I finally got going with help from this video: http://www.youtube.com/watch?v=QzuBW3mu7... which the guy has the machine lying on its back, then you can carefully bend the front bezel up until you see the latches, and I got the scraper in front of the screen and un-did the latches that way. Onto the next step!
Replaced one of the redundant images of the card going into the slot, with the previously linked image of the latch itself. I was struggling to figure out how to get the thing open, thinking it was a latch that pushed *up* to the top of the system, but it actually pushes *forward* towards the screen. That accounts for the bending of the card, and the excess length required to insert it. After figuring that out, the case came off nicely.
Apple uses a powerful magnet to release these latches, but the official tool is not available. If you have access to a few failed hard drives, you can take out the magnets from those, and stack them up to have a magnet strong enough to easily open these latches.
Simply place the magnet on an upper corner of the machine, and when you hear a click, gently pull the corner of the front case forward. Repeat the process for the other upper corner. Use care not to pull on the iSight cables.
Note: Use care when handling the hard drive magnets, they are powerful, and you don't want them to snap together on your fingers. OUCH!
This was perfect! I wish the original instructions mentioned the magnets.
I used magnets I pilfered from an old hard drive.
veganmo -
The iMacs I've taken apart open simply with a magnet. I made a video to show exactly how the latch works inside. You do need a strong magnet like the hard drive internal magnet suggestion however they can be found in many places, just look for 'rare earth' or 'neodymium' and you'll find one. probably .3" cube would be big enough.
there is the video that shows how the latch works. of course you may need TWO magnets to do both latches at the same time.
Save yourself some headache and get a magnet for this. I used these: www.amazon.com/gp/product/B004PWMVSI/ref=wms_ohs_product?ie=UTF8&psc=1
Sometimes just one will do the job, other times I've had to use all 4 together.
Much easier than trying to use a card.
sleestack is right on. The youtube vid is excellent for sliding the case right off without spudges and cards, etc. The vid's still there as of today, 9/30/2014. And the guy's foil removal is right on target, too. Very simple to replace the battery. I use this old 2006 computer with an old version of the PC program for Jobclock and only for that with Parallels 6 running the PC app. Don't want to upgrade or change anything at this point, going to milk it a couple more years. Got a nice big i5 for everything else. Oh, happy day.
Apple designed the latch to be released with a Magnet. That's it. That is the tool to be used.
Avoid frustration, hassles, wasted time: simply buy a "neodimio" Magnet.
Actually yes – IMHO It would have preferred iFixtit had mentioned a MAGNET to release the front Bezel, the credit card in an awkward and misleading (and not so smart) method.
I hope iFixit will change Step 3.
Be very careful here. One of the sides did not release using the plastic card. I tried to push it a bit but it would not give. It did work using 2 cards. What I did not realized until the very end, when I turned the imac back on, is that I broke the display. Thanks a lot ifixit. I get the hard drive back to work now but with a damaged display. And I can't even buy a replacement one from you.
Yes the screens in these machines are easy to break. I've opened these sorts of machines at least a 40 times. You do need to be very careful with the display. The won't take any pressure from a wayward thumb or finger etc. I have broken one once, trying to get a latch to give. You have to be very conscious not to out any fingers in the display at all.
BUT, how you think this is anyone's but your own fault is beyond me. iFixit has no blame to take here.
Please everyone, read through all instructions carefully and learn from others'.
And to this poster, go buy one of these machines from eBay or find in one in hard rubbish to repair yours. These white iMacs are almost 10 years old now. And are scrap in most people's minds.
-
-
-
Poggiare l'iMac dal lato della staffa su una superficie piatta.
-
Per sollevare la mascherina anteriore dall'iMac, eseguire queste operazioni contemporaneamente:
-
Premere con i pollici le alette della memoria RAM e tenere l'iMac verso il basso.
-
Tirare con gli indici il piccolo ponte sulla mascherina anteriore verso di sé.
-
Tirare la mascherina anteriore verso l'alto con gli indici.
-
Dopo che il piccolo ponte ha liberato le alette della memoria RAM, sollevare la mascherina anteriore dal bordo inferiore, quanto basta a liberare il bordo inferiore del case posteriore.
-
-
i posted a note on the next page about disconnecting the microphone and camera cable. may help. reed it before disconnect.
-
-
Scollegare il cavo del microfono.
-
Scollegare il cavo della fotocamera estraendone il connettore dal connettore femmina sulla scheda della fotocamera.
there's no need to disconnect the microphone and camera cable. you can work against a wall and carefully rest the frame and the display on the wall.
Citazione da sebalancea:
there's no need to disconnect the microphone and camera cable. you can work against a wall and carefully rest the frame and the display on the wall.
I didn't even use the wall, I just carefully pivoted the frame backwards and laid it on the table without disconnecting the wires
Be careful. My microphone and camera cables looked a little bit different from this. My camera cable connector did NOT plug directly into the camera board (and I almost tried pulling the cable out of the board), but rather there was a cable to cable connector that was stuffed behind the monitor. I had to skip this step until the monitor was out. I have an early 2006 20" iMac.
My Mac had a different camera board and it didn't appear that the cables could be detached. Leaving them in place and propping up the back of the case worked for me.
-
-
-
Sollevare la schermatura EMI dal case posteriore.
-
-
-
-
Fissare la schermatura EMI sulla superficie del display con del nastro per tenerla da parte.
Citazione da Bob:
I didn't see the need to tape the foil to the display (and I didn't want to get any sticky residue on the screen), so I skipped this bit with no problems.
I agree, and tape doesn't stick to the screen (I tried and the tape came loose before I was done)
-
-
-
Rimuovere le due viti Torx T6 da 5 mm che fissano il connettore del cavo dati del display alla scheda logica.
-
Estrarre il connettore del cavo dati del display dalla scheda logica tramite la linguetta d'estrazione nera.
on this step I just forgot (there always something to forget!!) to connect back display data cable connector to the logic board, after I replaced the hard drive. Don't worry nothing happens. Hwen I switched on the iMac and it was just functioning alright and normal but I wasn't able see anything other than a black screen :)
If you got a black screen but a normal white light on the right bottom corner, think abot the connector !
-
-
-
Sollevare nuovamente il nastro EMI dai due bordi verticali del display.
This is tricky and took some time and patience. It is best to have some foil tape handy because the EMF shield tears easily. Likewise when reinstalling the screen and EMF shield, it helps to have a partner who can stop the foil to the side of the screen from getting folded under the screen when you lower it back into position, ready to tape it back onto the edge of the screen.
Citazione da mindzeebeez:
This is tricky and took some time and patience. It is best to have some foil tape handy because the EMF shield tears easily. Likewise when reinstalling the screen and EMF shield, it helps to have a partner who can stop the foil to the side of the screen from getting folded under the screen when you lower it back into position, ready to tape it back onto the edge of the screen.
I found that using the plastic card to remove the cover worked well in lifting the EM tape from the screen. Also step 10 & 11 appear to be reversed since you can't get to the screws until you have lifted up the display (this can only occur once you have dealt with the EM shield)
Peeling back the tape was very time consuming. I bet the pros just cut it and patch with new metallic tape. This step was the worst.
-
-
-
Lasciare pendere la schermatura EMI inferiore dal display.
-
Rimuovere le quattro viti Torx T10 da 7,5 mm che fissano il display al case posteriore.
Citazione da Daniel:
This is also a Torx T-9 on my 20" iMac Core Duo, probably manuf'd around the same time.
My mistake, it's actually a T-10, but the T-9 was the only one I could get to work due to the limited angle.
I believe this is where the $4.95 looong T-10 screwdriver shown in the recommended tools would have come in handy. We managed to make the driver from the 54 bit set work by holding the bit driver with a vice grip, which made it possible to get down in there. The various holders that came with the set were just a hair too thick.
These four screws are tricky to deal with. They are well recessed and hard to spot at first. A magnetised screwdriver is a prerequisite. Another way is to glue the screw heads to the screwdriver with some very weak glue, and let it almost set before trying to locate the screws back into their holes whilst re-assembling. I lost one screw somewhere inside the computer! It is alright with 3 but I hope it doesn't touch something vulnerable on the circuit board.
Citazione da mindzeebeez:
These four screws are tricky to deal with. They are well recessed and hard to spot at first. A magnetised screwdriver is a prerequisite. Another way is to glue the screw heads to the screwdriver with some very weak glue, and let it almost set before trying to locate the screws back into their holes whilst re-assembling. I lost one screw somewhere inside the computer! It is alright with 3 but I hope it doesn't touch something vulnerable on the circuit board.
Try sticking the screw onto the driver with a tiny piece of blu-tac. Worked for me.
If your Torx screwdriver isn't magnetized, rub the tip 8-10 times on the magnet inside the white plastic cover (the one that holds the remote to the side of the monitor). Prestro... your Torx screwdriver is now magnetized!
I used a strong wall magnet to magnetize my screwdriver. It worked perfectly! Your tip was very helpful and pointed me to an answer that worked for me.
-
-
-
Sollevare il bordo inferiore del display e ruotarlo verso il bordo superiore dell'iMac.
If you remove the inverter wires after dealing with the EM shield you can flip the display without detaching the LCD data cable. Use the foot of the iMac (with a towel to protect the display) to hold the display while you work inside.
-
-
-
Scollegare entrambi i cavi dell'inverter dall'apposita scheda.
Watch out when reconnecting the inverter cables - the little pins on the inverter board are very easily bent indeed when the plug isn’t put back totally straight. I happened to bend one on the lower edge, resulting in the display being only dimly lit in the lower half and requiring me to open the machine once more. Since I only flipped up the display unit (as in some of the comments on step 16) I could skip step 15 and never touched the inverter cables on the top edge of the inverter board.
-
-
-
Scollegare i due cavi dell'inverter presso il bordo superiore dell'inverter spesso, mediante il metodo spiegato nel passaggio precedente.
I would mark the top of the large inverter cable connectors somehow, with a marker or pencil. My connectors had writing on the bottom, not the top as pictured, and I bent the pins trying to reinsert it incorrectly since the top and bottom look similar. Nearly all the other connectors have an obvious top and bottom.
Take pictures with iPhone of all tricky connectors and refer to them on reassembly:-)
-
-
-
Ruotare il display finché non è quasi perpendicolare al case posteriore e sollevarlo per rimuovere la schermatura EMI fissata sul bordo superiore.
You don't need to peel off the display from the top. Just lean it toward a wall etc. in a perpendicular angle. If you don't move the mac while you perform the following steps, it won't flip or fall down. You can also save step 15 this way, as the wires are long enough to stay connected.
Why peel it off? I just left it there in the perpendicular position leaning against the wall. Didn't annoy me at all when I changed the hard drive.
alex, Jul 02 2012
I've seen a few people comment having found their Airport dead after hard drive swap. It's really easy to rip off the wire from Airport antenna (up there nearby the mic and camera, to the left from them). The wire goes through the holes of upside EMI shielding and raising the display too high while trying to peel the shielding off can yank the wire so it gets loose from the soldering.
It looks like I'm late to the party but here goes anyway... I have Ubuntu Kylin installed on my iMac Intel 20" EMC 2105 and I want to use the iMac's display for my Linux install on that unit AND be able to switch the video going to the screen from my iMac to what's displayed on my Mac Mini. I think what I'm asking is how can I split the display so I can switch the video input to the video card from one machine to another.
You do not have to disassemble the logic board! At this point, you have to disassemble the hard disk, unscrew the 4 screws and the big power connector. The second small cable, without disassembling the motherboard, is enough to make it pass sideways, pulling away with a bit of force on plastic and the beat sink. The small sponge gasket must be removed and then rested. 3 minutes in total from this point!
-
-
-
Scollegare il sensore termico del disco rigido dal bordo superiore della scheda logica.
On my iMac (20" intel core duo Model A1207) this was not a "connector" rather it was four separate (loose) wires! So I did not remove them for fear of reconnecting them in the wrong order. Instead I first loosened the drive bracket and removed its cables, then I pryed the thermal sensor from the side of the drive.
Citazione da sanjaygovindjee:
On my iMac (20" intel core duo Model A1207) this was not a "connector" rather it was four separate (loose) wires! So I did not remove them for fear of reconnecting them in the wrong order. Instead I first loosened the drive bracket and removed its cables, then I pryed the thermal sensor from the side of the drive.
I agree!! LEAVE them attached, it simplifies things greatly!
Yep just done the power board on this imac and I say leave the thermal cable connected because its 50% sure to break up! ,just undo the harddrive, carefully move it downwards towards the speaker housing on the logicboad(tape it to the speaker housing).
you will still be able to access the power board cable under the logic board
-
-
-
Rimuovere le due viti Torx T10 da 9,2 mm che fissano la staffa del disco rigido al case posteriore.
-
-
-
Sollevare il disco rigido dal bordo sinistro per rendere accessibile l'inverter e tirarlo verso il bordo sinistro dell'iMac per sganciare i piedini di montaggio dal case.
Great guide. I followed it all and my iMac has gone from no power up at all to powering up...of sorts.
Now when I power up I get a chime and a brief blue screen with a window mentioning wireless mouse then all is blank. if I touch the power button I will get the blue screen briefly again.
Therefore could something else be wrong.
Any help appreciated.
-
-
-
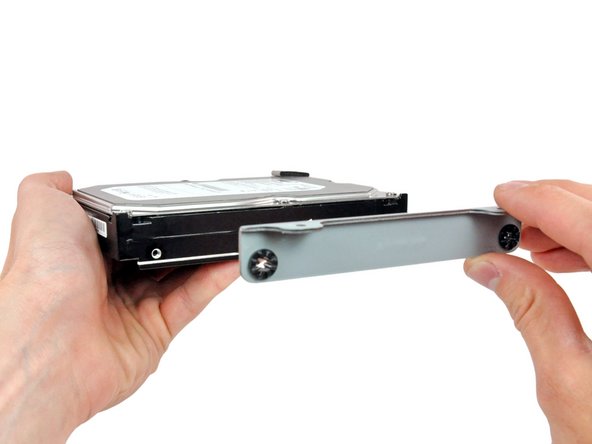
Rimuovere le due viti Torx T8 da 12 mm con bordino che fissano la staffa del disco rigido a quest'ultimo dal lato del connettore.
-
-
-
Rimuovere i due piedini Torx T8 da 9,2 mm dall'altro lato del disco rigido.
I followed this sites how-to, but didn't get the heat sensor attached very well to the new hard disk (I didn't know if i should reuse the glue it had, use new glue, what kind of glue, etc...) Now, after everything is reassembled, when I try to power on the hard disk/fans rev for 1 second and turn off, and then the light on the front panel blinks continuously and nothing else happens. No beeps, no fans, no display flicker...
Someone suggests here:
http://macosx.com/forums/mac-os-x-system...
that the light could indicate bad ram, which is possible in this case, but I wonder if it is the thermal switch somehow? I would rather not spend the money to replace the ram if this computer is a loss anyway (bad logic board?)
Any suggestions? Thank you for reading...
Figured the problem out, it's definitely a RAM failure
Citazione da invoak:
I followed this sites how-to, but didn't get the heat sensor attached very well to the new hard disk (I didn't know if i should reuse the glue it had, use new glue, what kind of glue, etc...) Now, after everything is reassembled, when I try to power on the hard disk/fans rev for 1 second and turn off, and then the light on the front panel blinks continuously and nothing else happens. No beeps, no fans, no display flicker...
Someone suggests here:
http://macosx.com/forums/mac-os-x-system...
that the light could indicate bad ram, which is possible in this case, but I wonder if it is the thermal switch somehow? I would rather not spend the money to replace the ram if this computer is a loss anyway (bad logic board?)
Any suggestions? Thank you for reading...
blinking light its just RAM failure, control if you re inserted well the RAMs
joleisa -
-
-
-
Mediante l'estremità piatta di un inseritore, rimuovere la scheda del sensore termico dall'adesivo che la fissa al disco rigido.
I found elsewhere that the thermal sensor should be reattached with rubber cement. That's what I used, and it seems to be working fine.
Rubber cement (Elmer's, non-vulcanizing) worked for me, but it took an overnight dry to get solid. I tried it 2-3 other times with only about an hour dry, and it wasn't set-up enough.
schurger -
Citazione da mtense:
I found elsewhere that the thermal sensor should be reattached with rubber cement. That's what I used, and it seems to be working fine.
I used double sided thermal tape (available from electrical component stores). It's usually used for heatsinks etc. so it will stick well on a hot surface.
When removing the sensor be careful to get underneath the adhesive (IE: keep as much adhesive on the sensor) It allowed me to just stick the sensor to the new hard drive (clean the new drive area with alcohol and allow to dry to promote adhesion) Don't get the sensor dirty with the dust etc from inside the mac, the dirt would make new adhesive necessary.
Question: Does a 2.5" SSD really need a sensor attached, or are they usually cold enough anyway? I know we should keep the sensor connected, since fans go crazy without it, but is it that important to actually mount it on the SSD itself? And if so, exactly where do they get the hottest? Around the connectors? In the middle of the chip cluster? Bottom? Top? :)
A 3.5" SSD would also fit (you'll need an adaptor to fit the 2.5" version).
I've fitted a SSD to my MacPro, and it runs at just above room temperature, so overheating is not an issue. It doesn't get warmer in any specific area, so I'd just stick the sensor where it looks best, and doesn't stress or interfere with any of the cables.
Bob -
-


Per riassemblare il dispositivo, seguire queste istruzioni in ordine inverso.
Per riassemblare il dispositivo, seguire queste istruzioni in ordine inverso.
Annulla: non ho completato questa guida.
Altre 343 persone hanno completato questa guida.
Un ringraziamento speciale a questi traduttori:
100%

Jasper Fleischhauer ci sta aiutando ad aggiustare il mondo! Vuoi partecipare?
Inizia a tradurre ›

19 Commenti
I used this guide in conjunction with this video for reference that was really helpful: http://www.youtube.com/watch?v=ShY8zuT-w... (and part 2). Repair went really easy (just take it slow). Hardest part for me was pulling out the screen. The torx screws are pretty far in and the 26 piece kit I bought from here wasn't long enough to reach (the extension has a large round magnet on it that will not insert far enough because of limited space). Thankfully I had a torx at home that was longer for that specific size, so I was able to unscrew just enough with MY torx and use the magnetic one to grab the screw (absolutely necessary to have a magnetic version). Bought the Western Digital drive and found out that it would not format with the original OS Tiger disk. Only OS Snow Leopard's Disk Utility would read the HD properly and format for Mac. If buying the Western Digital, make sure you have a newer OS to install than Tiger. I read about possible problems with OS Leopard's Disk Utility and WD drives as well, but I cannot speak specifically for that.
Great guide! I can't think of anything to add. Read it over several times to take in all for the tips, they are helpful. I replaced my dead HD with a 120GB SSD (OCZ Vertex 3 VTX3-25SAT3-120G). It is working great with Snow Leopard. I had to use Trim Enabler but that seems to be working fine. The 2.5 to 3.5 drive adapter was too small to fit the apple attachment be the two sided tape mount seems very secure.
A small feedback from my iman. (Late 2006, early 2007 20" display 2.16 intel core 2 duo):
Just changed my hdd and everything worked out fine. Two things are important as I found out that they differed from this guide:
1. In order to release the front bezel latches the card must be not be inserted vertically as shown in the pictures but with a slight angle using the direction from inside towards the upper corner of the bezel. I saw this in the following youtube video:
2. The torx requested to release the display screws is not a No 6 but a smaller one. Probably a No. 4, Ι am not sure exactly as I did not have one so I used a normal small screwdriver instead.
I hope I helped, the rest of the guide was very accurate and quite easy to follow.
Thank-you, my son and I just replaced our broken hard drive and upgraded the ram. We used parts we bought here and everything is going smoothly! Cross your fingers we get a couple more years out of the old girl.
Thank you!
I successfully replaced my HDD (new HDD: WD10EZEX) on my 20" Late 2006 2.16 GHz Intel Core 2 Duo).
It took me about 45 mins., and I'm a girl!
Magnetic Torx Screwdriver T10 is highly recommended!
The new HDD was not compatible with OS X Tiger Install Disk, even with jumper set on pins 5 and 6 (Disk Utility didn't detect new HDD correctly and was unable to format new HDD), so I tried OS X Lion instead and... voilà... works perfectly now.
Happy me :)
It took me a couple of hours because I could not open the case with my credit card. Congrats on your quick turnaround!
I needed to replace the original 250 GB drive. I used this procedure for the same A1174/EMC 2105 model. I used a new Seagate 500 GB as a replacement. All I have is OS X Tiger 10.4.4 startup disk and Disk Utility shows the disk as 3.6 TB! How do I get the system to recognize the new drive at it's native 500 GB size? Can I buy a newer OS X (Snow Leopard) and solve this issue?
Can I replace the 250GB HD with a 256 SSD in this model of iMac (Late 2006, iMac 5,1)
I've read on ifixit alot about the HD temp sensor as well as recommendations to stay with same manufacturer when replacing HD. If I install SSD, where does the temp sensor get placed. I assume if it's wrongly placed, the fan will run at the wrong speed.
SSD's don't get hot (they barely get warm), so you can stick the temp sensor anywhere on the SSD.
You'll need a mounting tray to mount a 2.5" SSD in a 3.5" space, but these often come with the SSD.
No need to stay with the same manufacturer, I've had a lot of success with various HDD's and SSD's, particularly Samsung. The only manufacturer I've had problems with is OCZ (I had two 500GB Vertex drives fail).
did all this and now imac will not start up. went back through and couldn't find my mistake. any help would be super.
I was able to swap the original hard drive for an SSD, but had to modify the hard drive mount to account for the smaller drive size and screw size. I installed CloudReady from a USB, so now the kids have a Chromebook-like computer that they can use to access their school work with less distractions. (Not “No Distractions”. They are still attached to the internet.)
Swapping in a new CPU and an SSD took me about 10 hours. I did take a dinner break and spent another hour rooting around in my garage to find my thermal paste. Still, this procedure can take a long time.
gordonhamachi - Replica
Only a french translation proposal. We use to say “démontage” instead of “installation'“ in that specific case. ;-) (Dismantling)
francis barbier - Replica