Introduzione
L'aggiunta di un secondo SSD nel computer portatile offre diversi vantaggi, fra cui velocità più elevate, maggiore spazio di archiviazione e la possibilità di installare nuovi software senza problemi. Utilizzare questa guida per eseguire l'installazione mediante un case per disco rigido nell'alloggiamento ottico. Alcuni alloggiamenti delle unità hanno un'altezza di 7 mm, mentre altri di 9,5 mm. In base alle dimensioni dell'alloggiamento dell'unità, potrebbe essere necessario un distanziatore per posizionare correttamente l'SSD.
Cosa ti serve
-
-
Rimuovi le seguenti 10 viti a croce Phillips che fissano il case inferiore a quello superiore:
-
Sette viti da 3 mm.
-
Tre viti da 13,5 mm.
-
-
CompraAttrezzo utilizzato in questo passaggio:P6 Pentalobe Screwdriver 2009 15" MacBook Pro Battery$5.49
Question: why do you remove the battery? According to Apple's official manual, this is not required (not for the mid-2009 and not for the mid-2010 15-inch MacBook Pro) - see pages 37 ff:
Citazione da alexkli:
Question: why do you remove the battery? According to Apple's official manual, this is not required (not for the mid-2009 and not for the mid-2010 15-inch MacBook Pro) - see pages 37 ff:
I'm interested by your experience.
Did you have removed the optical drive without removing the battery ?
I'm just in this step now and if it is possible I would proceed like you because removing the battery void the warranty (and there is a sticker).
Thanks in advance.
Looks like my note to step 3 appears on all repair guides that have the same step. I meant that in the context of the hard drive replacement only.
Did you have removed the optical drive without removing the battery ?
I haven't yet done anything, waiting for my MacBook Pro 15 inch mid-2010 to arrive.
I missed the notes and went ahead and purchased the 5 point driver for the battery before I realized it was not necessary.
I've edited the repair guide to remove the section on the battery, but I don't have the points to approve the changes.
Please note - the step about removing the battery is part of a pre-requisite guide, that is used for many of the guides, most that do require removal of the battery. Also, working inside a disassembled laptop with the battery still connected risks damaging/shorting out very expensive parts.
Absolutely. To be clear -- ALL of the above discussion is ONLY in reference to replacing the hard drive.
I replaced a hard drive in a MacBook Pro of an earlier model than this without removing the battery. The hard drive wasn't right. It only worked at about half speed, and I had to replace it once more. The second time I removed the battery and all went well. The recommendation by the iFixit staff to remove the battery before working on electronic equipment is a good one.
What is the size of those screws... I have rounded off the socket on mine and would like to replace them.
I measured the screw size, using a micrometer, its about 1.523mm in diameter and 3.186mm in length. Not sure what screw size that is. They are not easily available I guess, unless someone is selling used ones on ebay
-
-
Solleva la batteria tirando la linguetta di plastica e falla scorrere lontano dal bordo lungo del case superiore.
My T6 (appears to be same screw driver you have - $6 on amazon for 20piece set) did NOT fit int he battery screws...not sure if I had the wrong screws or what, but I went ahead w/o battery steps and it was pretty easy.
I also noticed that the new SDD (from crucial) didn't have the 4 screws, so I had to move those off the old HD and onto the new one.
Just had the same issue: T6 does not fit the battery screws ;-( ... but with a little bit more preassure it was possible to remove the screws.
-
-
-
Inclina la batteria all'indietro quanto basta per rendere accessibile il connettore del cavo della batteria.
-
Tira via il connettore del cavo della batteria dallo zoccolo sulla scheda logica e rimuovi la batteria dal case superiore.
-
-
-
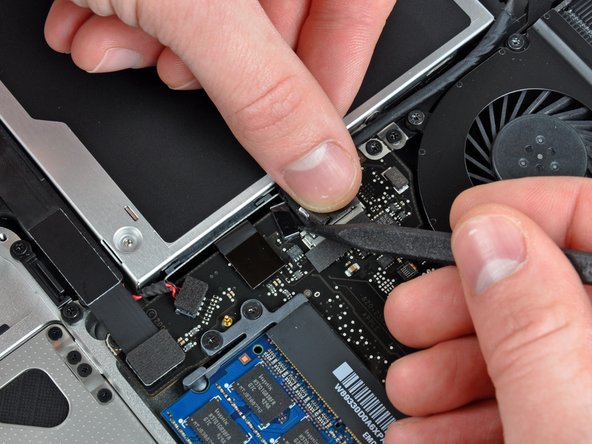
Trattenere l'estremità del fermacavo con un dito, mentre si utilizza la punta di un inseritore per sollevare leggermente l'altra estremità e ruotarla lontano dal connettore del cavo della fotocamera.
I found it quite easy to carefully remove the drive from under the camera cable without disconnecting it, and guide the new drive back in under. It saved time and the danger of damaging those fragile connectors.
-
-
-
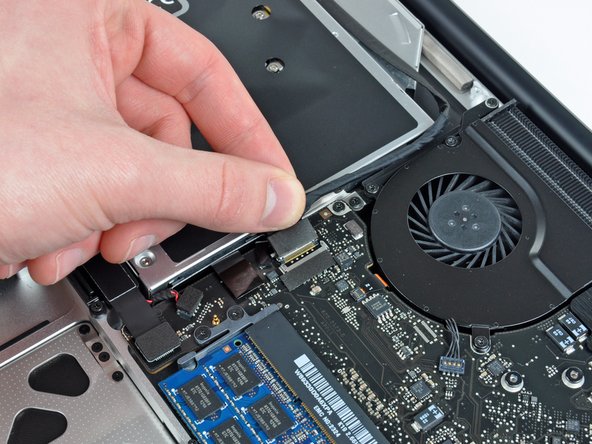
Scollegare il cavo della fotocamera, estraendo l'estremità maschio direttamente dal connettore femmina.
I would recommend leaving the camera cable plugged into the motherboard, and simply sliding the optical drive out from underneath it carefully. If you mistakenly life this connector straight up (as I did) you can damage either the cable connector or the motherboard socket. I damaged the connector on the cable and now the wifi antenna doesn't work. Replacing this damaged cable is about 10X more of a pain (in time and money) than the effort to slide the optical drive out from beneath this cable instead of disconnecting it.
Totally agree here, my wifi card is no longer recognized by the computer. Not sure what to do now.
-
-
-
-
Rimuovere il cavo della fotocamera dall'adesivo che lo fissa all'unità ottica.
When reassembling, which adhesive should be used to reattach the camera cable?
-
-
-
Scollegare il cavo del Bluetooth, estraendo l'estremità maschio direttamente dal connettore femmina.
-
Utilizzare l'estremità piatta di un inseritore per scollegare il cavo dell'antenna Bluetooth dal connettore femmina sulla scheda logica.
How can I determine if I have an antiglare display?
Thanks!
Dan
If you have the part in step 10, you do. If you don’t, you don’t (looks like pic in step 9).
As already pointed out in a comment to step 8, it is possible to slide carefully out the drive from underneath the bluetooth board without touching it, and to insert the replacement drive in the same way, avoiding to perform this step and the next one.
-
-
-
Rimuovere le due viti con testa a croce da 3,5 mm che fissano la parte esterna dell'unità ottica al case superiore.
When installing the HD bay, the screws here will not go back. Not sure if the bracket/holes are somehow different. After completing the install, everything seems secure. Does anyone think not having these screws is critical beyond securing the drive?
-
-
-
Rimuovi il cavo del drive ottico tirandolo via direttamente dall'unità ottica.
-
-
-
Rimuovi le due viti a croce Phillips #0 che fissano la piccola staffa metallica di supporto. Trasferisci questa staffa sulla nuova unità ottica o sul case esterno per hard drive.
-
-
-
Rimuovi il distanziale di plastica dal case del disco rigido nell'alloggiamento dell'unità ottica premendo una delle clip poste da ciascun lato e sollevandolo dal case.
All Macbooks use 9.5mm Optical Drive Caddy, also, If you’re wondering as well, the Optical Drive runs at SATA II speeds just like with the main hard drive area, so if you’re using a SSD, then it’s going to run at a slightly slower speed.
-
-
-
Verifica che i connettori del disco rigido siano rivolti verso il basso prima di posizionarlo nel case.
-
Posiziona il disco rigido delicatamente nell'apposito slot del case.
-
Tenendo saldamente il case in posizione con una mano, premi con l'altra il disco rigido nei connettori del case.
Okay it seems like some models of MacBook Pro have issues with a fast (6Gbit/s) SSD in the optical bay. Even though my Mac says it offers 6Gbit on both bays it simply didn't work in the optical bay. So I switched places between the two drives and everything seems to work. My Mac booted from the old HDD in optical bay automatically and then I cloned it afterwards and changed the startup disk to the new one. As said before, don't put a fast SSD in the optical bay!
This is an extremely late response to an old comment, but… whatev’s. My 2011 MacBook Pro had that issue: the main (HDD bay) SATA operated at 6Gbit, and while the optical bay said it was 6Gbit, the “Negotiated Link Speed” was like 1.5Gbits regardless of what you put in it (I can understand 1.5Gbits for an optical drive, but not for an SSD). Some of the early 2012 models did the same thing, from what I understand, but that was corrected pretty early on; both my 13” and 15” 2012’s run at 6Gb/s on both SATA busses.
AJH -
It’s not wise to swop the optidrive for an HD as there is no physical protection. The caddy is only intended for an SSD. -
-
-
Una volta agganciato il disco rigido, reinserisci il distanziale di plastica tenendo il disco premuto contro la parte inferiore del case.
-
-
-
Fissa l'unità al case con due viti con testa a croce Phillips #1.
Where are these screws coming from? Were they part of the original optical drive?
The new enclosure should include these two Phillips screws.
Can someone show the step of removal process of hdd/SSD placed in the caddy? I am unable to revert this process. Do we have to apply back greater force to remove back the hard drive/SSD from the caddy?
These screws seems to be located in different places on different enclosures. I had serious trouble getting the SSD that the previous owner of this MacBook installed out of the enclosure until I realized the screws holding the SSD in place were on the side and not on the bottom. In case anyone else has the same issue!
-
-
-
Collega la staffa dell'unità ottica al nuovo case mediante due viti con testa a croce Phillips #0.
-
Ricollega tutti i cavi rimossi dall'unità ottica originale nel case dell'alloggiamento ottico.
Replaced the optical with hdd, as well as replaced the hard drive with an ssd. Now I get the circle with a line through it. But, when I hold the option key down, it gives me both hard drives, PLUS, the thumb drive I have in the USB port with a Mountain Lion installer. It even shows the recovery disks, but gives me the circle with the line when I choose one. Any help is appreciated.
Mate,
My mbp shipped with OS 10.8, and I had upgraded twice to 10.10
I've a 10.7 USB which upgraded my old MBP.
My plan today was to boot with my new ssd, my time machine back up and the Lion usb plugged in.
I would then click on the Lion usb, and tell it to put the OS and time machine back up on the ssd.
So I help down ALT and when it started it gave me the options of the usual Mac internal or the Lion USB.
I clicked Lion, but instead of taking me to the install options (Disk utility, restore from time machine etc etc) it gave me that grey circle with a diagonal line through it. The no entry sign - grey on grey - that I think you have.
Some googling said that it is because I was trying to usb a 10.7 install on a MBP that shipped 10.8
You can't go back, apparently.
So if any of the OSs are older than the mac you got, you will get this error. The grey in grey no entry.
I just cloned my HDD to my ssd (Carbon copy cloner free 30 day trial) using an external stat-usb3 wire and all is good.
Rory -
I have a 17" Macbook Pro6,1 unibody with an Intel Core i5, 2.53GHz. I was successful installing a 250GB SSD in the DVD bay, and I'm able to boot from it. I did this by first installing OS X 10.9.4 on the SSD mounted into an external HD case, testing the system to see if it would boot up into the SSD, then installing the SSD and carrier in the DVD drive bay. The system now boots up from the SSD with no problems. If you are having installation problems, I recommend trying this method.
I just have finished installing second SSD to my MBP (unibody 15` 2010).
First one was changed like one year ago. Samsung 500GB SSD. It is in my HDD bay and I'm running system from it.
Today I put a new Samsung 1TB 850 Evo 1 SSD in to my optic bay.
I encounter problem with SSD not recognized by Finder.
But It was recognized by Disk Utility.
What I did was I erase new SSD by Disk Utility. Then the new partition was created and now It has been seen by Finder.
So If you see it in Disk Utility just erased it.
Some extra info in under this link--> https://discussions.apple.com/docs/DOC-4...
Wish you all luck :)
My installation went great thanks to the guide. I did notice a small thing that might make a good tip, and that is to inspect all the visible screws. I saw one that was slightly raised, and when I poked around with the spudger, I found 2 more that had worked themselves out a bit. Its probably something super rare but at the age of these things, it wouldn't hurt to check.
-
-
-
Non buttare via questo disco! Puoi ancora usare l'unità ottica esternamente con l'aiuto del nostro cavo USB per Unità Ottica SATA.
-
Allinea la spina del cavo SATA con la presa sull'unità e connettila bene.
-
Collega il connettore USB al tuo portatile e la tua unità ottica è pronta all'uso.
There is a small metal button in the front of the drive and you can use that to eject the drive if you were wondering.
Maybe that explain the eject button mechanism maybe….
Die neue SSD wurde durch das Laufwerk ersetzt aber leider wird jetzt die alte HDD nicht mehr erkannt. Hatte schon ein anderer das Problem?
-


Per riassemblare il dispositivo, seguire queste istruzioni in ordine inverso.
Per riassemblare il dispositivo, seguire queste istruzioni in ordine inverso.
Annulla: non ho completato questa guida.
Altre 85 persone hanno completato questa guida.
Un ringraziamento speciale a questi traduttori:
100%

Nina Steinhaeuser ci sta aiutando ad aggiustare il mondo! Vuoi partecipare?
Inizia a tradurre ›


6 Commenti
I have just gotten my second hard drive up and running after a few false starts. The main piece of advice I'd give you if you are going to do the same is, format the new hard drive via USB BEFORE you install it!
Physically installing the second hard drive was no trouble at all. The problem I had was formatting it inside the computer. This gave me multiple failed attempts using Disk Utility. When I tried to erase or partition the drive, after a long hang, I always got the error: "File system formatter failed."
I thought something might be wrong with the hard drive, and was about to return it. But then I thought I'd take it out of the computer and plug it in using the Silicone 2.5" Hard Drive Enclosure with USB 2.0 Cable. I ran erase in Disk Utility again and it worked! Now it's showing up in finder and I can start storing files on it.
Also, I must say the customer support from ifixit is great. I messaged them about this and some other issues I was having and I got a detailed response from them within a couple of days. Thanks guys!
After doing this for the first time and starting my computer it worked like a charm but after taking the drive back out to swap primary and secondary drives (so i could have my os installed on the bigger drive) it quit working. Now my secondary drive won't work at all. It won't show up in finder or DU. I'm fairly confident that i didn't break anything on the logic board. Any ideas?
I am struggling with this on a 15 in. Have done this same thing on three 13 in MacBook pros and one iMac.
Fan running, camera gone and bluetooth and wifi not installed. Have done SMC reset and checked cables numerous times. Please provide guidance -
Great guide!
Enabled me to put a new SSD in, in place of a defunct Apple Superdrive, & to get back to work on video production & programming with space to spare here on a machine that is now more than 12 years old. This. Is. A very good feeling.
2 steps merit note:
1. Disconnecting and then reconnecting the camera + Bluetooth connector from the mainboard turns out to be a little bit fussy, I think in part because my computer has a spongy adhesive-attached retainer of some kind parked in front of the connector to help keep it in place (additional to the adhesive tape on top).
2. Step 13, removing a screw at the "upper right" (as viewed during repair) of the optical drive bay, pitted me against a recalcitrant screw. Phillips screws only seem to answer to enhanced downward pressure to solve this problem, but whatever it attaches to gives way and flexes downward! In delicate equipment that's a little scary. Nothing broke (whew!) & replacing the screw on reassembly went just fine.
Upshot: great guide & parts!
May be helpful to have more distinct colors to identify the different screws.
Victor Caamano - Replica