Introduzione
L'aggiunta di un secondo disco rigido nell'iMac offre diversi vantaggi, fra cui velocità più elevate, maggiore spazio di archiviazione e la possibilità di installare nuovi software senza problemi. Utilizzare questa guida per eseguire l'installazione mediante il nostro case per disco rigido nell'alloggiamento ottico.
Cosa ti serve
-
-
Allentare la vite con testa a croce al centro dello sportello di accesso.
-
Rimuovere lo sportello di accesso dall'iMac.
-
-
-
Far aderire due ventose agli angoli opposti del pannello di vetro.
Save $15 dollars and use a plunger. Works perfectly.
Perhaps not so elegant but equally effective without any adverse effects to either... try a vacuum cleaner.
The same kind of suction cups are available from Harbor Freight Tools (Item # 62715) for $2.99 each or $5.98/pair (plus sales tax).
-
-
-
Estrarre delicatamente il pannello di vetro dall'iMac.
The glass panel is somewhat thin and should come away quite easily without much force so be gentle.
To reinstall the glass, I lined up the bottom edge first, then pivoted the top in. The magnets pulled it quickly into place.
-
-
-
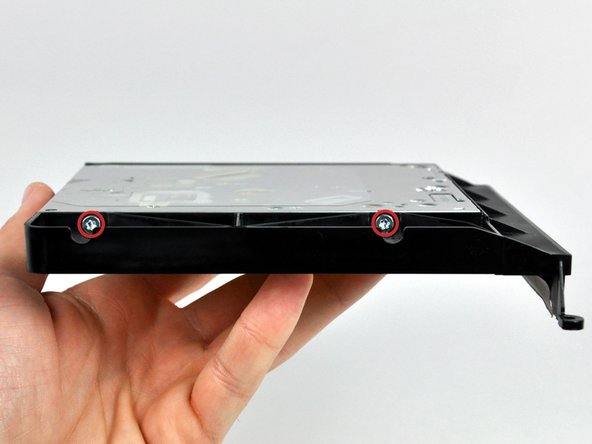
Rimuovere le 12 viti seguenti, che fissano la mascherina anteriore al case posteriore:
-
Otto viti Torx T8 da 13 mm.
-
Quattro viti Torx T8 da 25 mm.
I only had two 25 mm T8 Torx on my model. (The two inner orange circles as shown in the diagram.)
I don't know if this is different but i am in the process of disassembling a 24' imac emc: 2134. i have only: (2) 25 mm T8 screws the inner two on the bottom of the screen. I have (4) 13 mm t8 screws the outer most holes on the bottom and the 2 holes on the right side of the monitor above the drive entrance and the remaining holes are (6) 11 mm t8 screws
I have the same screws as ccarter on a 2211 except on the bottom row there are only 4 screws total, the longer ones go in the middle two.
My 2211 has a different screw configuration.
2 - 32mm long screws towards the middle of the bottom edge
4 - 18mm long screws (2 at the corners of the bottom edge and 2 along the right edge)
6 - 13mm screws along top and left edges
Mine is the same — two very long, four medium, and six short. Also my T9 worked better than my T8 which was a bit loose.
I have the same screws as Christian. The key is to make sure all screws are flush to the surface, so that the glass can be held up by the magnets.
On mine, for the red circles, I had the six 13mm Torx plus two 25mm Torx. It's not indicated in the picture here, but the 25mm Torx went on either side of the optical drive.
I marked next to each hole with a pencil "S, M or L" to indicate which length screw goes where. No guess work on reassembly.
-
-
-
Sollevare delicatamente la mascherina dal bordo superiore, lontano dal case posteriore. Può essere utile premere delicatamente gli angoli del display con i pollici.
-
Dopo aver rimosso il bordo superiore della mascherina anteriore dal case posteriore, ruotare la mascherina verso la staffa ed estrarla dal case posteriore.
Looking at the meaning of the LEDS
i've got 3 LEDS on but i don't get a chime or the screen.
i am going to check the inverter voltages but can only find info for the 20" macs iMac Intel 20" EMC 2210 Power Supply Output Voltage Test
does anyone know where i can get info for the 24"
i have the same thing, 3 LEDs on but no chime and no screen.
what is the fix? and problem?
Bill -
-
-
-
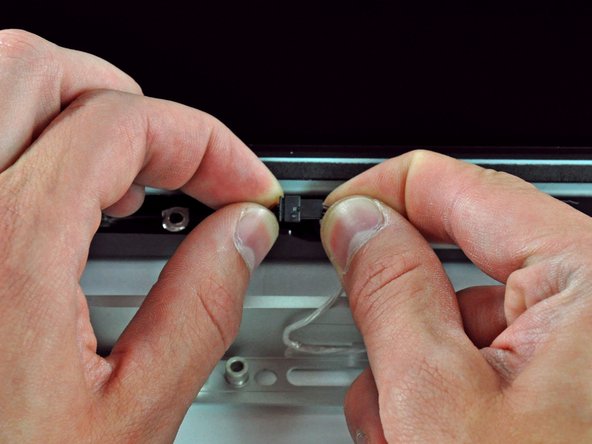
Scollegare il connettore del cavo del microfono, rimuovendo il nastro secondo necessità.
I also skipped disconnecting the microphone cable. I have a large table and I stacked some books next to the iMac. There was plenty of cable for the bezel to fold nicely over the top of the iMac.
I used the floor instead of a table and left the cable connected.
-
-
-
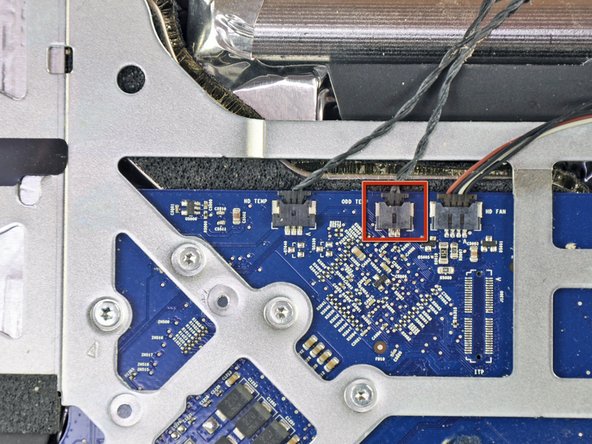
Scollegare il sensore temperatura dell'LCD estraendone il connettore direttamente dal connettore femmina sulla scheda logica.
The temp sensor on my EMC2134 is located underneath the LCD and the cable is not very long. I propped up the LCD to facilitate removal.
You have to be extremely careful when pulling out the LCD Temp connection as it doesn't want to come easy. I almost pulled the entire connection off the logic board using too much force. I therefore, used a pair of hemostats to grab the male end (the very top of the connector) and used a small screwdriver to hold the base of the connection in-place (female end attached to the logic board) in order to pull the connector apart.
There apparently is a variant of the EMC2134, like Pierre Scerri said. It has its LCD temp sensor underneath the LCD; the thin wires are about 5 in / 13 cm long and taped to the back of the LCD, and only about 2 in free, so lift the LCD gently.
There is a connector on the place where the LCD temp connector is on the iFixit photo, but in this variant it is marked 'CPU FAN' and there is no reason to disconnect it.
The logic boards in my computer are black, not blue.
-
-
-
Rimuovere le due viti Torx T6 da 5,3 mm che fissano il cavo dati del display alla scheda logica.
I used surgical tweezers to put place these two tiny screws back in without dropping them into the computer.
Okay. It was extremely difficult. I had to use precision screw (1.4 m/m). It worked on one of the screw. The other one... I was forced to use a hexagon bit at 1.5 size to a success with extreme precision and careful maneuver. I just hope nobody else experiences this as much as I have. Good luck.
-
-
-
Scollegare il connettore del cavo dati del display dal connettore femmina sulla scheda logica, estraendo le linguette di plastica a esso collegate dall'iMac all'utente.
For my 2134 iMac, I ended up just (carefully) putting my fingers on the edges of the little board and (gently) pulling up. Did the trick for me (I couldn't get anything to happen when I pulled up on the plastic tab, which I did also have trouble finding purchase on)
Same for me :just pull upwards with your nails on both edges.
Pull up works, no clue why they say pull down because you can’t no room to pull down.
Depends on exactly where the tape was positioned originally; this determines whether it will easily pull “up”. I find that grabbing the connector opposite the screw holes with two fingers and jiggling it free was dead easy. Much easier than keeping a grip on the tape tag.
-
-
-
Rimuovere le otto viti Torx T8 da 12 mm che fissano il pannello del display al case posteriore.
-
Sollevare il pannello del display dal bordo sinistro e ruotarlo verso il bordo destro dell'iMac.
My T9 bit fits better than my T8 bit.
-
-
-
-
Tenendo l'LCD sollevato, scollegare l'apposito cavo tirandolo verso il basso.
-
In alternativa, il cavo di alimentazione dell'LCD può essere scollegato dall'LCD stesso, invece che dal lato alimentatore.
I was unable to disconnect the LCD cable, possibly due to fear of breaking the connector. I was able to swap drives with it connected. The iMac was placed on its rear cover on a large table, leaving plenty of workspace to rotate the LCD panel to the left side while still connected. The screen will lay at an angle on the case edge. I verified the LCD cable was clear of the case endue and not pinched.
This also avoids going near high power capacitors with your fingers.
I found it easier to disconnect the LCD cable at the LCD end after lifting the black tape.
Fully agree. Easiest is to remove cable from LCD in stead of trying to pull it off the board
Remove cable from the LCD Display not the board
Fully agree with others. It is easiest is to remove cable from LCD display instead of trying to pull it off the board. It comes off the board very easily, but it is difficult to put it back onto the board. It is easier to snap the cable bad onto the LCD Display itself.
ToddR -
I could not get the LCD power cable disconnected from the board - it is on really hard and there is no way to leverage it off without breaking something. My solution was to leave the screen attached and rotate it away from the work area/computer (granted you need a work surface that is large enough and a soft surface to place the screen on). If you try this method, be careful that you keep clear of the screen during the remaining steps - should not be hard.
It seemed that if I ever got the connection unplugged, there would be no way to get it back under and re-attached properly.
This is probably the toughest step of the entire process that needs a workaround.
As said previously, reconnecting the data cable is really difficult and I managed to bend a pin. Thanks to good support from ifixit staff I managed to bend it back - not sure how as it's so small. Unscrewing the IC board is a good idea. If I ever had to do this again I would avoid disconnecting this cable and just move it out of the way, or disconnect it at the other end as previously suggested.
LIke others mentioned, this was the most difficult step because of the awkward angle. Working alone I managed to get it off but found it much harder to line it up properly for reattachment. What I ended up doing was getting someone to hold the the LCD (resting on the left side, perpendicular to the iMac which was laying down) and I removed the 4 screws that hold the power supply in place. Removing those screws allowed me to lift the power supply a couple inches which made it so much easier to reattach. I wish I had done that when I was trying to remove the cable during disassembly. Good luck!
This was near impossible to remove as there is no room to grip the connector and no easy way to wedge something in there to help remove it. I felt like giving up but the hard drive removal and swap was so easy you just need to get someone to hold the screen for 10 minutes. Don't try removing the cable ... you most likely will get frustrated unnecessarily.
Les commentaires sont tous en anglais à cette étape, et j'aurai dû faire l'effort de les lire avant de perdre 1h à cause de ce connecteur. Effectivement, il n'est pas nécessaire de débrancher le connecteur de l'écran, car c'est une vrai galère à remettre sans risque de le casser. On peut donc laisser l'écran branché, à la verticale, soigneusement incliné sur un mur, l'imac toujours posé sur le bureau. J'espère que ce message sera utile, car j'aurai bien aimé qu'on me le dise avant !
+1 for removing the LCD cable from the screen side, not the mac side.
Not removing it, depending on the lenght of the cable which doesn't seem to be fixed, might not be an option for everybody.
Remove cable from the LCD Display not the board
Fully agree with others. It is easiest is to remove cable from LCD display instead of trying to pull it off the board. It comes off the board very easily, but it is difficult to put it back onto the board. It is easier to snap the cable bad onto the LCD Display itself.
This is really a good way to break the cable! Avoid the stress easily by removing the four screws (T-9) holding the video board down, then lift the edge near the cable before removing. Also, the cable is easily reattached to the board with these four screws removed. Reattaching without doing so is time consuming and quite difficult. This approach is easier than removing the cable from the LCD.
Reconnecting the LCD Connector was the only challenging part of this procedure. I must have bent the pins on the LCD connector when taking it off so was unable to reattach. I ended up taking off a bracket that was adjacent to the LCD connector as well as the other end of the cable....O I disconnected these 2 pieces and was able to examine the other end of the LCD connector I was able to bend the pins back into place and the connector snapped back into place. The display works and the hard drive works as well. Thanks iFixIt!
I wish I had read your comments about not disconnecting the LCD. It was really hard disconnecting and connecting it back was !@#$. I managed to twist some of the pins so in the end I had to unscrew the board, twist the pins back and plug the cable. When I restarted, I really thought that it was never going to work. So a down point for not pointing to comments at step #11. Otherwise great tutorial.
I found a far easier way. Just gently turn the screen 90° to one side and don't disconnect the cable! If all you are doing is replacing the HD, there's plenty of room without disconnecting the cable. At least on my machine the cable is flexible and I didn't have any problem making room. Way, way easier.
I didn't disconnect the LCD cable. I stacked some books on the side and put a blanket on them. I was then able to fold the screen next to the computer LCD still connected. Should some iMacs have a shorter cable this may not be an option to everyone. Thanks for good tips everyone.
No need to remove the LCD panel.
I agree this is the toughest step in the process — and the most unnecessary. I was able to rotate the panel out of the way without disconnecting it, placing a cloth between the chassis and the panel now leaning against it to prevent any inadvertent damage.
As others have stated, disconnecting the inverter cable from the power supply first is NOT the way to go. I ended up damaging the cable trying to get it out before I went to disconnect it from the LCD panel end instead. Much easier to do and much less prone to damaging the cable or it's insertion socket.
The guide needs to be updated and the suggestion to pull the inverter cable downward from the power supply removed. It is not a good idea and will cost you at least a few days and $10 to replace the cable should something go wrong. Please update this guide.
Get the male part out of the female fitting is a standard problem with boards. There are pulling/clamping devices you can get at electronics stores to pull the fitting out. They are like fuse pullers many car fuse boxes are equipped with. IFixit should sell them with the kit. I did it all without any problems, formatted the drive and then installed the operating system and defeated Apple who wouldn't even consider replacing the drive in my "obsolete" machine which my wife now uses instead of a crappy Dell PC.
If you are just changing the HDD, instead of removing the cable at the left, simply pivot the LCD 90 degrees counter-clockwise and gently set it back down. This allows one to access the HDD to swap.
I didn’t find my own solution in the previous comments, so here it is… Oh, I worked on the Apple iMac "Core 2 Duo" 2.8 24-Inch (Early 2008) A1225 EMC 2211.
I simply lift the LCD panel from the other side! Look at the photo in the previous step: after you disconnected that cable (data cable) you can lift the lcd panel and rotate it and the cable is long enough to bring the panel at a 90 degrees position (vertically in the air).
Than it’s up to you. I tried to place the panel side on the table but again the cable was too short. So I placed it on the inside of the case, which is free from other cable and boards. Not elegant, I know.
The important part is that in that position I was able to remove the 4 screws from the Power Supply board and easily disconnect the LCD cable! And it’s equaly easy to reassembly it.
Important note: the LCD panel is pretty heavy! Be very careful with the edges (the metal is sharp). Don’t let it fall. Don’t touch the boards and the other components.
I also bent two pins of the board connector while trying to plug it back in… so I unscrewed the board, managed to bend the pins back with tweezers but I’m afraid I might’ve damaged the connector as I still get a black screen and LED 4 is off, even though everything is back in its place…
-
-
-
Continuare a sollevare l'LCD dal lato destro.
-
Rimuovere l'LCD.
Much simpler to remove the LCD cable at the LCD insertion site, rather than trying to remove it as suggested in the manual. Reinsertion is also less traumatic.
-
-
-
Se occorre, rimuovere i pezzi di nastro che fissano i cavi del sensore termico dell'unità ottica o del disco rigido all'iMac.
-
Scollegare il connettore del sensore termico dell'unità ottica dalla scheda logica, estraendolo verso la parte superiore dell'iMac.
-
-
-
Rimuovere le due viti Torx T10 da 7 mm a passo fine che fissano l'unità ottica al case posteriore.
-
-
-
Sollevare l'estremità libera dell'unità ottica, leggermente fuori dal case posteriore.
-
Rimuovere le due viti Torx T6 da 3,5 mm che fissano il connettore dell'unità ottica a quest'ultima.
My EMC 2134 had no torx screws on the ODD. The SATA connector plugs straight into the ODD.
-
-
-
Se necessario, rimuovere la porzione di nastro in schiuma che copre il sensore termico dell'unità ottica.
-
Per rimuovere il sensore termico dell'unità ottica, utilizzare la punta di un inseritore per sollevare l'aletta centrale della staffa del sensore termico, applicando una leggera tensione al cavo del sensore.
-
-
-
Ruotare leggermente la staffa dell'unità ottica, allontanandola dall'unità stessa.
-
Estrarre la staffa dall'unità ottica dall'estremità aperta di quest'ultima, prestando attenzione a non fare incastrare le linguette.
-
Se c'è un disco o altro bloccato nella tua unità ottica, abbiamo una guida per risolvere la situazione.
-
-
-
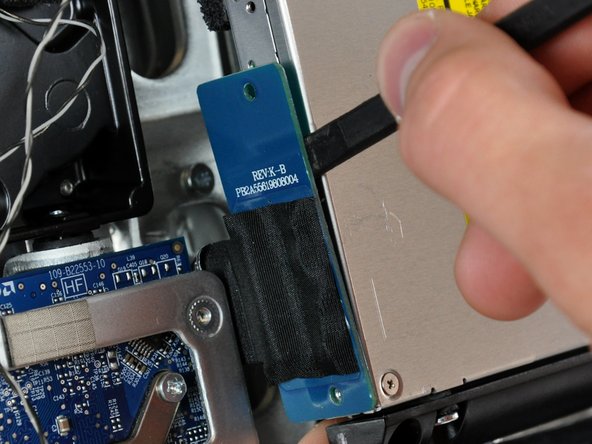
Rimuovi le tre viti con testa a croce Phillips n. 0 da 3 mm dal case dell'unità ottica.
Hello, is the sata & power cabla from the mac can directly feet inside the SSD?
plug in the back of the ssd
I'm trying to find out as well. I read elsewhere you need something like this without the bracket: http://www.amazon.com/gp/product/B0056OB...
However I have NOT confirmed this.
If I understand you correctly; the enclosure allows you to use the existing iMac optical cable. Also the enclosure allows for a safe fitting of the optical drive. In my newer machine I had to double side tape the SSD to the back of the iMac and buy a special cable. Note: this was not an optical drive replacement scenario or I would have done exactly as this tutorial suggests.
I bought another caddy, not the one from the description. i had to extract the plastic adaptor from the optical drive and put in on the new caddy 12,7mm
-
-
-
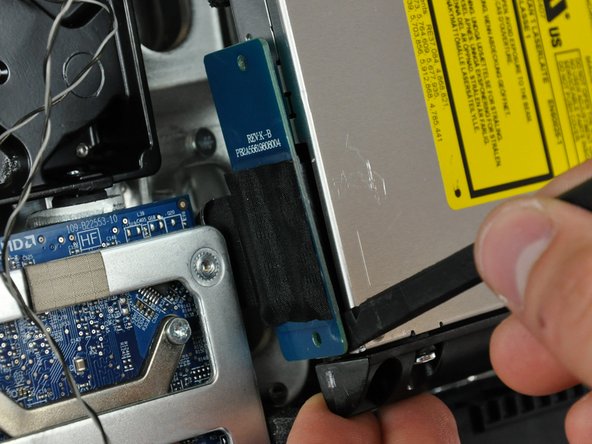
A partire dal bordo sinistro, apri delicatamente il case dell'unità ottica.
-
Continua ad aprire le due metà del case fino a separarle.
This is the 12.7mm caddy.. but, the caddy 9.5 mm fit fine as well? or it doesn't fit on imac mid 2010
My caddy (ordered 5/2019) had two additional screws that needed to be removed from the sides for it to open.
-
-
-
Solleva la mascherina in plastica nera dal case dell'unità ottica.
-
Riassembla il case dell'unità ottica senza la mascherina, riutilizzando le tre viti con testa a croce da 3 mm originali per preservarne l'integrità.
Just curious, why is it necessary to remove this black plastic faceplate from the enclosure? It doesn't appear to serve any function in or out of the enclosure.
Maybe because it would interfere with the bracket you have to put back on in step 21?
So I'm confused about the Optical Drive Bracket, the one that originally held the DVD-CD drive. I had an awful time remounting the kit into that bracket as the screws didn't line up correctly. I finally got everything to fit, less one of the four holding screws. Did anyone else experience this problem? I would have expected a much better alignment for this assembly considering the quality of the iFixIt site.
For the record, the upgrade went fine with a SanDisk Extreme II 480GB SSD, but that one step was next to impossible, and not covered in any detail by the instructions.
Yep, I had exactly the same problem. The alignment was way off.
olafgoy -
My kit also did not line up correctly. I had to put all four screws in at an angle cross-threaded to mount the unit.
Kevo -
Same here. managed to get two screws in at a decent angle on one side and couldn't get the others in. Felt solid enough once I'd screwed the original ODD casing back onto the iMac.
I had the same alignment problem, too. I ended up removing the rubber grommets from the plastic enclosure, widening the holes with a small file, then replacing the grommets. All four screws went in, but not in perfect alignment. Should be ok, though.
I bought a different enclosure than the one recommended ($18 instead of $39) and it came with new screws because the old screws were too big to fit in the holes for the new enclosure.
Hi. Which enclosure did you buy? link please.
Alex -
Where did you get the alternative enclosure from?
I completed this guide last night on my iMac and it all worked great until I got to step 26 and none of the holes on the 12.7 mm PATA Optical Bay SATA Hard Drive Enclosure lined up with the black plastic faceplate. Just like what is being commented on by previous fixers, I could only get 2 screws on one side of the enclosure in, but they were crooked and unable to screw in all the way. It was crude, but it worked.
The rest of this guide works flawlessly. This is a great site!
-
-
-
Rimuovi il posizionatore di plastica dal case del disco rigido dell'alloggiamento ottico, premendo una delle clip poste lateralmente e sollevandolo dal case.
What’s the switch for on the inside of the caddy? What position should it be in? Mine came switched to the right (towards SATA connector that disk inserts into).
-
-
-
Verifica che i connettori del disco rigido siano rivolti verso il basso prima di posizionarlo nel case.
-
Posiziona il disco rigido delicatamente nell'apposito slot del case.
-
Tenendo saldamente il case in posizione con una mano, premi il disco rigido nei connettori del case con l'altra.
-
-
-
Una volta agganciato il disco rigido, reinserisci il posizionatore di plastica tenendo il disco premuto contro la parte inferiore del case.
-
Ricollega tutti i cavi rimossi dall'unità ottica originale nel case dell'alloggiamento ottico.
Why no mention of attaching the new hard drive to the Optical Drive Enclosure using the enclosed phillips screws?
Once you have securely inserted the new hard drive into the Optical Drive Enclosure and replaced the plastic positioner you should attach the drive to the enclosure using two of the provided phillips screws. Two holes on the underside of the enclosure should align with two attachment holes on the underside of the drive.
I suspect that the plastic positioner will secure the drive well enough (for this style of adapter). As I mentioned in earlier comment, this should mean you can replace / upgrade the SATA drive later without needing to remove the adapter, skipping many steps.
Do you need a sata cable to connect the new drive to the board or does it connect via the optical drive cable that we disconnected earlier?
It does connect to the optical drive cable but if you don't use the optical bay enclosure you'll need a 13 pins to 22 pins sata adaptor (and some tape!)
The sata cable for the optical drive has 6 + 7 pins while ssd and hhd have 15 + 7 pins
Can someone please explain why you need to remove the black plastic faceplate from the optical bay enclosure. It is designed to receive the standard SSD. What is gained from removing a part of it?
Thank you! This guy has made upgrading the mid 2010 iMac I inherited from my mom MUCH easier and saved me a lot of time, trial, and error.
I'm a little confused. Do I need the enclosure from ifixit or am I removing the optical drive and installing an ssd in the preexisting op drive enclosure? If using the already existing enclosure what type of ssd do I need as for Sata connectors?
-


Per riassemblare il dispositivo, seguire queste istruzioni in ordine inverso.
Per riassemblare il dispositivo, seguire queste istruzioni in ordine inverso.
Annulla: non ho completato questa guida.
Altre 43 persone hanno completato questa guida.
Un ringraziamento speciale a questi traduttori:
100%

Jasper Fleischhauer ci sta aiutando ad aggiustare il mondo! Vuoi partecipare?
Inizia a tradurre ›


5 Commenti
These iMacs use ATA DVD drives. Using the SATA drive enclosure linked above is guaranteed to fail. :-(
My EMC 2134 has a SATAII optical drive.
I apologize for the reply after over a year.
No iMac 24 "both 2007 and 2008 can accommodate a SATA Superdrive. This is certain.
It is clear that this installation is made to the adapter referred to as "Related Products": [prodotto collegato mancante o disabilitato: IF107-079].
So any HDD or SSD you enter this run at high speed to 100 MB / sec of UltraATA100.
Henry -
Do I assume correctly that this iMac model doesn't have two SATA ports on the logic board, so a dual 2.5" SSD/HDD drive could be installed in the 3.5" bay with an adapter/bracket? This way one could save the optical drive... Anyone?
All I have to say on this thread is: I can’t even begin to understand how this machine is still running as it is. When it was new, circa 2007-2008, a coffee-like beverage was knocked off a shelf above the iMac. It poured all the way through to the bottom. Even though it missed the power supply, it covered everything else INCLUDING the Superdrive. Which still ran but obviously the eye was permanently blind. Between the primary fan and heat dissipation block, there was about one square centimeter of partially obstructed airway. the rest was caked at about a 2-3mm depth. All of the black consolidating foam? Turned to dust at the slightest touch. This was initially going to be a part out on eBay journey. After all, to find a replacement 24” display would be legendarily unlikely. The way this machine was running… another day at the park. She’s clean and I’m keeping her.
AMAZING GUIDE… This was my first iMac teardown :-)
If only I could share the photos and video…
PH2 head necessary to remove screw.
airshack - Replica
Mine was as written, a PH1.
tpivo - Replica