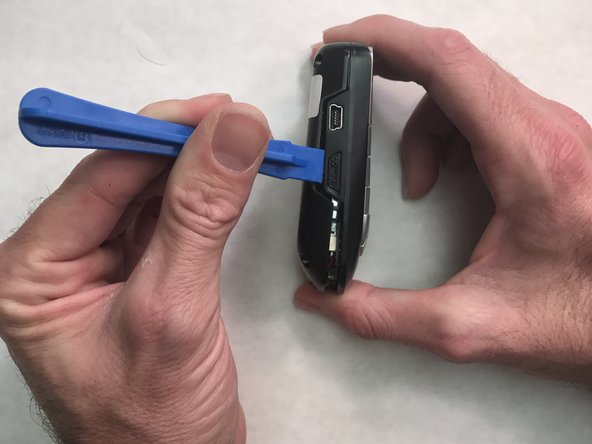
Salta al contenuto principale

Insignia NS-HD01A Battery Replacement

Cosa ti serve

  1. Insignia NS-HD01A Battery Replacement, Battery: passo 1, immagine 1 di 1
    • Remove the rubber screw caps using the pointed tip of the Spudger.

  2. Insignia NS-HD01A Battery Replacement: passo 2, immagine 1 di 1
    • Remove the four 6.0 mm Phillips screws located below the rubber caps using the PH00 bit installed in the driver.

  3. Insignia NS-HD01A Battery Replacement: passo 3, immagine 1 di 2 Insignia NS-HD01A Battery Replacement: passo 3, immagine 2 di 2
    • Use the plastic opening tool to pry open the back cover.

    • Slide the tool around the sides of the radio to gradually pry the back cover off. Do not remove the cover completely as there is still a cable connecting it to radio.

  4. Insignia NS-HD01A Battery Replacement: passo 4, immagine 1 di 3 Insignia NS-HD01A Battery Replacement: passo 4, immagine 2 di 3 Insignia NS-HD01A Battery Replacement: passo 4, immagine 3 di 3
    • Use the blunt tweezers to unplug the battery cable from the PCB board. Grab the battery cable plug from the sides.

  5. Insignia NS-HD01A Battery Replacement: passo 5, immagine 1 di 2 Insignia NS-HD01A Battery Replacement: passo 5, immagine 2 di 2
    • Use the flat side of the Spudger to pry the battery out of the back cover.

    • Insert the replacement battery into the back cover.

    • Reassemble the radio, making sure to reconnect the battery cable.

Conclusione

To reassemble your device, follow these instructions in reverse order.

Altre 2 persone hanno completato questa guida.

Joel Najmon

Membro da: 10/08/16

152 Reputazione

1 Guida realizzata

Team

IUPUI, Team 2-2, Wilson Fall 2016 Membro di IUPUI, Team 2-2, Wilson Fall 2016

IUPUI-WILSON-F16S2G2

5 Membri

1 Guida realizzata

0 Commenti

Aggiungi Commento

Visualizza Statistiche:

Ultime 24 Ore: 0

Ultimi 7 Giorni: 2

Ultimi 30 Giorni: 9

Tutti i Tempi: 1,022