Salta al contenuto principale

Infant Optics DXR-8 Monitor Screen Replacement

Cosa ti serve

  1. Infant Optics DXR-8 Monitor Screen Replacement, Internal Monitor Components: passo 1, immagine 1 di 3 Infant Optics DXR-8 Monitor Screen Replacement, Internal Monitor Components: passo 1, immagine 2 di 3 Infant Optics DXR-8 Monitor Screen Replacement, Internal Monitor Components: passo 1, immagine 3 di 3
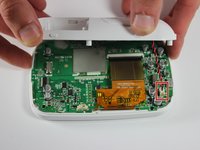
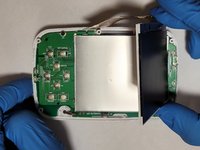
    • Using the plastic opening tool, remove screen protector from front of monitor.

  2. Infant Optics DXR-8 Monitor Screen Replacement: passo 2, immagine 1 di 3 Infant Optics DXR-8 Monitor Screen Replacement: passo 2, immagine 2 di 3 Infant Optics DXR-8 Monitor Screen Replacement: passo 2, immagine 3 di 3
    • Remove the six 4mm screws using a Phillips #00 screwdriver.

    • Remove the screen, exposing the circuit board.

    • Turn device over to expose rear circuit board.

  3. Infant Optics DXR-8 Monitor Screen Replacement: passo 3, immagine 1 di 3 Infant Optics DXR-8 Monitor Screen Replacement: passo 3, immagine 2 di 3 Infant Optics DXR-8 Monitor Screen Replacement: passo 3, immagine 3 di 3
    • Disconnect speaker from monitor for ease of access by unplugging wire.

  4. Infant Optics DXR-8 Monitor Screen Replacement, Monitor Screen: passo 4, immagine 1 di 3 Infant Optics DXR-8 Monitor Screen Replacement, Monitor Screen: passo 4, immagine 2 di 3 Infant Optics DXR-8 Monitor Screen Replacement, Monitor Screen: passo 4, immagine 3 di 3
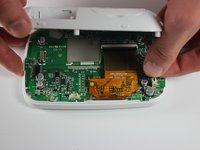
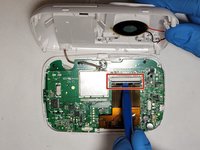
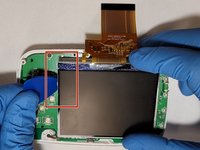
    • Using a plastic opening tool, disconnect the ribbon cable connector.

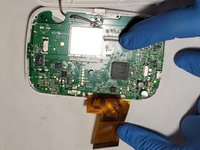
    • Gently separate the ribbon cable from the motherboard.

  5. Infant Optics DXR-8 Monitor Screen Replacement: passo 5, immagine 1 di 2 Infant Optics DXR-8 Monitor Screen Replacement: passo 5, immagine 2 di 2
    • Using a Phillips #000 screwdriver, remove the four 4mm screws around the edge of the motherboard.

    • Flip the motherboard away from the front case to reveal the screen on the other side.

  6. Infant Optics DXR-8 Monitor Screen Replacement: passo 6, immagine 1 di 1
    • Using a plastic opening tool, carefully pry the top retaining frame off of the screen. Start in one corner and work around the bottom of the frame.

  7. Infant Optics DXR-8 Monitor Screen Replacement: passo 7, immagine 1 di 3 Infant Optics DXR-8 Monitor Screen Replacement: passo 7, immagine 2 di 3 Infant Optics DXR-8 Monitor Screen Replacement: passo 7, immagine 3 di 3
    • Using a plastic opening pick, carefully pry a corner of the screen away from the motherboard.

    • Lift the screen off of the motherboard.

Conclusione

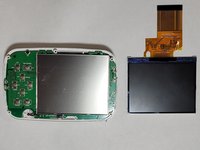
To reassemble your device, follow these instructions in reverse order.

Un'altra persona ha completato questa guida.

3 Commenti

Hey Daniel!

Thanks for sharing ??

Where did you get the replacement part?

Ro Brandi - Replica

On Amazon is the quickest option.

Hilitand LQ035NC111 LCD Display, 3.5inch TFT RGB LCD Display Module 320 x 240 Display Panel LQ035NC111 54pin LCD

Stebe -

Just completed the screen change, it works great! Thanks so much for this step by step guide.

The screen I ordered came with the metal brackets. Since the base was glued to the motherboard, it took a few extra steps of de-casing the one I got and re-casing onto the board. But worked fine.

I ordered: https://www.amazon.com/dp/B07NYN5PK2?psc...

James Quinlan - Replica

Aggiungi Commento

Visualizza Statistiche:

Ultime 24 Ore: 4

Ultimi 7 Giorni: 8

Ultimi 30 Giorni: 66

Tutti i Tempi: 4,399