Salta al contenuto principale
InFocus LP540 Projector Main Board Replacement

InFocus LP540 Projector Main Board Replacement

Jorge L Navarro

Jorge L Navarro e 8 altri collaboratori

Ultimo aggiornamento il June 14, 2021

15 - 20 minuti
Moderato

Introduzione

Vai al passo 1

This guide shows how to replace an InFocus LP540 Projector Main Board.

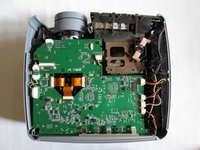
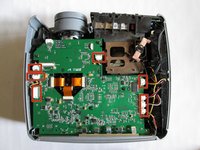
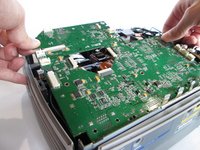
The mainboard of a projector connects all the different functions, and when damaged, can cause the projector to stop working. So, if there are volume, video, connection, or power malfunctions with the projector, that may indicate that the mainboard may need to be replaced.

Cosa ti serve

Strumenti

Mostra di più…

  1. InFocus LP540 Projector Main Board Replacement, Main Board: passo 1, immagine 1 di 3 InFocus LP540 Projector Main Board Replacement, Main Board: passo 1, immagine 2 di 3 InFocus LP540 Projector Main Board Replacement, Main Board: passo 1, immagine 3 di 3
    • Flip the projector right-side up and turn it so that the back ports are facing you.

    • Remove the 7 mm metallic screws using the flat-head screwdriver.

    • Using the T10 Torx screwdriver, remove the two black 10 mm screws located at the center of the back panel.

  2. InFocus LP540 Projector Main Board Replacement: passo 2, immagine 1 di 2 InFocus LP540 Projector Main Board Replacement: passo 2, immagine 2 di 2
    • Flip the projector over.

    • Use the T10 Torx screwdriver head to remove the two 77mm screws located nearest to the back panel ports.

    • Remove the two 10mm screws located near the lens side with the T10 Torx screwdriver head.

    • Flip the projector back over.

    • Lift up the main lid cautiously to avoid ripping the electrical ribbons.

  3. InFocus LP540 Projector Main Board Replacement: passo 3, immagine 1 di 3 InFocus LP540 Projector Main Board Replacement: passo 3, immagine 2 di 3 InFocus LP540 Projector Main Board Replacement: passo 3, immagine 3 di 3
    • Unplug the speaker wire from the circuit board by simultaneously squeezing the sides and pulling.

    • Pull on the brown tabs located at the sides of the white plastic ribbon holder and pull the ribbon out.

    • Remove the top cover.

  4. InFocus LP540 Projector Main Board Replacement: passo 4, immagine 1 di 2 InFocus LP540 Projector Main Board Replacement: passo 4, immagine 2 di 2
    • Hold down the release tabs to remove the cables from the white tabs.

  5. InFocus LP540 Projector Main Board Replacement: passo 5, immagine 1 di 3 InFocus LP540 Projector Main Board Replacement: passo 5, immagine 2 di 3 InFocus LP540 Projector Main Board Replacement: passo 5, immagine 3 di 3
    • Use the T10 Torx screwdriver to remove the five 5mm screws located throughout the motherboard.

    • Pull up the five metal tabs located at the rear of the projector.

    • Do not pull up on the metal tabs too hard or too fast because they can break easily.

  6. InFocus LP540 Projector Main Board Replacement: passo 6, immagine 1 di 3 InFocus LP540 Projector Main Board Replacement: passo 6, immagine 2 di 3 InFocus LP540 Projector Main Board Replacement: passo 6, immagine 3 di 3
    • Remove the three gold ribbons by flipping up the black taps that hold the ribbon in place.

    • Pull the ribbons out carefully and place them under the main board.

    • Carefully lift the entire main board up.

Conclusione

To reassemble your device, follow these instructions in reverse order.

Un'altra persona ha completato questa guida.

Team

Cal Poly, Team 13-17, Regan Winter 2014 Membro di Cal Poly, Team 13-17, Regan Winter 2014

CPSU-REGAN-W14S13G17

6 Membri

5 Guide realizzate

0Commenti sulla guida

Aggiungi Commento

Visualizza Statistiche:

Ultime 24 Ore: 0

Ultimi 7 Giorni: 3

Ultimi 30 Giorni: 15

Tutti i Tempi: 2,233