Salta al contenuto principale

Huawei Watch 2 Battery Assembly Replacement

Cosa ti serve

  1. Huawei Watch 2 Battery Assembly Replacement, Huawei Watch 2 Opening Procedure: passo 1, immagine 1 di 1
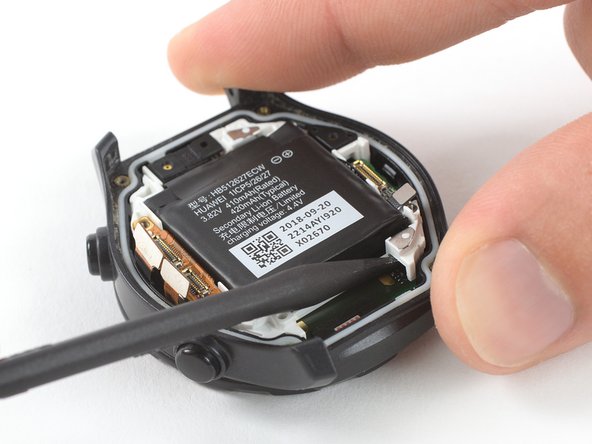
    • Before starting repairs, take your watch off the charger and power it down.

    • Feel free to attach or remove the watch band as needed to provide more control as you make repairs.

  2. Huawei Watch 2 Battery Assembly Replacement: passo 2, immagine 1 di 1
    • Remove the four Torx T2 screws (4.5 mm length).

  3. Huawei Watch 2 Battery Assembly Replacement: passo 3, immagine 1 di 3 Huawei Watch 2 Battery Assembly Replacement: passo 3, immagine 2 di 3 Huawei Watch 2 Battery Assembly Replacement: passo 3, immagine 3 di 3
    • Use a pair of tweezers to remove the four plastic covers sitting next to the watch band holders.

  4. Huawei Watch 2 Battery Assembly Replacement: passo 4, immagine 1 di 3 Huawei Watch 2 Battery Assembly Replacement: passo 4, immagine 2 di 3 Huawei Watch 2 Battery Assembly Replacement: passo 4, immagine 3 di 3
    • Insert an opening tool into the gap between the back cover and the watch case at the bottom edge of the back cover.

    • Use the opening tool to pry up the back cover of the Huawei Watch 2.

    • Do not remove the back cover assembly all the way yet—it's still connected to the mainboard.

  5. Huawei Watch 2 Battery Assembly Replacement: passo 5, immagine 1 di 2 Huawei Watch 2 Battery Assembly Replacement: passo 5, immagine 2 di 2
    • Carefully fold the back cover assembly to the opposite side of the two watch crowns.

  6. Huawei Watch 2 Battery Assembly Replacement, Huawei Watch 2 Battery Disconnect: passo 6, immagine 1 di 1
    • Remove the Phillips #00 screw (1.8 mm length).

  7. Huawei Watch 2 Battery Assembly Replacement: passo 7, immagine 1 di 3 Huawei Watch 2 Battery Assembly Replacement: passo 7, immagine 2 di 3 Huawei Watch 2 Battery Assembly Replacement: passo 7, immagine 3 di 3
    • The heart rate sensor flex cable is attached to the metal shield which covers the battery connector. In order to avoid damage to the flex cable, only grab the metal shield on the bottom end where the Phillips screw was located.

    • Use a pair of tweezers to carefully remove the metal shield.

    • Remove the back cover assembly.

  8. Huawei Watch 2 Battery Assembly Replacement: passo 8, immagine 1 di 2 Huawei Watch 2 Battery Assembly Replacement: passo 8, immagine 2 di 2
    • Use the flat end of a spudger to pry up and disconnect the battery flex cable.

  9. Huawei Watch 2 Battery Assembly Replacement, Battery Assembly: passo 9, immagine 1 di 1
    • Remove the two Phillips #00 screws (1.8 mm length).

  10. Huawei Watch 2 Battery Assembly Replacement: passo 10, immagine 1 di 2 Huawei Watch 2 Battery Assembly Replacement: passo 10, immagine 2 di 2
    • Use a pair of tweezers to remove the metal shield covering the display and the digitizer flex cables.

  11. Huawei Watch 2 Battery Assembly Replacement: passo 11, immagine 1 di 2 Huawei Watch 2 Battery Assembly Replacement: passo 11, immagine 2 di 2
    • Use the flat end of a spudger to pry up and disconnect the digitizer flex cable.

  12. Huawei Watch 2 Battery Assembly Replacement: passo 12, immagine 1 di 2 Huawei Watch 2 Battery Assembly Replacement: passo 12, immagine 2 di 2
    • Use the flat end of a spudger to pry up and disconnect the display flex cable.

  13. Huawei Watch 2 Battery Assembly Replacement: passo 13, immagine 1 di 2 Huawei Watch 2 Battery Assembly Replacement: passo 13, immagine 2 di 2
    • Avoid damaging the resistors on top of the motherboard during the following removal procedure.

    • The motherboard and the battery assembly are held together by two screws on the bottom of the motherboard. In order to replace the battery assembly, you need to pry the full assembly out of the watch frame.

    • Insert the pointed end of a spudger into the recess at the bottom right corner of the white battery frame.

    • Use the spudger to pry up the right corner of the assembly consisting of the battery and the motherboard.

  14. Huawei Watch 2 Battery Assembly Replacement: passo 14, immagine 1 di 2 Huawei Watch 2 Battery Assembly Replacement: passo 14, immagine 2 di 2
    • Insert the pointed end of a spudger into the recess at the bottom left corner of the white battery frame.

    • Use the spudger to pry up the left corner of the assembly consisting of the battery and the motherboard.

  15. Huawei Watch 2 Battery Assembly Replacement: passo 15, immagine 1 di 2 Huawei Watch 2 Battery Assembly Replacement: passo 15, immagine 2 di 2
    • Use a pair of tweezers to remove the battery and motherboard assembly.

  16. Huawei Watch 2 Battery Assembly Replacement: passo 16, immagine 1 di 2 Huawei Watch 2 Battery Assembly Replacement: passo 16, immagine 2 di 2
    • Use a pair of tweezers to remove the black rubber gasket from the microphone next to the top right corner of the battery.

  17. Huawei Watch 2 Battery Assembly Replacement: passo 17, immagine 1 di 1
    • Remove the two Phillips screws (1.8 mm length) from the bottom of the motherboard.

  18. Huawei Watch 2 Battery Assembly Replacement: passo 18, immagine 1 di 3 Huawei Watch 2 Battery Assembly Replacement: passo 18, immagine 2 di 3 Huawei Watch 2 Battery Assembly Replacement: passo 18, immagine 3 di 3
    • Use a pair of tweezers to remove the motherboard from the battery assembly.

    • At this point during reassembly make sure that the flex cable on the bottom side of the battery assembly is connected to the motherboard.

  19. Huawei Watch 2 Battery Assembly Replacement: passo 19, immagine 1 di 1
    • Before reassembly check your new part for any components that might need to be transferred from the old one.

Conclusione

To reassemble your Huawei Watch 2 follow these instructions in reverse.

If possible, turn on your Huawei Watch 2 and test your repair before resealing.

For optimal performance, calibrate your newly installed battery: Charge it to 100% and keep charging it for at least 2 more hours. Then use your device until it shuts off due to low battery. Finally, charge it uninterrupted to 100%.

Take your e-waste to an R2 or e-Stewards certified recycler.

Repair didn’t go as planned? Check out our Answers community for troubleshooting help.

Altre 3 persone hanno completato questa guida.

Team

iFixit Membro di iFixit

Staff

135 Membri

16.732 Guide realizzate

Un commento

Hi, i am looking for a replacement part between the button and the main component. It looks like a black plastic. I am guessing they are here to prevent cutting the metal. The thing is, after some time they are broken.

Could you please guide me on how they are called and where I could get a replacement

Jeffrey N. Carré - Replica

Aggiungi Commento

Visualizza Statistiche:

Ultime 24 Ore: 2

Ultimi 7 Giorni: 12

Ultimi 30 Giorni: 79

Tutti i Tempi: 4,987