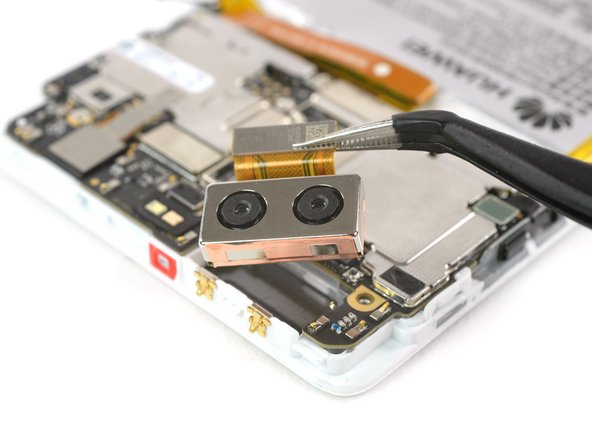
Salta al contenuto principale

Huawei P9 Rear Camera Replacement

Cosa ti serve

  1. Huawei P9 Rear Camera Replacement, Back Cover: passo 1, immagine 1 di 3 Huawei P9 Rear Camera Replacement, Back Cover: passo 1, immagine 2 di 3 Huawei P9 Rear Camera Replacement, Back Cover: passo 1, immagine 3 di 3
    • First switch off your phone and remove the SIM card tray.

    • Unscrew the two Pentalobe P2 screws located at the bottom next to the device's USB C port.

    • If the screen is cracked you might want to use some tape to protect your eyes from glass shreds and get a better grip to open the phone.

  2. Huawei P9 Rear Camera Replacement: passo 2, immagine 1 di 2 Huawei P9 Rear Camera Replacement: passo 2, immagine 2 di 2
    • Avoid to lift only the display instead of the whole phone assembly as doing so may cause damage to the screen.

    • Use an iSclack or a suction handle to separate the phone assembly from the rear panel.

    • In case you can‘t manage to lift the phone assembly out of the rear panel you can insert the pointed end of a spudger in the headphone jack opening and press the phone assembly upwards until you create a gap between assembly and rear panel. Then use the spudger to lever the phone assembly out of the panel.

    • Don't remove the rear panel completely yet. There is a cable connected to it! It is running from the finger print sensor to the display unit.

  3. Huawei P9 Rear Camera Replacement, Fingerprint sensor: passo 3, immagine 1 di 2 Huawei P9 Rear Camera Replacement, Fingerprint sensor: passo 3, immagine 2 di 2
    • Disconnect the fingerprint sensor using a spudger.

  4. Huawei P9 Rear Camera Replacement, Rear Camera: passo 4, immagine 1 di 2 Huawei P9 Rear Camera Replacement, Rear Camera: passo 4, immagine 2 di 2
    • Undo the two Phillips #00 screws.

    • Remove the bracket.

    • Mind the connector underneath.

  5. Huawei P9 Rear Camera Replacement: passo 5, immagine 1 di 2 Huawei P9 Rear Camera Replacement: passo 5, immagine 2 di 2
    • Release the connector.

    • Loosen the camera from the motherboard and take it away.

Conclusione

To reassemble your device, follow these instructions in reverse order. When reassembling your phone apply new adhesive where it is necessary.

Altre 5 persone hanno completato questa guida.

Team

iFixit Membro di iFixit

Staff

135 Membri

16.732 Guide realizzate

0 Commenti

Aggiungi Commento

Visualizza Statistiche:

Ultime 24 Ore: 0

Ultimi 7 Giorni: 2

Ultimi 30 Giorni: 6

Tutti i Tempi: 3,504