Introduzione
Usa questa guida per rimuovere e sostituire il display del tuo smartphone Huawei P10.
Per proteggere gli occhi da schegge di vetro e avere una migliore presa per aprire il telefono, puoi disporre del nastro adesivo sullo schermo.
In fase di rimontaggio, applica del nuovo adesivo dove necessario.
Cosa ti serve
-
-
Spegni il tuo telefono prima di eseguire qualsiasi operazione.
-
Svita le due viti Pentalobe P2 sul fondo.
-
Rimuovi il vassoio della scheda SIM.
-
-
-
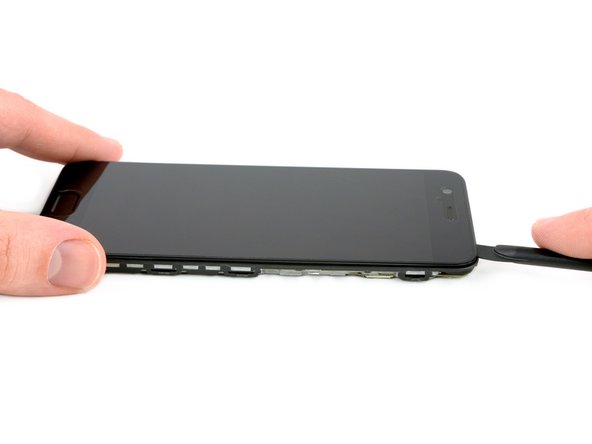
Inserisci uno strumento di apertura in plastica tra il display e il case iniziando dalla parte inferiore del tuo telefono.
-
Stacca con delicatezza dal case il display insieme ai suoi componenti.
-
Dopo aver staccato la parte inferiore, usa lo strumento di apertura per aprire le clip presenti su entrambi i lati.
Hi! I cannot find a way to insert the plastic opening tool. Any suggestions on how I can create a gap to start. Everything seems quit rigid.
Also, where will I find your reply.
vbr/lars.skoldebring@gmail.com
Hi Lars, you might want to use a suction handle to lift the display and create a small gap to insert the plastic tool. If you don’t have a suction handle you can “build” a handle with tape that you stick onto the display in a shape similar to this —> __∏__ (also you may want to edit your post and remove your email address ;) )
Hi,
I’m stuck at this step for about two hours… There’s nothing I can do to open the case. Tried all kinds of opening tools and a suction handle. There is no gap at all between the display and the body. How can anything be inserted into a gap that practically does not exist? Please help.
Sorry to hear that. You could try and lift the display by using a suction cup and pull to create a small gap for a tool to get in.
-
-
-
Apri parzialmente il telefono allontanando le estremità superiori.
-
Usa uno spudger per disconnettere il cavo flessibile dell'accensione e del volume.
Thanks JaL, of course it is.
-
-
-
Rimuovi le due viti a croce Phillips #00.
-
Usa delle pinzette per rimuovere entrambe le piastre metalliche.
-
-
-
-
Rimuovi le quattro viti a croce Phillips #00.
-
Usando delle pinzette, rimuovi la piastra metallica.
-
-
-
Con uno spudger, scollega il cavo flessibile principale.
-
Usa delle pinzette per scollegare il cavo di antenna e tirarlo fuori dal morsetto che lo tiene sulla scheda di ricarica.
Warum soll das Antennenkabel gelöst werden? M.E. schafft dieser Schritt nur ein Risiko das Antennenkabel/den Stecker zu beschädigen.
-
-
-
Usando uno spudger, scollega i cavi del jack cuffie e dell'altoparlante.
Ist das entfernen der Kopfhörerbuchse nötig? M.E. nicht - es besteht vielleicht ein geringes Risiko, diese beim Display entfernen zu beschädigen, aber vermutlich wird man diese eher lösen als beschädigen.
-
-
-
Usa uno spudger per estrarre la scheda di ricarica.
-
Rimuovi la scheda di ricarica.
I didn’t remove the charging board (I didn’t look precisely enough and thought I had to remove the head phone socket which I put back again as it can stay in place) and it didn’t interfer.
Please also include that their might be a small piece of tape over the microphone on the new PCB.
My mic was not working "on ear" but it was working when on speaker.
Found that small piece of tape by comparing the 2 boards, removed the tape and problem solved. -
-
-
Usa uno spudger per estrarre delicatamente l'altoparlante. C'è dell'adesivo sottostante, quindi può opporre un po' di resistenza. Puoi usare un iOpener per ammorbidire la colla.
-
Rimuovi l'altoparlante.
Welchen Klebstoff sollte man hier verwenden?
Hallo Funk Phenomenon,
um den Lautsprecher wieder anzubringen kannst du vorgeschnittene Klebestreifen bestellen. Solltest du hierfür keinen Anbieter finden, kannst du Streifen aus doppelseitigem Klebeband heraus schneiden.
-
-
-
Se non l'hai ancora fatto, rimuovi il cavo di antenna.
-
Usa delle pinzette per staccare il cavo di interconnessione.
-
Usa un iOpener per ammorbidire l'adesivo sotto il display. Prenditi una particolare cura delle parti superiore e inferiore dello schermo.
-
-
-
Inserisci la punta di un plettro di apertura tra il display e il telaio centrale dalla parte inferiore del telefono, vicino al pulsante home.
-
Fai scorrere il plettro di apertura lungo il lato inferiore per tagliare l'adesivo.
-
Fai scorrere il plettro di apertura fino all'angolo inferiore destro e lascialo in posizione.
-
Inserisci un altro plettro di apertura sotto lo schermo nell'angolo inferiore sinistro.
-
-
-
Tira via delicatamente il gruppo display dal telaio.
-
Rimuovi il gruppo display.
Make sure that the flexible pcba is stuck to the screen!!
I noticed that my home button was not working after I connected the new screen. Turns out there were two pieces of double sided tape on the screen. I needed to remove the non-sticking layer and stick the flexible pcba to the screen for the home button to work.
Der Lautsprechergrill muss, sofern das neue Display keinen enthält, entfernt werden.
Ich habe da jetzt ein unschönes Loch - fiel mir beim Testaufbau nicht auf :-( (und bedeutet jetzt eine Stunde arbeit es ggf. zu fixen)
You need to transfer the speaker grill if the new display doesn’t have one.
-


Per rimontare il tuo dispositivo, segui queste istruzioni in ordine inverso.
Per rimontare il tuo dispositivo, segui queste istruzioni in ordine inverso.
Annulla: non ho completato questa guida.
Altre 23 persone hanno completato questa guida.
Un ringraziamento speciale a questi traduttori:
100%

albertob ci sta aiutando ad aggiustare il mondo! Vuoi partecipare?
Inizia a tradurre ›


4 Commenti
Any advice which adhesive to use? I’ve seen a russian replacement video, it looked like the guy was using some kind of silicone.
Little late but maybe this?
I used B-7000 glue. It enables you to release the screen when a second replacement is needed.
Assuming I purchase a screen off of ebay, and replace it using this method, will the touch id still work?
Das Honor 9 hat an der Unterkante keine Schrauben.
Wie ist das Honor 9 zu öffnen?
Michael Tuschek - Replica
Vielleicht beantwortet diese Anleitung deine Frage ;)
Tobias Isakeit -
Hi, my P10 does not have screws, just two tiny holes. Do I push in here to unfasten? Einar, Norway
Einar Ryvarden - Replica
Hi Einar Ryvarden,
in case you bought a used or refurbished phone, someone might have forgotten to put them back in. Since you have holes at the bottom edge next to the charging port this is likely. You can try to start with step 2 and see if you can lift the phone assembly (don’t forget to remove the SIM tray first). As far as I know there is no version of the regular Huawei P10 with no screws. However you there are none in the P10 lite and in the P10 plus, maybe one of the opening procedures for those phones might help you.
Dominik Schnabelrauch -