Salta al contenuto principale
Unisciti alla Community delle riparazioni - Crea un account
How to Unplug the Battery

How to Unplug the Battery

Anna Miller

Anna Miller e 2 altri collaboratori

Ultimo aggiornamento il 22 dic 2022

10 minuti
Moderato

Introduzione

Vai al passo 1

Acer Swift 3 2022.

Model Number: N20C12

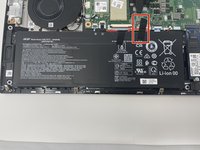
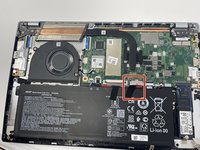
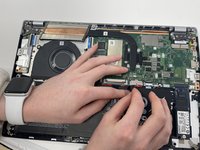
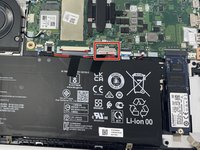
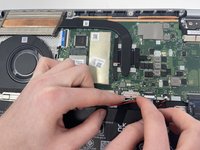
Here is a guide on how to unplug the battery. It is important to have the battery completely unplugged to prevent any electrical damage to the laptop before disassembly. The battery is a piece of hardware that powers the rest of the computer, so it is important to have it unplugged for any disassembly. This will keep your laptop's longevity while fixing those pesky problems.

These five steps will be listed in every guide to ensure the best quality of life for your laptop. It is important to be careful during the 5th step, for it is easy to damage the white plastic plug-in or the attachment on the motherboard.

Cosa ti serve

Strumenti

Mostra di più…

  1. How to Unplug the Battery, Bottom Cover: passo 1, immagine 1 di 1
    • Be sure to power off the laptop before starting.

    • Flip the device over so the bottom panel is facing up.

  2. How to Unplug the Battery: passo 2, immagine 1 di 2 How to Unplug the Battery: passo 2, immagine 2 di 2
    • Remove the eleven 5 mm screws from the back of the device using a TR6 Torx screwdriver.

  3. How to Unplug the Battery: passo 3, immagine 1 di 1
    • Use the iFixit opening tool to pry open the back of the device.

    • Remove the bottom cover from the laptop.

  4. How to Unplug the Battery, How to Unplug the Battery: passo 4, immagine 1 di 3 How to Unplug the Battery, How to Unplug the Battery: passo 4, immagine 2 di 3 How to Unplug the Battery, How to Unplug the Battery: passo 4, immagine 3 di 3
    • Peel back the strip of black tape.

  5. How to Unplug the Battery: passo 5, immagine 1 di 2 How to Unplug the Battery: passo 5, immagine 2 di 2
    • Unplug the group of wires by pulling the white plastic piece towards yourself.

    • Be careful, this piece can be easily damaged.

Conclusione

To reassemble your device, follow these instructions in reverse order.

Un'altra persona ha completato questa guida.

Anna Miller

Membro da: 09/26/22

903 Reputazione

6 Guide realizzate

Team

0Commenti sulla guida

Aggiungi Commento

Visualizza Statistiche:

Ultime 24 Ore: 0

Ultimi 7 Giorni: 13

Ultimi 30 Giorni: 37

Tutti i Tempi: 804