Salta al contenuto principale
Unisciti alla Community delle riparazioni - Crea un account
How to Replace KBD67 Lite R3 Keyboard Switch Spring

How to Replace KBD67 Lite R3 Keyboard Switch Spring

Frank Loi

Frank Loi e un altro collaboratore

Ultimo aggiornamento il 24 nov 2022

10 - 15 minuti
Facile

Introduzione

Vai al passo 1

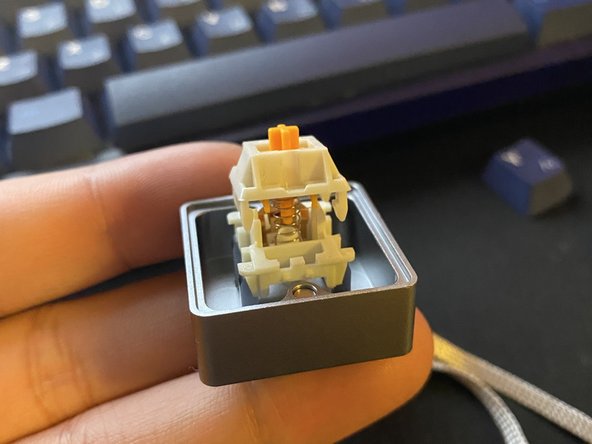
Even though keyboard switches are made to last longer than your average office keyboard, switch springs wear out over time, and you may notice a diminished typing experience. This guide demonstrates how to replace the switch springs in a KBD67 Lite R3 keyboard that is hot-swappable, although this process will be similar for most mechanical keyboards. The switches being used to demonstrate the replacement in this guide are the Glorious Pandas by Glorious Gaming.

Cosa ti serve

Strumenti

Mostra di più…

  1. How to Replace KBD67 Lite R3 Keyboard Switch Spring, Switch Spring: passo 1, immagine 1 di 2 How to Replace KBD67 Lite R3 Keyboard Switch Spring, Switch Spring: passo 1, immagine 2 di 2
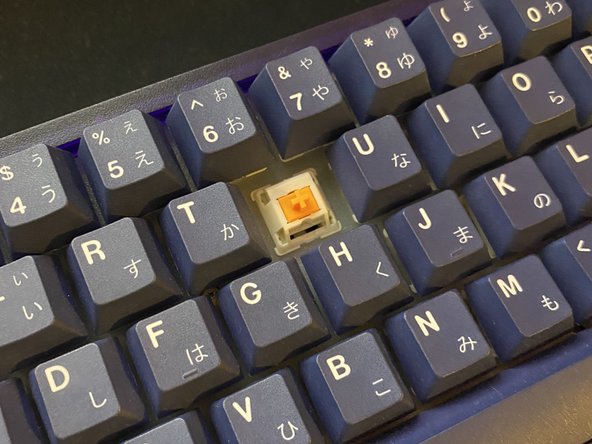
    • Align the keycap puller to the keycap.

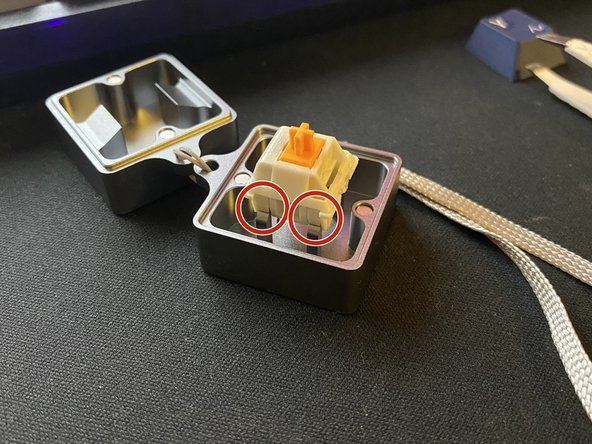
    • Gently pull vertically on the keycap to remove it, exposing the key switch.

  2. How to Replace KBD67 Lite R3 Keyboard Switch Spring: passo 2, immagine 1 di 3 How to Replace KBD67 Lite R3 Keyboard Switch Spring: passo 2, immagine 2 di 3 How to Replace KBD67 Lite R3 Keyboard Switch Spring: passo 2, immagine 3 di 3
    • Align the key switch puller with the key switch that you're removing.

    • Pull the key switch out of the keyboard.

  3. How to Replace KBD67 Lite R3 Keyboard Switch Spring: passo 3, immagine 1 di 3 How to Replace KBD67 Lite R3 Keyboard Switch Spring: passo 3, immagine 2 di 3 How to Replace KBD67 Lite R3 Keyboard Switch Spring: passo 3, immagine 3 di 3
    • Locate the side of the switch that has latches.

    • Place the side of the switch with latches on top of the key switch opener legs.

    • Apply gentle force pushing the switch down on the switch opener to open up the switch.

  4. How to Replace KBD67 Lite R3 Keyboard Switch Spring: passo 4, immagine 1 di 2 How to Replace KBD67 Lite R3 Keyboard Switch Spring: passo 4, immagine 2 di 2
    • Remove the top housing and stem to reveal the switch spring.

    • Remove the switch spring and proceed to replace it with another spring of your choice.

  5. How to Replace KBD67 Lite R3 Keyboard Switch Spring: passo 5, immagine 1 di 3 How to Replace KBD67 Lite R3 Keyboard Switch Spring: passo 5, immagine 2 di 3 How to Replace KBD67 Lite R3 Keyboard Switch Spring: passo 5, immagine 3 di 3
    • Locate the side of the switch that has legs, then place the switch on top of the spring. with the legs facing the metal plate.

    • Push the top and bottom housing together to assemble the switch.

    • Do not do this on the switch opener. The switch opener was used for photography purposes.

  6. How to Replace KBD67 Lite R3 Keyboard Switch Spring: passo 6, immagine 1 di 3 How to Replace KBD67 Lite R3 Keyboard Switch Spring: passo 6, immagine 2 di 3 How to Replace KBD67 Lite R3 Keyboard Switch Spring: passo 6, immagine 3 di 3
    • Locate the switch pin holes on your keyboard.

    • Locate the pins on your key switch and line it up with the keyboard pin holes.

    • Apply gentle force pushing down until it clicks onto place.

  7. How to Replace KBD67 Lite R3 Keyboard Switch Spring: passo 7, immagine 1 di 1
    • Put the key cap back onto the switch.

    • Test the keyboard input and ensure that everything is functioning correctly.

Conclusione

To reassemble your device, follow these instructions in reverse order.

Frank Loi

Membro da: 07/04/22

145 Reputazione

1 Guida realizzata

Team

1Commento della guida

Frank you did an amazing job on this one. I always wondered how to replace a keyboard key and finally you provided a perfect guide. Your introduction covers everything one needs to know including the parts required - thank you for the where to buy links. Talking about the guide it's clear and precise - all steps are documented well with those amazing parts focused pictures. Language is easy to read and understand. After reading your guide I feel more confident now to replace the key or the spring within.

Krushi Patel - Replica

Aggiungi Commento

Visualizza Statistiche:

Ultime 24 Ore: 0

Ultimi 7 Giorni: 4

Ultimi 30 Giorni: 14

Tutti i Tempi: 1,055