Salta al contenuto principale
How to Repair the Buttons on a Logitech Pebble Mouse

How to Repair the Buttons on a Logitech Pebble Mouse

Emma Whitmer

Emma Whitmer e 3 altri collaboratori

Ultimo aggiornamento il June 21, 2023

6 - 10 minuti
Facile

Introduzione

Vai al passo 1

If you need to repair the buttons on your Logitech Pebble M350/M355 mouse, follow this guide. This guide will show you how to disassemble the mouse to reach the scroll wheel and buttons and apply a small amount of lubricant to them.

Many users of this mouse have encountered a problem where the buttons eventually stop working. Since this isn't ideal for a device you use every day, the purpose of our guide is to provide a simple solution for this common problem.

Cosa ti serve

Strumenti

Mostra di più…

iFixit guadagna commissioni quando acquisti tramite questi link.
  1. How to Repair the Buttons on a Logitech Pebble Mouse, How to Repair the Buttons on a Logitech Pebble Mouse: passo 1, immagine 1 di 3 How to Repair the Buttons on a Logitech Pebble Mouse, How to Repair the Buttons on a Logitech Pebble Mouse: passo 1, immagine 2 di 3 How to Repair the Buttons on a Logitech Pebble Mouse, How to Repair the Buttons on a Logitech Pebble Mouse: passo 1, immagine 3 di 3
    • Use your hands to remove the magnetic top panel of the mouse.

  2. How to Repair the Buttons on a Logitech Pebble Mouse: passo 2, immagine 1 di 3 How to Repair the Buttons on a Logitech Pebble Mouse: passo 2, immagine 2 di 3 How to Repair the Buttons on a Logitech Pebble Mouse: passo 2, immagine 3 di 3
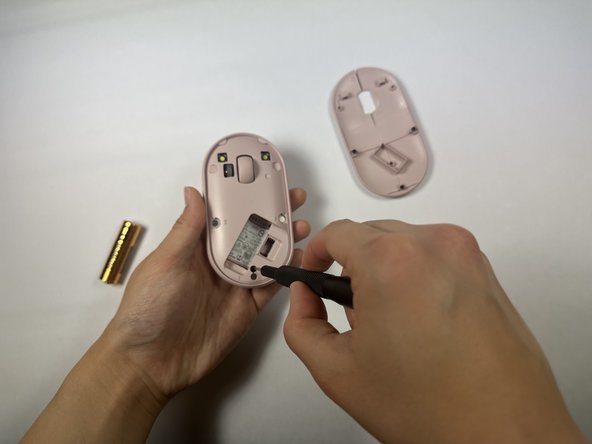
    • Remove the USB adaptor in the small rectangular hole on the lower right corner.

    • Remove the battery.

  3. How to Repair the Buttons on a Logitech Pebble Mouse: passo 3, immagine 1 di 2 How to Repair the Buttons on a Logitech Pebble Mouse: passo 3, immagine 2 di 2
    • Use a Phillips #000 screwdriver to remove one screw holding the inner panel in place.

  4. How to Repair the Buttons on a Logitech Pebble Mouse: passo 4, immagine 1 di 3 How to Repair the Buttons on a Logitech Pebble Mouse: passo 4, immagine 2 di 3 How to Repair the Buttons on a Logitech Pebble Mouse: passo 4, immagine 3 di 3
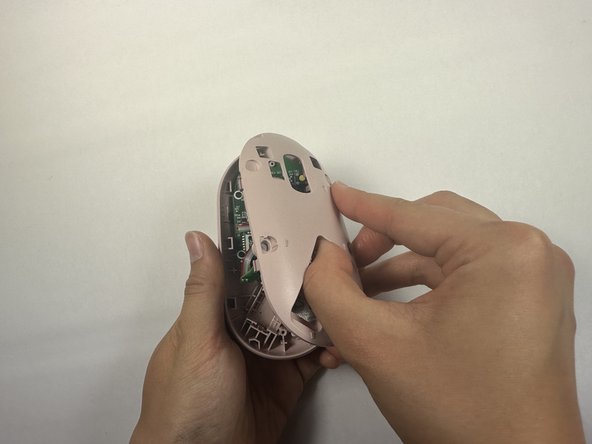
    • Remove the the inner panel.

    • This may take a little bit of effort but it should come off fairly easily.

    • You can use the battery socket as leverage to remove the panel. To avoid breaking the panel, be gentle but firm.

  5. How to Repair the Buttons on a Logitech Pebble Mouse: passo 5, immagine 1 di 1
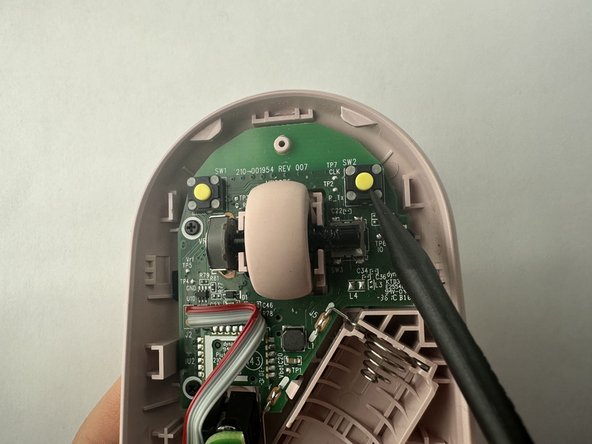
    • Use a fine-tipped object or a Q-tip and dip it in a small amount of oil.

  6. How to Repair the Buttons on a Logitech Pebble Mouse: passo 6, immagine 1 di 3 How to Repair the Buttons on a Logitech Pebble Mouse: passo 6, immagine 2 di 3 How to Repair the Buttons on a Logitech Pebble Mouse: passo 6, immagine 3 di 3
    • Gently wipe the metal axle where the scroll wheel is mounted with a small amount of 3-in-1 oil.

    • Repeat for the left and right click buttons.

Conclusione

To reassemble your device, follow these instructions in reverse order.

Altre 2 persone hanno completato questa guida.

Emma Whitmer

Membro da: 04/19/23

169 Reputazione

1 Guida realizzata

Team

UC Davis, Team 2-6, Morris Spring 2023 Membro di UC Davis, Team 2-6, Morris Spring 2023

UCD-MORRIS-S23S2G6

3 Membri

1 Guida realizzata

3Commenti sulla guida

At first i'm laugh about fixing button with oil, but then i tried it... and it worked like a charm!

Marat - Replica

I didn't even disassemble (unscrew) my pebble. Just applied a drop of mineral oil to the button and it did help a lot! Thanks!

Tomek Luzak - Replica

Hi Emma, Is it fine to use the spray version of wd40 if not what is the difference?

Best

Hakan

Hakan Toptas - Replica

Aggiungi Commento

Visualizza Statistiche:

Ultime 24 Ore: 0

Ultimi 7 Giorni: 32

Ultimi 30 Giorni: 142

Tutti i Tempi: 3,431