Salta al contenuto principale

How to Clean the Condenser Coils in your Whirlpool Refrigerator

Cosa ti serve

  1. How to Clean the Condenser Coils in your Whirlpool Refrigerator, Safety precautions: passo 1, immagine 1 di 1
    • Before you begin your repair, perform the following:

    • Turn off your main water supply

    • Unplug your device

  2. How to Clean the Condenser Coils in your Whirlpool Refrigerator, Unfasten the rear panel: passo 2, immagine 1 di 3 How to Clean the Condenser Coils in your Whirlpool Refrigerator, Unfasten the rear panel: passo 2, immagine 2 di 3 How to Clean the Condenser Coils in your Whirlpool Refrigerator, Unfasten the rear panel: passo 2, immagine 3 di 3
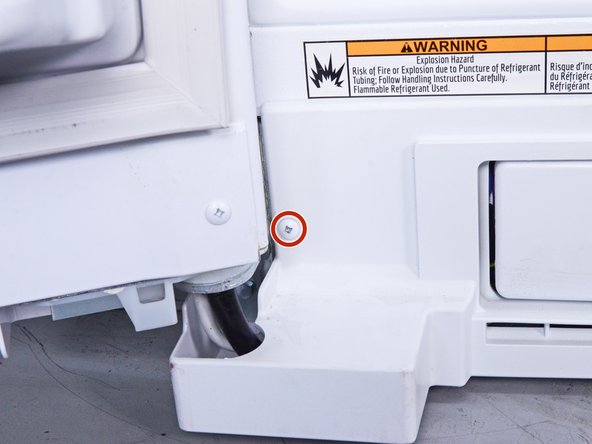
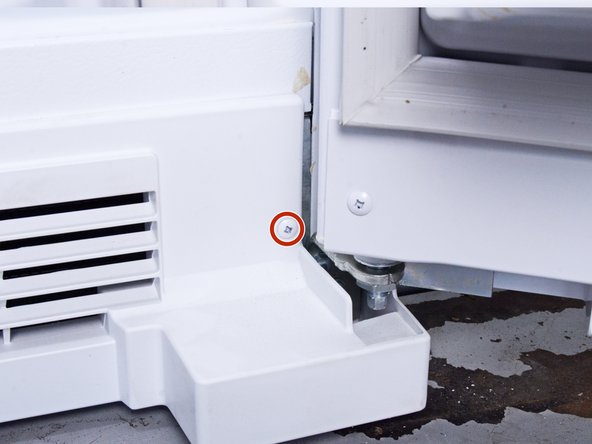
    • Remove the screw(s) securing the rear panel.

    • Loosen the screw securing the water hose enough for the rear panel to freely move.

  3. How to Clean the Condenser Coils in your Whirlpool Refrigerator, Remove the rear panel: passo 3, immagine 1 di 3 How to Clean the Condenser Coils in your Whirlpool Refrigerator, Remove the rear panel: passo 3, immagine 2 di 3 How to Clean the Condenser Coils in your Whirlpool Refrigerator, Remove the rear panel: passo 3, immagine 3 di 3
    • Pull the rear panel off the chassis to remove it.

  4. How to Clean the Condenser Coils in your Whirlpool Refrigerator, Open the doors: passo 4, immagine 1 di 3 How to Clean the Condenser Coils in your Whirlpool Refrigerator, Open the doors: passo 4, immagine 2 di 3 How to Clean the Condenser Coils in your Whirlpool Refrigerator, Open the doors: passo 4, immagine 3 di 3
    • Depending on your repair, open one or both doors.

  5. How to Clean the Condenser Coils in your Whirlpool Refrigerator, Unfasten the front panel: passo 5, immagine 1 di 3 How to Clean the Condenser Coils in your Whirlpool Refrigerator, Unfasten the front panel: passo 5, immagine 2 di 3 How to Clean the Condenser Coils in your Whirlpool Refrigerator, Unfasten the front panel: passo 5, immagine 3 di 3
    • Remove the screw(s) securing the front panel.

  6. How to Clean the Condenser Coils in your Whirlpool Refrigerator, Remove the front panel: passo 6, immagine 1 di 3 How to Clean the Condenser Coils in your Whirlpool Refrigerator, Remove the front panel: passo 6, immagine 2 di 3 How to Clean the Condenser Coils in your Whirlpool Refrigerator, Remove the front panel: passo 6, immagine 3 di 3
    • Pull the front panel straight off the chassis and remove it.

    • You may have to slightly open the water filter door to remove the front panel completely.

  7. How to Clean the Condenser Coils in your Whirlpool Refrigerator, Vacuum the condenser coils: passo 7, immagine 1 di 2 How to Clean the Condenser Coils in your Whirlpool Refrigerator, Vacuum the condenser coils: passo 7, immagine 2 di 2
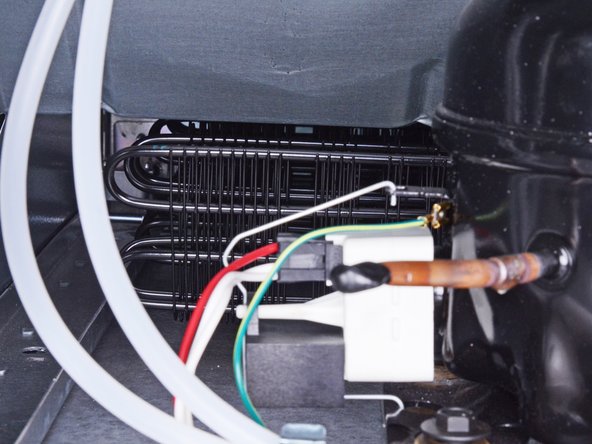
    • Vacuum any dust or debris clinging to the black condenser coils.

Conclusione

To reassemble your device, follow these instructions in reverse order.

Repair didn’t go as planned? Ask our Answers community for help.

Altre 7 persone hanno completato questa guida.

nicO

Membro da: 04/14/15

15.885 Reputazione

88 Guide realizzate

Team

Global Fixers Membro di Global Fixers

Community

33 Membri

544 Guide realizzate

Un commento

Thanks for this, step 5 helped out a lot. I do have to say it is very frustrating trying to clean the coils on this model. The coils have that ‘V’ pattern all the way back which makes it really difficult to get a brush through. You almost need some type of access through the side to do this properly.

Kurt R - Replica

Aggiungi Commento

Visualizza Statistiche:

Ultime 24 Ore: 14

Ultimi 7 Giorni: 65

Ultimi 30 Giorni: 298

Tutti i Tempi: 3,738