Salta al contenuto principale

Hoover WindTunnel 2 Rewind Dust Cup Assembly Replacement

Cosa ti serve

  1. Hoover WindTunnel 2 Rewind Dust Cup Assembly Replacement, Primary Air Filter: passo 1, immagine 1 di 1
    • Press button on the top of the dust cup and pull back.

    • Remove dust cup from vacuum

  2. Hoover WindTunnel 2 Rewind Dust Cup Assembly Replacement: passo 2, immagine 1 di 1
    • Pull back on black lever and rotate dust cup lid back.

  3. Hoover WindTunnel 2 Rewind Dust Cup Assembly Replacement: passo 3, immagine 1 di 1
    • Lift up on fabric flap to remove filter from vaccum

    • If you wish to clean the filter rather than replace it, it can be washed under a faucet.

    • If washing the filter, make sure it fully dries out before re-installing.

  4. Hoover WindTunnel 2 Rewind Dust Cup Assembly Replacement, Dust Cup Assembly: passo 4, immagine 1 di 1
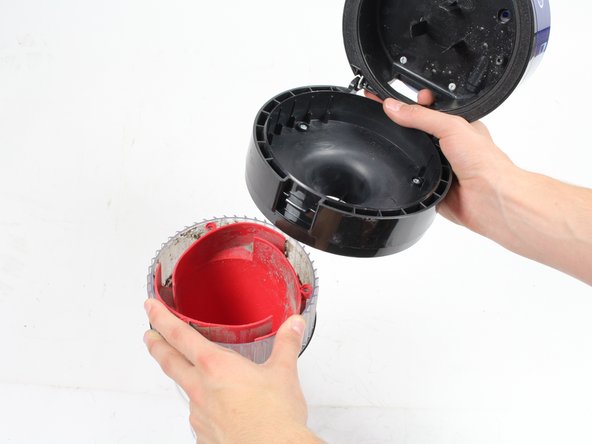
    • Holding onto both the top handle and dust cup body, twist the two components apart following the instructions printed on the back.

  5. Hoover WindTunnel 2 Rewind Dust Cup Assembly Replacement: passo 5, immagine 1 di 2 Hoover WindTunnel 2 Rewind Dust Cup Assembly Replacement: passo 5, immagine 2 di 2
    • Unscrew the three 4 cm Phillips #3 screws located inside the dust filter compartment to detach the dust filter system.

Conclusione

To reassemble your device, follow these instructions in reverse order.

Un'altra persona ha completato questa guida.

Chino Cruz

Membro da: 01/22/18

135 Reputazione

1 Guida realizzata

Team

Cal Poly, Team S11-G4, Banghart Winter 2018 Membro di Cal Poly, Team S11-G4, Banghart Winter 2018

CPSU-BANGHART-W18S11G4

5 Membri

10 Guide realizzate

0 Commenti

Aggiungi Commento

Visualizza Statistiche:

Ultime 24 Ore: 2

Ultimi 7 Giorni: 11

Ultimi 30 Giorni: 44

Tutti i Tempi: 4,597