Salta al contenuto principale

Honda S2000 VTEC Solenoid Upper Replacement

Cosa ti serve

  1. Honda S2000 VTEC Solenoid Upper Replacement, VTEC Solenoid Upper: passo 1, immagine 1 di 2 Honda S2000 VTEC Solenoid Upper Replacement, VTEC Solenoid Upper: passo 1, immagine 2 di 2
    • Locate Vtec Solenoid on front left of engine.

  2. Honda S2000 VTEC Solenoid Upper Replacement: passo 2, immagine 1 di 3 Honda S2000 VTEC Solenoid Upper Replacement: passo 2, immagine 2 di 3 Honda S2000 VTEC Solenoid Upper Replacement: passo 2, immagine 3 di 3
    • Locate and remove 3 bolts.

    • Do not drop cable that is attached by a bolt.

  3. Honda S2000 VTEC Solenoid Upper Replacement: passo 3, immagine 1 di 3 Honda S2000 VTEC Solenoid Upper Replacement: passo 3, immagine 2 di 3 Honda S2000 VTEC Solenoid Upper Replacement: passo 3, immagine 3 di 3
    • Pull the plug upwards off of metal cable holder, and then disconnect the two cables.

  4. Honda S2000 VTEC Solenoid Upper Replacement: passo 4, immagine 1 di 3 Honda S2000 VTEC Solenoid Upper Replacement: passo 4, immagine 2 di 3 Honda S2000 VTEC Solenoid Upper Replacement: passo 4, immagine 3 di 3
    • Remove the metal cable holder and set it to the side.

    • Pull off the upper Vtec Solenoid.

  5. Honda S2000 VTEC Solenoid Upper Replacement: passo 5, immagine 1 di 3 Honda S2000 VTEC Solenoid Upper Replacement: passo 5, immagine 2 di 3 Honda S2000 VTEC Solenoid Upper Replacement: passo 5, immagine 3 di 3
    • Grab a new replacement upper Solenoid.

    • Place the gasket (new or used if still good) into its slot.

    • Spread a small amount of oil all along the gasket.

  6. Honda S2000 VTEC Solenoid Upper Replacement: passo 6, immagine 1 di 2 Honda S2000 VTEC Solenoid Upper Replacement: passo 6, immagine 2 di 2
    • Insert wisdom here.

  7. Honda S2000 VTEC Solenoid Upper Replacement: passo 7, immagine 1 di 3 Honda S2000 VTEC Solenoid Upper Replacement: passo 7, immagine 2 di 3 Honda S2000 VTEC Solenoid Upper Replacement: passo 7, immagine 3 di 3
    • Grab metal cable holder and place one of the bolts into it.

    • Hand tighten all three bolts.

    • Ensure the metal cable holder is straight.

  8. Honda S2000 VTEC Solenoid Upper Replacement: passo 8, immagine 1 di 3 Honda S2000 VTEC Solenoid Upper Replacement: passo 8, immagine 2 di 3 Honda S2000 VTEC Solenoid Upper Replacement: passo 8, immagine 3 di 3
    • Tighten all 3 bolts with a ratchet.

    • Plug the cable back in, and attach it to the metal holder.

  9. Honda S2000 VTEC Solenoid Upper Replacement: passo 9, immagine 1 di 2 Honda S2000 VTEC Solenoid Upper Replacement: passo 9, immagine 2 di 2
    • Wipe down the edges where the two parts meet to pick up any oil that may have spilled.

    • Keep a eye on solenoid for any oil leaking after cleaning.

Conclusione

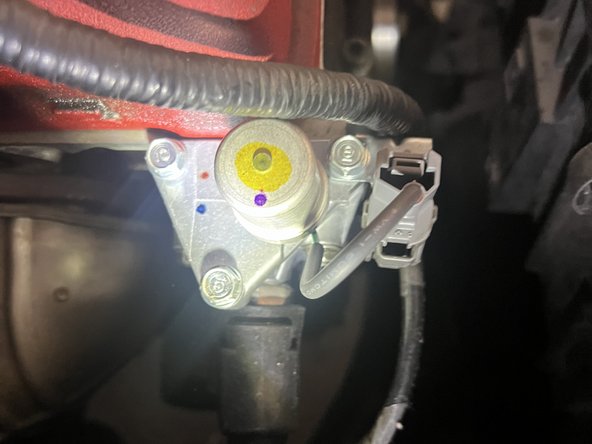
You now have a proper working Solenoid, Just make sure to keep an eye on the solenoid in case of any oil leaks

Angeljauregui

Membro da: 03/12/24

169 Reputazione

1 Guida realizzata

Team

0 Commenti

Aggiungi Commento

Visualizza Statistiche:

Ultime 24 Ore: 1

Ultimi 7 Giorni: 6

Ultimi 30 Giorni: 29

Tutti i Tempi: 65