Salta al contenuto principale

Questa guida ha delle modifiche più recenti. Passa all'ultima versione non verificata.

Harman Kardon Onyx Studio 2 Speakers Replacement

Cosa ti serve

  1. Harman Kardon Onyx Studio 2 Speakers Replacement, Front Panel: passo 1, immagine 1 di 3 Harman Kardon Onyx Studio 2 Speakers Replacement, Front Panel: passo 1, immagine 2 di 3 Harman Kardon Onyx Studio 2 Speakers Replacement, Front Panel: passo 1, immagine 3 di 3
    • Using a plastic opening tool, pry off the front grill by wedging it in the notch on the front of the device.

  2. Harman Kardon Onyx Studio 2 Speakers Replacement: passo 2, immagine 1 di 2 Harman Kardon Onyx Studio 2 Speakers Replacement: passo 2, immagine 2 di 2
    • Remove the five 14.4 mm T10 Torx screws.

  3. Harman Kardon Onyx Studio 2 Speakers Replacement: passo 3, immagine 1 di 1
    • Gently pull the front apart from the back.

  4. Harman Kardon Onyx Studio 2 Speakers Replacement: passo 4, immagine 1 di 2 Harman Kardon Onyx Studio 2 Speakers Replacement: passo 4, immagine 2 di 2
    • Remove the four wires connecting the front and back panels.

    • Pinch the connector tab and pull gently upwards.

    • Repeat for the other three connectors.

  5. Harman Kardon Onyx Studio 2 Speakers Replacement, Control Board: passo 5, immagine 1 di 1
    • Pull the silicone button band off of the outer edge of the speaker.

  6. Harman Kardon Onyx Studio 2 Speakers Replacement: passo 6, immagine 1 di 2 Harman Kardon Onyx Studio 2 Speakers Replacement: passo 6, immagine 2 di 2
    • Disconnect the two pressure connections from the circuit board.

  7. Harman Kardon Onyx Studio 2 Speakers Replacement: passo 7, immagine 1 di 2 Harman Kardon Onyx Studio 2 Speakers Replacement: passo 7, immagine 2 di 2
    • Gently remove the control board band by placing fingers in contact with it through the button openings.

    • Work from the outer edges in so as not to bend the band.

  8. Harman Kardon Onyx Studio 2 Speakers Replacement, Circuit Board: passo 8, immagine 1 di 2 Harman Kardon Onyx Studio 2 Speakers Replacement, Circuit Board: passo 8, immagine 2 di 2
    • Disconnect the remaining connectors from the circuit board.

    • Disconnect the Bluetooth antenna.

  9. Harman Kardon Onyx Studio 2 Speakers Replacement: passo 9, immagine 1 di 2 Harman Kardon Onyx Studio 2 Speakers Replacement: passo 9, immagine 2 di 2
    • Remove the four 10 mm T10 Torx screws.

    • Pull the circuit board out of the device as it is now free.

  10. Harman Kardon Onyx Studio 2 Speakers Replacement, Speakers: passo 10, immagine 1 di 1
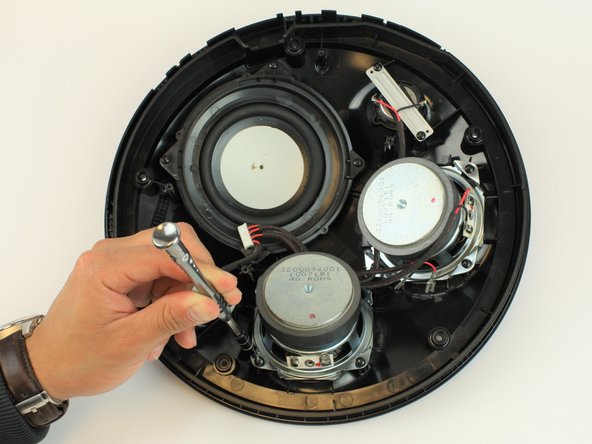
    • Using the metal spudger, gently pry off the two red and black connectors.

  11. Harman Kardon Onyx Studio 2 Speakers Replacement: passo 11, immagine 1 di 2 Harman Kardon Onyx Studio 2 Speakers Replacement: passo 11, immagine 2 di 2
    • Remove the four 14.3 mm T10 Torx screws.

  12. Harman Kardon Onyx Studio 2 Speakers Replacement: passo 12, immagine 1 di 1
    • Pull out the speaker, and if necessary follow these steps to replace the other identical speaker.

Conclusione

To reassemble your device, follow these instructions in reverse order.

Altre 7 persone hanno completato questa guida.

Team

USF Tampa, Team 16-5, Blackwell Spring 2017 Membro di USF Tampa, Team 16-5, Blackwell Spring 2017

USFT-BLACKWELL-S17S16G5

3 Membri

24 Guide realizzate

2 Commenti

Hi, do anyone know sparepart number for woofer elements?

Mikko Lehto - Replica

Hello.. what is the wattage of the speaker? and where can i get a replacement. how much?

James Santiago - Replica

Aggiungi Commento

Visualizza Statistiche:

Ultime 24 Ore: 0

Ultimi 7 Giorni: 25

Ultimi 30 Giorni: 83

Tutti i Tempi: 19,517