Salta al contenuto principale

Questa guida ha delle modifiche più recenti. Passa all'ultima versione non verificata.

HTC myTouch 3G Motherboard Replacement

Cosa ti serve

  1. HTC myTouch 3G Motherboard Replacement, Motherboard: passo 1, immagine 1 di 2 HTC myTouch 3G Motherboard Replacement, Motherboard: passo 1, immagine 2 di 2
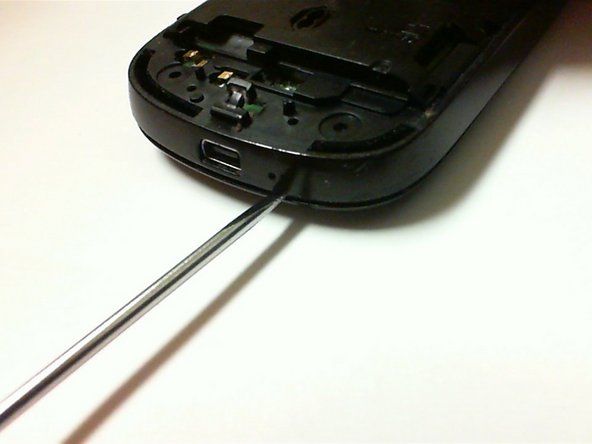
    • Press each thumb on both sides of the upper corners and apply pressure downwards.

    • Then, while still applying pressure, slide the back cover down.

  2. HTC myTouch 3G Motherboard Replacement: passo 2, immagine 1 di 2 HTC myTouch 3G Motherboard Replacement: passo 2, immagine 2 di 2
    • Remove the Battery.

    • Remove the SIM card.

  3. HTC myTouch 3G Motherboard Replacement: passo 3, immagine 1 di 1
    • Push the SD card in and the SD card should pop loose.

    • Pull the SD card out.

  4. HTC myTouch 3G Motherboard Replacement: passo 4, immagine 1 di 2 HTC myTouch 3G Motherboard Replacement: passo 4, immagine 2 di 2
    • Remove the four 6-mm T5 torx screws in the four corners.

    • Remove the two 4-mm T5 torx screws in the middle.

  5. HTC myTouch 3G Motherboard Replacement: passo 5, immagine 1 di 2 HTC myTouch 3G Motherboard Replacement: passo 5, immagine 2 di 2
    • Use the existing gap, to dislodge the antenna cover from the phone.

    • Pull out the antenna cover to have access to the motherboard.

  6. HTC myTouch 3G Motherboard Replacement: passo 6, immagine 1 di 2 HTC myTouch 3G Motherboard Replacement: passo 6, immagine 2 di 2
    • Use a precision flathead screwdriver to dislodge the back plate from the phone by carefully inserting it into the slit between the frame and cover and pushing downward.

    • Go around the edges of the phone, and continue to dislodge the back plate from the front part of the phone.

  7. HTC myTouch 3G Motherboard Replacement: passo 7, immagine 1 di 2 HTC myTouch 3G Motherboard Replacement: passo 7, immagine 2 di 2
    • Remove the 3-mm Phillips head screw located on the side of the bottom left-hand corner of the phone.

    • Remove the 3-mm Phillips head screw located on the top right-hand corner of the phone.

    • Do not remove any of the screws located on the actual circuit boards.

  8. HTC myTouch 3G Motherboard Replacement: passo 8, immagine 1 di 3 HTC myTouch 3G Motherboard Replacement: passo 8, immagine 2 di 3 HTC myTouch 3G Motherboard Replacement: passo 8, immagine 3 di 3
    • Place a finger between the circuit board and the front cover, and lift up gently.

    • Continue separating the circuit board from the front cover and screen and watch for a ribbon cable to detach.

    • Finish separating the circuit board from the front panel.

Conclusione

To reassemble your device, follow these instructions in reverse order.

Altre 2 persone hanno completato questa guida.

Tony Tran

Membro da: 09/25/12

381 Reputazione

3 Guide realizzate

Team

Cal Poly, Team 2-9, Propen Fall 2012 Membro di Cal Poly, Team 2-9, Propen Fall 2012

CPSU-PROPEN-F12S2G9

3 Membri

10 Guide realizzate

0 Commenti

Aggiungi Commento

Visualizza Statistiche:

Ultime 24 Ore: 0

Ultimi 7 Giorni: 0

Ultimi 30 Giorni: 0

Tutti i Tempi: 1,491