Questa versione può contenere modifiche errate. Passa all'ultima istantanea verificata.
Cosa ti serve
-
Questo passaggio è privo di traduzione. Aiuta a tradurlo
-
Turn over the Vive controller so that the bottom saucer is facing up.
-
Use the T5 Torx screwdriver to remove three black 21mm screws from the bottom saucer.
-
-
Questo passaggio è privo di traduzione. Aiuta a tradurlo
-
Use the nylon spudger to separate the top and bottom saucer covers all around the edges.
-
Remove only the top saucer cover by pulling up with your hand.
-
-
Questo passaggio è privo di traduzione. Aiuta a tradurlo
-
Use the Phillips 00 screwdriver to remove the three silver 12.8mm screws from the exposed upper sensor panel.
-
-
Questo passaggio è privo di traduzione. Aiuta a tradurlo
-
Carefully pull away the bottom saucer cover with your hand.
-
-
Questo passaggio è privo di traduzione. Aiuta a tradurlo
-
Use the T5 Torx screwdriver to remove the two black 5.2mm screws on the back gray panel.
-
-
Questo passaggio è privo di traduzione. Aiuta a tradurlo
-
Turn over the Vive controller so that the exposed bottom saucer panel is facing up.
-
Use the T5 Torx screwdriver to remove the three black 5.2mm screws.
-
-
Questo passaggio è privo di traduzione. Aiuta a tradurlo
-
Use the nylon spudger to separate the front panel gently by running the spudger around the edges of the handle.
-
Gently lift the right side of the panel to the left.
-
-
-
Questo passaggio è privo di traduzione. Aiuta a tradurlo
-
Disconnect the upper ribbon cable gently by pulling the ribbon up and away from the motherboard with two fingers.
-
-
Questo passaggio è privo di traduzione. Aiuta a tradurlo
-
Disconnect the middle ribbon cable gently by pulling the ribbon cable up and away from the motherboard with two fingers.
-
-
Questo passaggio è privo di traduzione. Aiuta a tradurlo
-
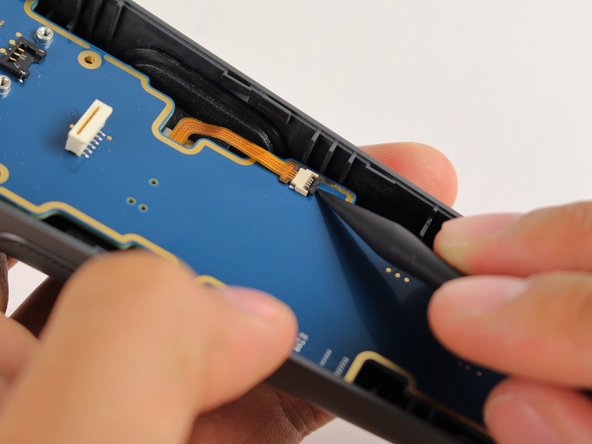
Use the nylon spudger to lift the white tab by 90 degrees.
-
Disconnect the bottom ribbon cable gently by pulling the ribbon cable down with two fingers.
-
-
Questo passaggio è privo di traduzione. Aiuta a tradurlo
-
Use the Phillips 00 screwdriver to remove two black 2.8mm screws from the silver plate.
-
Use the Phillips 00 screwdriver to remove the black 5.8mm screw from the bottom right corner of the silver plate.
-
-
Questo passaggio è privo di traduzione. Aiuta a tradurlo
-
Remove the silver plate by pinching it with two fingers and lifting up.
-
-
Questo passaggio è privo di traduzione. Aiuta a tradurlo
-
Use the Phillips 00 screwdriver to remove the black 5.8mm screw from the top left of the battery frame.
-
-
Questo passaggio è privo di traduzione. Aiuta a tradurlo
-
Use the T5 Torx screwdriver to remove the two silver 4.2mm screws from the bottom of the battery frame.
-
-
Questo passaggio è privo di traduzione. Aiuta a tradurlo
-
Disconnect the three-pin cable gently by pinching the cable with two fingers and pulling up.
-
-
Questo passaggio è privo di traduzione. Aiuta a tradurlo
-
Lift the battery frame to remove the battery from the Vive controller
-
-
Questo passaggio è privo di traduzione. Aiuta a tradurlo
-
Use the Phillips 00 screwdriver to remove the two black 5.8mm screws from the top of the motherboard.
-
-
Questo passaggio è privo di traduzione. Aiuta a tradurlo
-
Use the T5 Torx screwdriver to remove the two silver 4.2mm screws from the bottom of the motherboard.
-
-
Questo passaggio è privo di traduzione. Aiuta a tradurlo
-
Use the nylon spudger to rotate the black tab up by 90 degrees.
-
Disconnect the ribbon cable carefully with your finger.
-
-
Questo passaggio è privo di traduzione. Aiuta a tradurlo
-
Lift the motherboard up and out of the Vive controller using your hands.
-


Annulla: non ho completato questa guida.
Altre 9 persone hanno completato questa guida.
Team

Cal Poly, Team S15-G5, Livingston Fall 2017 Membro di Cal Poly, Team S15-G5, Livingston Fall 2017
CPSU-LIVINGSTON-F17S15G5
4 Membri
51 Guide realizzate
13 Commenti
Hi, do you know where I can get a new motherboard? I bought my controller second hand and after several months it stoppedworking…. when I took it apart the connection at the bottom has been removed and two wires soldered in place but it’s so small I can’t do it again so I need a new motherboard
thanks
I am looking for the connetor at step 10. The top of the connector is broken (fail quality assurence). I am not interrested to purchase a new controler at 200$ because of a 2 cents connector.
Thank you
I had the same connector problem in step 10, where can I just buy the mother board
did either of you find the connector for the power button to mother board in step 10