Questa versione può contenere modifiche errate. Passa all'ultima istantanea verificata.
Cosa ti serve
-
-
Riempi una pentola o una padella con abbastanza acqua per immergerci un iOpener.
-
Scalda l'acqua finché non bolle. Spegni il fuoco.
-
Posiziona l'iOpener nell'acqua calda per 2-3 minuti. Assicurati che l'iOpener sia completamente immerso nell'acqua.
-
Usa delle pinze per estrarre l'iOpener scaldato dall'acqua calda.
-
Asciuga accuratamente l'iOpener con un asciugamano.
-
Il tuo iOpener è pronto all'uso! Se devi scaldare di nuovo l'iOpener, scalda l'acqua fino all'ebollizione, spegni il fuoco e immergi l'iOpener in acqua per 2-3 minuti.
-
-
Questo passaggio è privo di traduzione. Aiuta a tradurlo
-
Handling it by the tag, place the heated iOpener across the bottom casing.
-
-
Questo passaggio è privo di traduzione. Aiuta a tradurlo
-
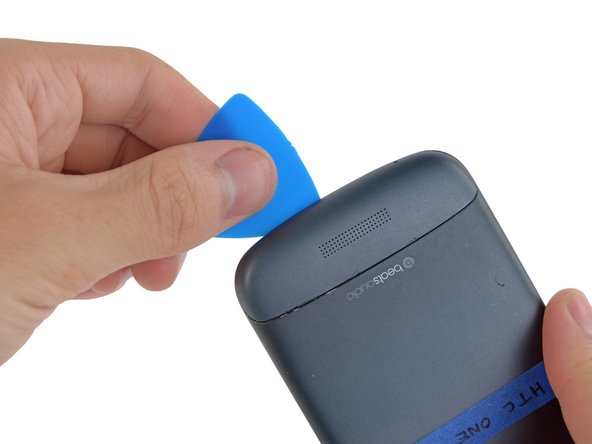
Gently place an opening pick in the corner of the gap between the bottom casing and rear case.
-
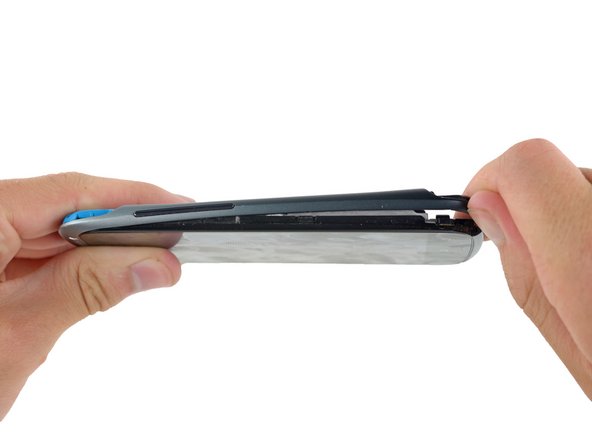
Slide the opening pick along the side of the casing, prying it away from the adhesive as you go.
-
-
Questo passaggio è privo di traduzione. Aiuta a tradurlo
-
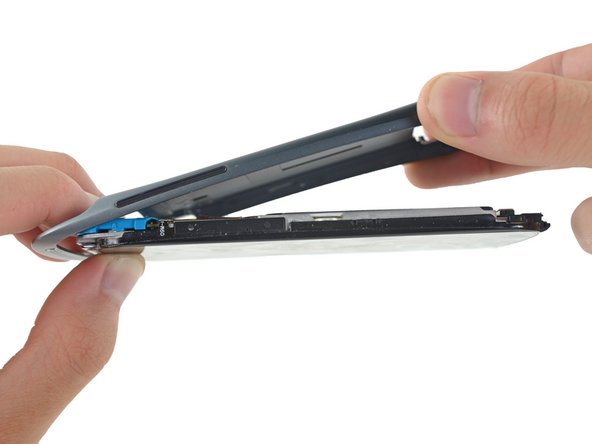
Use your fingers to pull the bottom casing off the rest of the phone.
-
-
Questo passaggio è privo di traduzione. Aiuta a tradurlo
-
Starting at the groove near the headphone jack, use a plastic opening tool to lift the top casing.
-
-
Questo passaggio è privo di traduzione. Aiuta a tradurlo
-
Use your fingers to pull the top casing off of the rest of the phone.
-
-
Questo passaggio è privo di traduzione. Aiuta a tradurlo
-
Remove the following screws holding the rear case to the rest of the phone:
-
Two 3.15 mm Phillips #00 screws
-
One 4.15 Torx T5 screw
-
One 4 mm Torx T5 screw
-
-
-
Questo passaggio è privo di traduzione. Aiuta a tradurlo
-
Place your fingers on either side of the phone and gently push up on the rear case.
-
-
Questo passaggio è privo di traduzione. Aiuta a tradurlo
-
Pull the rear case away from the rest of the phone with your hands.
-
-
Questo passaggio è privo di traduzione. Aiuta a tradurlo
-
Using the pointed end of a spudger, lift the battery cable and release the connector.
-
-
Questo passaggio è privo di traduzione. Aiuta a tradurlo
-
Switching to the flat end of the spudger, work your way underneath the battery and peel it away from the adhesive.
-
-
Questo passaggio è privo di traduzione. Aiuta a tradurlo
-
Remove the three 3.15mm Phillips #00 screws from the turquoise case.
-
-
Questo passaggio è privo di traduzione. Aiuta a tradurlo
-
Using a plastic opening tool, lift the turquoise case from the end near the headphone jack.
-
-
Questo passaggio è privo di traduzione. Aiuta a tradurlo
-
A camera filter is now free to move, so remove it using tweezers.
-
-
Questo passaggio è privo di traduzione. Aiuta a tradurlo
-
Use tweezers to lift the yellow polyimide tape that covers the ZIF connectors.
-
-
Questo passaggio è privo di traduzione. Aiuta a tradurlo
-
Use the pointed end of a spudger to lift the white tab on the largest ZIF connector opposite the USB connector.
-
-
Questo passaggio è privo di traduzione. Aiuta a tradurlo
-
Use the pointed edge of a spudger to work the ZIF cable out of its connector.
-
-
Questo passaggio è privo di traduzione. Aiuta a tradurlo
-
Repeat the procedure from steps 19 and 20 to remove the cables from the remaining ZIF connectors.
-
-
Questo passaggio è privo di traduzione. Aiuta a tradurlo
-
Using the pointed end of the spudger, pop the antenna cable from its connector on the motherboard.
-
-
Questo passaggio è privo di traduzione. Aiuta a tradurlo
-
Remove the 3.15 mm Phillips #00 screw from the motherboard.
-
-
Questo passaggio è privo di traduzione. Aiuta a tradurlo
-
Remove the motherboard from the rest of the phone.
-
-
Questo passaggio è privo di traduzione. Aiuta a tradurlo
-
Similar to step 18, remove the polyimide tape with tweezers.
-
-
Questo passaggio è privo di traduzione. Aiuta a tradurlo
-
Following the procedure from steps 19 & 20, open and disconnect the ZIF cable close to the center of the circuit board.
-
-
Questo passaggio è privo di traduzione. Aiuta a tradurlo
-
Use tweezers to lift and remove the rear camera from the logic board.
-


Team

Cal Poly, Team 10-55, Amido Spring 2014 Membro di Cal Poly, Team 10-55, Amido Spring 2014
CPSU-AMIDO-S14S10G55
4 Membri
31 Guide realizzate