Salta al contenuto principale

Questa versione può contenere modifiche errate. Passa all'ultima istantanea verificata.

Cosa ti serve

  1. , Riscaldamento iOpener: passo 1, immagine 1 di 2 , Riscaldamento iOpener: passo 1, immagine 2 di 2
    • Ti raccomandiamo di pulire il tuo forno a microonde prima dell'operazione, perché ignobili entità unte e appiccicose potrebbero attaccarsi all'iOpener.

    • Disponi l'iOpener al centro del tuo forno a microonde.

    • Per forni a microonde con piatto rotante: assicurati che il piatto giri liberamente. Se l'iOpener si incastrasse da qualche parte, potrebbe surriscaldarsi e bruciare.

  2. : passo 2, immagine 1 di 1
    • Riscalda l'iOpener per 30 secondi.

    • Se durante la riparazione l'iOpener si raffredda, scaldalo di nuovo nel microonde per altri 30 secondi.

    • Fai attenzione a non surriscaldare l'iOpener durante l'operazione. Il surriscaldamento potrebbe far esplodere l'iOpener. Non scaldare sopra i 100°C (212°F)

    • Non toccare mai l'iOpener se appare gonfio.

    • Se l'iOpener è ancora troppo caldo in mezzo per poterlo toccare, continua a utilizzarlo mentre attendi che si raffreddi un po' prima di scaldarlo di nuovo. Un iOpener riscaldato correttamente dovrebbe rimanere caldo fino a 10 minuti.

  3. : passo 3, immagine 1 di 1
    • Rimuovi l'iOpener dal forno a microonde, afferrandolo per una delle due estremità piatte per evitare il contatto con la parte centrale calda.

    • L'iOpener sarà davvero caldissimo, perciò fai attenzione quando lo maneggi. Usa una presina da forno, se necessario.

  4. , Metodo di riscaldamento alternativo per l'iOpener: passo 4, immagine 1 di 2 , Metodo di riscaldamento alternativo per l'iOpener: passo 4, immagine 2 di 2
    • Se non hai un microonde, segui questo passo per scaldare il tuo iOpener in acqua bollente.

    • Riempi una pentola o una padella con abbastanza acqua per immergerci un iOpener.

    • Scalda l'acqua finché non bolle. Spegni il fuoco.

    • Posiziona l'iOpener nell'acqua calda per 2-3 minuti. Assicurati che l'iOpener sia completamente immerso nell'acqua.

    • Usa delle pinze per estrarre l'iOpener scaldato dall'acqua calda.

    • Asciuga accuratamente l'iOpener con un asciugamano.

    • L'iOpener sarà molto caldo, quindi fai attenzione e tienilo solo dalle linguette alle estremità.

    • Il tuo iOpener è pronto all'uso! Se devi scaldare di nuovo l'iOpener, scalda l'acqua fino all'ebollizione, spegni il fuoco e immergi l'iOpener in acqua per 2-3 minuti.

  5. Questo passaggio è privo di traduzione. Aiuta a tradurlo

    : passo 5, immagine 1 di 1
    • Handling it by the tag, place the heated iOpener across the bottom casing.

    • Let the iOpener sit for at least a minute to soften the adhesive beneath the casing.

  6. Questo passaggio è privo di traduzione. Aiuta a tradurlo

    : passo 6, immagine 1 di 3 : passo 6, immagine 2 di 3 : passo 6, immagine 3 di 3
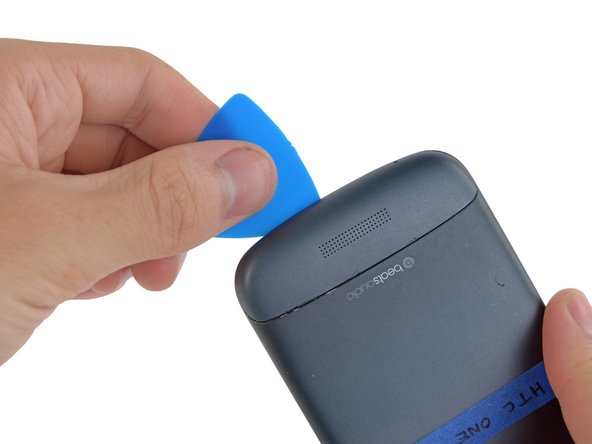
    • Gently place an opening pick in the corner of the gap between the bottom casing and rear case.

    • Slide the opening pick along the side of the casing, prying it away from the adhesive as you go.

  7. Questo passaggio è privo di traduzione. Aiuta a tradurlo

    : passo 7, immagine 1 di 1
    • Use your fingers to pull the bottom casing off the rest of the phone.

  8. Questo passaggio è privo di traduzione. Aiuta a tradurlo

    : passo 8, immagine 1 di 2 : passo 8, immagine 2 di 2
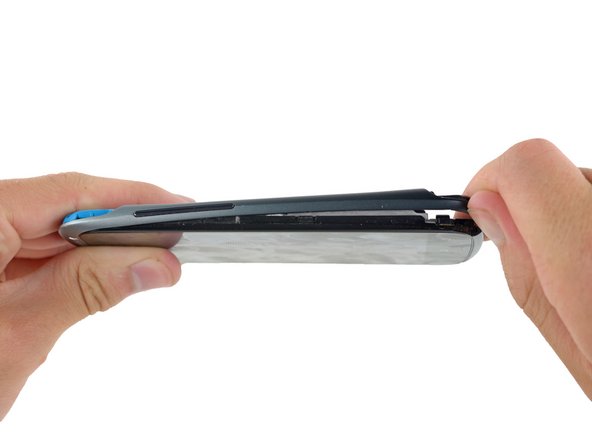
    • Starting at the groove near the headphone jack, use a plastic opening tool to lift the top casing.

  9. Questo passaggio è privo di traduzione. Aiuta a tradurlo

    : passo 9, immagine 1 di 1
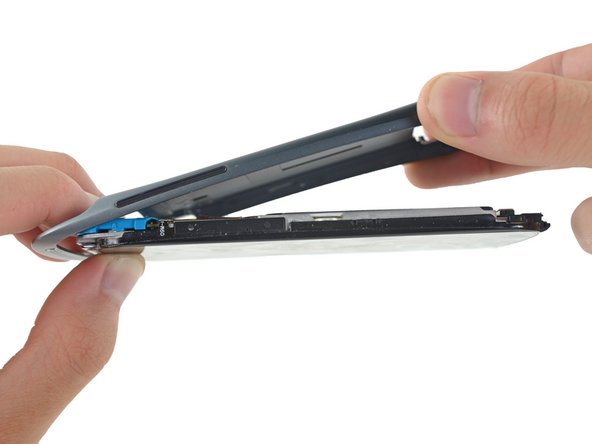
    • Use your fingers to pull the top casing off of the rest of the phone.

  10. Questo passaggio è privo di traduzione. Aiuta a tradurlo

    : passo 10, immagine 1 di 1
    • Remove the following screws holding the rear case to the rest of the phone:

    • Two 3.15 mm Phillips #00 screws

    • One 4.15 Torx T5 screw

    • One 4 mm Torx T5 screw

  11. Questo passaggio è privo di traduzione. Aiuta a tradurlo

    : passo 11, immagine 1 di 3 : passo 11, immagine 2 di 3 : passo 11, immagine 3 di 3
    • Place your fingers on either side of the phone and gently push up on the rear case.

    • It is important to start from the bottom of the phone because the rear case wraps around the front of the phone at the top which makes it impossible to start prying from there.

  12. Questo passaggio è privo di traduzione. Aiuta a tradurlo

    : passo 12, immagine 1 di 1
    • Pull the rear case away from the rest of the phone with your hands.

  13. Questo passaggio è privo di traduzione. Aiuta a tradurlo

    : passo 13, immagine 1 di 2 : passo 13, immagine 2 di 2
    • Using the pointed end of a spudger, lift the battery cable and release the connector.

  14. Questo passaggio è privo di traduzione. Aiuta a tradurlo

    : passo 14, immagine 1 di 2 : passo 14, immagine 2 di 2
    • Switching to the flat end of the spudger, work your way underneath the battery and peel it away from the adhesive.

  15. Questo passaggio è privo di traduzione. Aiuta a tradurlo

    : passo 15, immagine 1 di 1
    • Remove the battery from the phone.

Linea Traguardo

Altre 12 persone hanno completato questa guida.

Jay Miley

Membro da: 04/22/14

5.046 Reputazione

13 Guide realizzate

Team

Cal Poly, Team 10-55, Amido Spring 2014 Membro di Cal Poly, Team 10-55, Amido Spring 2014

CPSU-AMIDO-S14S10G55

4 Membri

31 Guide realizzate

4 Commenti

i charge the battery very well but once i on the phone it will go off immediately

kene - Replica

Hello thank you for the guide. Getting the backplate off was tough. When assembling a little rubber block was loose. this goes next to the motor

J Shepherd - Replica

What do you use to glue the cover back on, so that in the future you can replace the battery again?

Natalie - Replica

What adhesive(s) should be used under the battery and to

reseal the case after completing replacement of the battery?

Dan Koren - Replica

Aggiungi Commento

Visualizza Statistiche:

Ultime 24 Ore: 2

Ultimi 7 Giorni: 2

Ultimi 30 Giorni: 13

Tutti i Tempi: 7,814