Introduzione
This guide will teach you how to clean a dirty or clogged printhead on common HP and Canon inkjets.
NOTE: These steps do not apply to Epson printers as the design and ink formulation do not allow this method to work. The ink format (ET- bulk ink tank or cartridge) does not change this.
- IMPORTANT: This does not fix every printer. These steps will not work on failed hardware!
- If the problem persists, it is often due to a hardware problem with the printhead. On the model I used here (HP B210a), I noticed that it is often caused by a failed printhead. This has become more common for many older printers like this compared to how often it was hardware when I initially published this guide. At that time, the issue was generally clog-related and recoverable; keep this risk in mind as a potential issue, not to discourage the attempt. Do not expect repairs to be economical when it's a hardware fault, as inkjets are "loss leaders" to the extreme of using Big Brother ink DRM to ensure you use OEM ink.
Guide Notes
- WARNING: THIS PROCEDURE MAY "KILL" A PRINTER WITH A HARDWARE-LEVEL ISSUE—BEYOND REPAIR! Use caution if you suspect a possible HARDWARE issue! Write off these "risky" printers mentally and expect to replace them if "killed".
- The printhead removal steps were written for the HP B210a and similarly designed printers (564/920 removable). For other series, you will likely need a model-specific guide. Models like the HP Photosmart 6520 require special precautions as the printhead is permanently installed (requires partial disassembly) and requires SETUP ink if the calibration is lost.
- HP ONLY: Non-removable printhead models (E.g., Photosmart 6520, 564 ink tanks) require special attention to preserve the calibration as SETUP ink is required. On printers with this problem, try pressing "?" seven times to allow retail trade ink to be used if you lose the calibration. This is not guaranteed to work, but it is known to work on some models with this problem.
- HP ONLY: If SETUP cartridges are required for your model, it is critical to preserve the calibration; these may not survive a lost calibration unless you can disable the trade ink block by pressing the "?" button ~seven times. This works on some of these models but not all of them.
- If I have not tested your printer, I cannot guarantee the calibration preservation procedure will work. No printers will be tested for the trade ink block; use at your own risk.
HP ONLY: Power cord disconnect bypass:
IMPORTANT: This method should work for most printers with this printhead design, but I have not tested yours if it isn't listed. In addition, there are no guarantees it will work either (even if I have personally done it). A LOST CALIBRATION IS VERY WASTEFUL ON INK; HAVE A SET ON HAND OR SWAP ALL INK TANKS PROACTIVELY!
- Photosmart C6380
- Photosmart Premium C309g
- Photosmart Plus B209a
- Photosmart Plus B210a
Cosa ti serve
Documento in evidenza
-
-
In addition to the parts listing, these items are highly recommended:
-
Ink protection: Plastic bag or ink caps
-
Only needed in specific cases: Replacement ink for preparation process after cleaning (3rd party ink works, but will nag you).
-
Optional (Stubborn clogging): Gloves and 91% alcohol
-
-
-
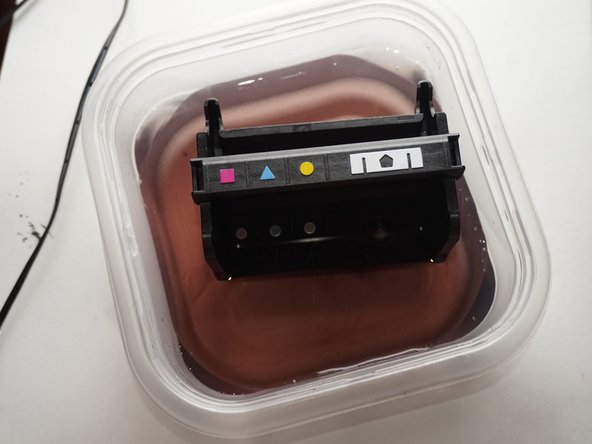
Before removing the printhead, hot water is needed. Remove the K-Cup holder and get a bowl of water.
-
-
-
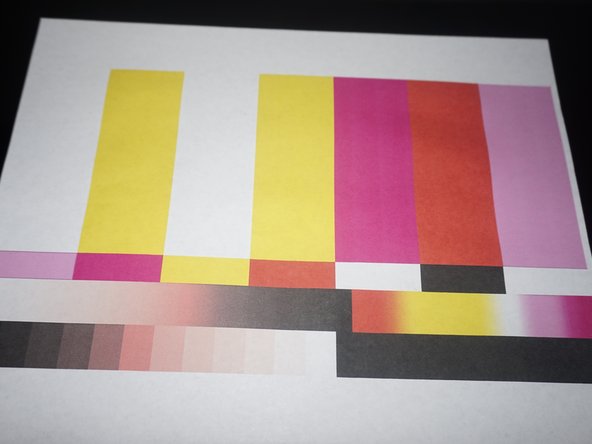
Print a test image as a baseline. A good image can be found here: SMPTE color bars.
-
-
-
-
Remove the ink cartridges from the printer. Install the shipping caps or put them in a plastic bag.
-
-
-
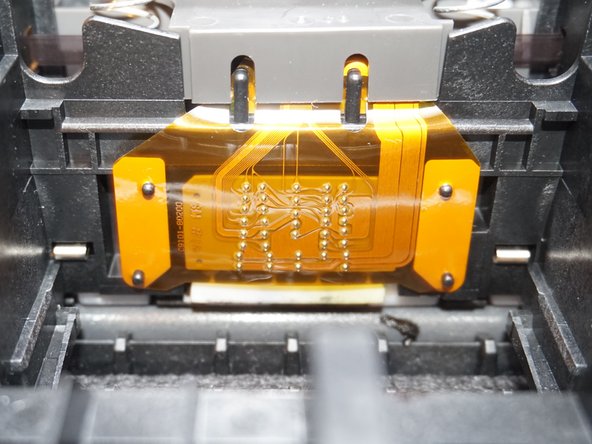
When the printer is unplugged, lift the lever up and remove the printhead.
-
Remove the printhead as shown. IMPORTANT: Leave the scanner lid open, or put a note near the printer.
-
-
-
THESE STEPS MAY NOT BE REQUIRED ON ALL PRINTERS. If your printhead contact is similar, it is recommended to clean it regardless of the printer manufacturer.
-
Using an alcohol wipe, clean the printhead interface to avoid any errors relating to poor printhead contact.
-
-
-
Put the printhead in hot water. Repeat until the printhead is reasonably clean. Change the cleaning water frequently.
-
Wipe the printhead contacts and nozzles by hand to ensure these areas are dry.
-
Before reinstalling the printhead, let it air dry for ~3-4 hours. Using a fan may speed this step up.
-
-
-
Once the printhead is satisfactorily dry, reinstall the printhed and ink in the printer. Plug the printer in.
-
-
-
After replacing the printhead, test the printer. Match the previous settings and check for improvement.
-


If your printer is working correctly, it was just a clog. Persistent issues usually total out the printer as a unit.
If your printer is working correctly, it was just a clog. Persistent issues usually total out the printer as a unit.
Documenti Allegati

Team
