Salta al contenuto principale

HP ProBook x360 11 G5 EE Battery Replacement

Cosa ti serve

  1. HP ProBook x360 11 G5 EE Battery Replacement, Keyboard Assembly: passo 1, immagine 1 di 3 HP ProBook x360 11 G5 EE Battery Replacement, Keyboard Assembly: passo 1, immagine 2 di 3 HP ProBook x360 11 G5 EE Battery Replacement, Keyboard Assembly: passo 1, immagine 3 di 3
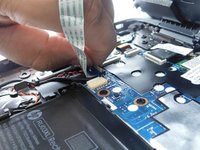
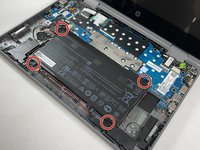
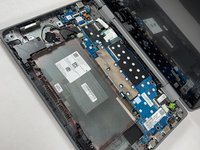
    • Remove the 4.1 mm screws with a T5 Torx screwdriver.

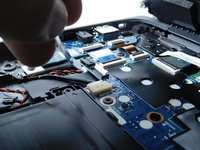
    • Remove the 4.1 mm screws using a JIS #0 screwdriver.

  2. HP ProBook x360 11 G5 EE Battery Replacement: passo 2, immagine 1 di 1
    • Use an opening pick to pry the corners of the keyboard deck.

  3. HP ProBook x360 11 G5 EE Battery Replacement: passo 3, immagine 1 di 3 HP ProBook x360 11 G5 EE Battery Replacement: passo 3, immagine 2 di 3 HP ProBook x360 11 G5 EE Battery Replacement: passo 3, immagine 3 di 3
    • Use an opening pick or opening tool to pry around the sides of the keyboard assembly.

  4. HP ProBook x360 11 G5 EE Battery Replacement: passo 4, immagine 1 di 3 HP ProBook x360 11 G5 EE Battery Replacement: passo 4, immagine 2 di 3 HP ProBook x360 11 G5 EE Battery Replacement: passo 4, immagine 3 di 3
    • Lift the keyboard assembly to expose two ribbon cables.

    • Lift the two plastic tabs that hold the cables in place on the motherboard

    • Slide the ribbon cables out of each connector.

  5. HP ProBook x360 11 G5 EE Battery Replacement: passo 5, immagine 1 di 2 HP ProBook x360 11 G5 EE Battery Replacement: passo 5, immagine 2 di 2
    • Remove the keyboard assembly from the rest of the computer.

  6. HP ProBook x360 11 G5 EE Battery Replacement, Battery: passo 6, immagine 1 di 2 HP ProBook x360 11 G5 EE Battery Replacement, Battery: passo 6, immagine 2 di 2
    • Remove the four 3 mm screws from the battery with the JIS #0 screwdriver.

  7. HP ProBook x360 11 G5 EE Battery Replacement: passo 7, immagine 1 di 3 HP ProBook x360 11 G5 EE Battery Replacement: passo 7, immagine 2 di 3 HP ProBook x360 11 G5 EE Battery Replacement: passo 7, immagine 3 di 3
    • Pry the battery up from the laptop using an opening pick.

    • Lift the battery out of its place.

Conclusione

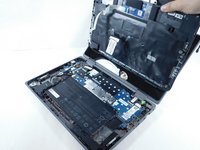
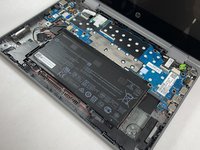
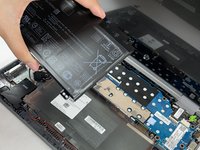
To reassemble your device, follow these instructions in reverse order.

Un'altra persona ha completato questa guida.

eric paz

Membro da: 09/02/21

194 Reputazione

1 Guida realizzata

Team

Gateway, Team 1-4, Pee Fall 2021 Membro di Gateway, Team 1-4, Pee Fall 2021

GCC-PEE-F21S1G4

5 Membri

5 Guide realizzate

0Commenti sulla guida

Aggiungi Commento

Visualizza Statistiche:

Ultime 24 Ore: 5

Ultimi 7 Giorni: 17

Ultimi 30 Giorni: 70

Tutti i Tempi: 2,371