Salta al contenuto principale

Questa guida ha delle modifiche più recenti. Passa all'ultima versione non verificata.

HP Pavilion dv9000 Keyboard Replacement

Cosa ti serve

  1. HP Pavilion dv9000 Keyboard Replacement, Battery: passo 1, immagine 1 di 1
    • Turn the laptop over to expose the bottom side.

    • Locate the battery removal switch next to the battery compartment

    • Important: Before doing any repairs on the laptop, make sure it is completely powered down and unplugged.

  2. HP Pavilion dv9000 Keyboard Replacement, Battery Removal: passo 2, immagine 1 di 2 HP Pavilion dv9000 Keyboard Replacement, Battery Removal: passo 2, immagine 2 di 2
    • Slide the switch all the way to the left to release the battery. The battery should pop up.

    • Lift the battery out.

  3. HP Pavilion dv9000 Keyboard Replacement, Keyboard: passo 3, immagine 1 di 2 HP Pavilion dv9000 Keyboard Replacement, Keyboard: passo 3, immagine 2 di 2
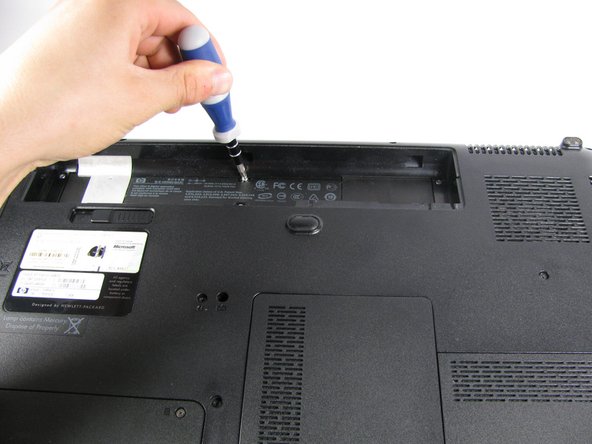
    • Remove the six 5 mm screws in the battery compartment using Phillips #1 screwdriver.

    • Remove the 7mm keyboard screw located towards the center of the laptop with a Phillips #1 screwdriver.

  4. HP Pavilion dv9000 Keyboard Replacement: passo 4, immagine 1 di 1
    • Flip the laptop over and open the lid.

    • Lift out the plastic panel containing the power button and flip it over.

    • Be careful, the panel is still attached by a small ribbon cable.

  5. HP Pavilion dv9000 Keyboard Replacement: passo 5, immagine 1 di 3 HP Pavilion dv9000 Keyboard Replacement: passo 5, immagine 2 di 3 HP Pavilion dv9000 Keyboard Replacement: passo 5, immagine 3 di 3
    • Locate the ribbon cable attached to the underside of the plastic panel.

    • Using a spudger, unplug the ribbon cable by pushing the brown tab away from circuit board and sliding the ribbon out with your hand.

    • Set the plastic panel aside.

  6. HP Pavilion dv9000 Keyboard Replacement: passo 6, immagine 1 di 3 HP Pavilion dv9000 Keyboard Replacement: passo 6, immagine 2 di 3 HP Pavilion dv9000 Keyboard Replacement: passo 6, immagine 3 di 3
    • Using a Phillips #1 screwdriver, remove the three 5mm screws holding the keyboard in place.

    • Carefully lift the keyboard up (no more than a few cm) and slide it forward, towards the laptops monitor to reveal another larger ribbon cable.

    • Be extremely careful as the keyboard is still attached to the computer by the larger ribbon cable.

  7. HP Pavilion dv9000 Keyboard Replacement: passo 7, immagine 1 di 3 HP Pavilion dv9000 Keyboard Replacement: passo 7, immagine 2 di 3 HP Pavilion dv9000 Keyboard Replacement: passo 7, immagine 3 di 3
    • Use a spudger to push the black tab forward and slide it away from the white connector.

    • Gently pull the ribbon cable from the connector housing.

    • Remove the keyboard.

Conclusione

To reassemble your device, follow these instructions in reverse order.

Un'altra persona ha completato questa guida.

Team

Cal Poly, Team 10-32, Maness Winter 2014 Membro di Cal Poly, Team 10-32, Maness Winter 2014

CPSU-MANESS-W14S10G32

4 Membri

6 Guide realizzate

Un commento

Please I have a problem with my hp laptop the keyboard and there is noise on it, repair it automatic. thanks you

Clement Glah - Replica

Aggiungi Commento

Visualizza Statistiche:

Ultime 24 Ore: 0

Ultimi 7 Giorni: 1

Ultimi 30 Giorni: 4

Tutti i Tempi: 3,154