Salta al contenuto principale

HP Pavilion dv6-6180us Screen Replacement

Cosa ti serve

  1. HP Pavilion dv6-6180us Screen Replacement, Hard Drive: passo 1, immagine 1 di 1
    • Turn off and unplug the device before starting.

    • Flip your device over so the bottom panel is facing up.

  2. HP Pavilion dv6-6180us Screen Replacement: passo 2, immagine 1 di 1
    • Slide the lock switch to the right.

    • The panel will pop open at the top corner.

  3. HP Pavilion dv6-6180us Screen Replacement: passo 3, immagine 1 di 1
    • Use the plastic opening tool to remove the back panel.

    • Some force may be required to remove the panel from the case. Use caution when prying to avoid breaking the panel or the plastic tabs securing it in place.

  4. HP Pavilion dv6-6180us Screen Replacement: passo 4, immagine 1 di 1
    • Use the PH 1 screwdriver to remove the four 3.5 mm screws securing the hard drive.

  5. HP Pavilion dv6-6180us Screen Replacement: passo 5, immagine 1 di 1
    • Lift the corner bracket to remove the hard drive.

  6. HP Pavilion dv6-6180us Screen Replacement: passo 6, immagine 1 di 1
    • Unplug the hard drive wire to detach the hard drive.

  7. HP Pavilion dv6-6180us Screen Replacement, Screen: passo 7, immagine 1 di 1
    Attrezzo utilizzato in questo passaggio:
    Tweezers
    $4.99
    Compra
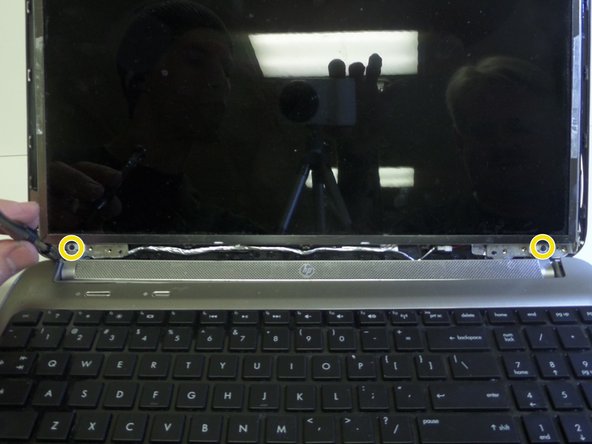
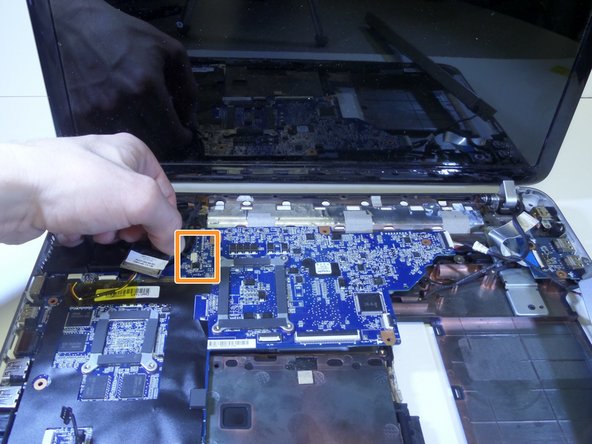
    • Using tweezers, grab the top and bottom while rocking back and forth to pull rubber plug out.

    • Cover is glued into place so gently pick at the edge before removing.

  8. HP Pavilion dv6-6180us Screen Replacement: passo 8, immagine 1 di 1
    • Unscrew two 6mm screws using PH1 screwdriver.

  9. HP Pavilion dv6-6180us Screen Replacement: passo 9, immagine 1 di 1
    • Pry the left lower corner with fingers.

  10. HP Pavilion dv6-6180us Screen Replacement: passo 10, immagine 1 di 1
    • Remove screen frame.

  11. HP Pavilion dv6-6180us Screen Replacement: passo 11, immagine 1 di 2 HP Pavilion dv6-6180us Screen Replacement: passo 11, immagine 2 di 2
    • Unscrew two 3mm screws using PH 1 screwdriver

    • Eight 6mm screws using PH 1 screwdriver.

    • Use PH 000 screwdriver to remove two 4mm screws.

  12. HP Pavilion dv6-6180us Screen Replacement: passo 12, immagine 1 di 1
    • Pry open the keyboard using plastic opening tool starting from the top.

    • Lift up keyboard gently because a silver ribbon is still attaching it to the laptop.

  13. HP Pavilion dv6-6180us Screen Replacement: passo 13, immagine 1 di 3 HP Pavilion dv6-6180us Screen Replacement: passo 13, immagine 2 di 3 HP Pavilion dv6-6180us Screen Replacement: passo 13, immagine 3 di 3
    • Place keyboard upside down.

    • Lift up plastic cover over keyboard connector cable.

    • Pull ribbon cable up away from keyboard to completely remove.

  14. HP Pavilion dv6-6180us Screen Replacement: passo 14, immagine 1 di 1
    • Remove seven 4mm pannel screws with PH 1 screwdriver.

  15. HP Pavilion dv6-6180us Screen Replacement: passo 15, immagine 1 di 1
    • Place the computer on its side.

    • Separate top panel from bottom frame.

  16. HP Pavilion dv6-6180us Screen Replacement: passo 16, immagine 1 di 2 HP Pavilion dv6-6180us Screen Replacement: passo 16, immagine 2 di 2
    • Pop open rest palm assembly.

  17. HP Pavilion dv6-6180us Screen Replacement: passo 17, immagine 1 di 1
    • Pull ribbon to detach from bottom panel.

  18. HP Pavilion dv6-6180us Screen Replacement: passo 18, immagine 1 di 1
    • Remove two 5mm screws securing fan, using HP 1 screwdriver.

  19. HP Pavilion dv6-6180us Screen Replacement: passo 19, immagine 1 di 1
    • Flip laptop over.

    • Remove two 4mm screws securing antenna using PH 1 screwdriver.

    • Pull antenna to the right to remove.

  20. HP Pavilion dv6-6180us Screen Replacement: passo 20, immagine 1 di 1
    • Flip laptop side up.

    • Pull off yellow insulating tape.

  21. HP Pavilion dv6-6180us Screen Replacement: passo 21, immagine 1 di 2 HP Pavilion dv6-6180us Screen Replacement: passo 21, immagine 2 di 2
    • Grab tab on left top corner and remove black wire.

    • Remove white input attachment.

  22. HP Pavilion dv6-6180us Screen Replacement: passo 22, immagine 1 di 1
    • Lift up speaker.

  23. HP Pavilion dv6-6180us Screen Replacement: passo 23, immagine 1 di 1
    • Hold the motherboard and pull to the right.

    • The plugs on the left may be difficult to snap out.

  24. HP Pavilion dv6-6180us Screen Replacement: passo 24, immagine 1 di 1
    • Remove a 4mm screw securing wire attachment using PH 1 screwdriver.

  25. HP Pavilion dv6-6180us Screen Replacement: passo 25, immagine 1 di 1
    • Remove two hinge covers.

  26. HP Pavilion dv6-6180us Screen Replacement: passo 26, immagine 1 di 1
    • Unhook the antenna wire from behind hinge.

  27. HP Pavilion dv6-6180us Screen Replacement: passo 27, immagine 1 di 1
    • Lay screen face down.

    • Detach silver wire from screen

Conclusione

To reassemble your device, follow these instructions in reverse order.

Un'altra persona ha completato questa guida.

Team

CSU Fullerton, Team 1-2, Bruce Fall 2016 Membro di CSU Fullerton, Team 1-2, Bruce Fall 2016

CSUF-BRUCE-F16S1G2

4 Membri

4 Guide realizzate

0 Commenti

Aggiungi Commento

Visualizza Statistiche:

Ultime 24 Ore: 3

Ultimi 7 Giorni: 8

Ultimi 30 Giorni: 21

Tutti i Tempi: 1,535