Salta al contenuto principale

HP Pavilion Notebook 15-ab293cl Hard Drive Replacement

Cosa ti serve

  1. HP Pavilion Notebook 15-ab293cl Hard Drive Replacement, Hard Drive: passo 1, immagine 1 di 2 HP Pavilion Notebook 15-ab293cl Hard Drive Replacement, Hard Drive: passo 1, immagine 2 di 2
    • Flip the laptop over so that the battery is facing upward.

  2. HP Pavilion Notebook 15-ab293cl Hard Drive Replacement: passo 2, immagine 1 di 3 HP Pavilion Notebook 15-ab293cl Hard Drive Replacement: passo 2, immagine 2 di 3 HP Pavilion Notebook 15-ab293cl Hard Drive Replacement: passo 2, immagine 3 di 3
    • Slide both tab buttons inward to open the battery cover. Gently push the battery out to remove.

  3. HP Pavilion Notebook 15-ab293cl Hard Drive Replacement: passo 3, immagine 1 di 2 HP Pavilion Notebook 15-ab293cl Hard Drive Replacement: passo 3, immagine 2 di 2
    • Remove the black plastic hinge covers at the top corners of the laptop.

    • Use the Phillips #1 to remove the two 7.5mm screws.

    • Use the opening tool to pry the black covers off of the laptop.

  4. HP Pavilion Notebook 15-ab293cl Hard Drive Replacement: passo 4, immagine 1 di 3 HP Pavilion Notebook 15-ab293cl Hard Drive Replacement: passo 4, immagine 2 di 3 HP Pavilion Notebook 15-ab293cl Hard Drive Replacement: passo 4, immagine 3 di 3
    • Remember to remove the tabs shown in the second picture.

    • Remove all 16 - 7.5mm screws with the Phillips #1 screwdriver.

    • Pry and slide the CD/DVD drive out of the laptop case.

  5. HP Pavilion Notebook 15-ab293cl Hard Drive Replacement: passo 5, immagine 1 di 1
    • Unscrew the two 3.5mm silver screws with the Phillips #000 and the Philips # 1.

  6. HP Pavilion Notebook 15-ab293cl Hard Drive Replacement: passo 6, immagine 1 di 3 HP Pavilion Notebook 15-ab293cl Hard Drive Replacement: passo 6, immagine 2 di 3 HP Pavilion Notebook 15-ab293cl Hard Drive Replacement: passo 6, immagine 3 di 3
    • Turn the computer so that the screen faces you.

    • Use the pry tool to pry off the edge of the keyboard side of laptop.

  7. HP Pavilion Notebook 15-ab293cl Hard Drive Replacement: passo 7, immagine 1 di 3 HP Pavilion Notebook 15-ab293cl Hard Drive Replacement: passo 7, immagine 2 di 3 HP Pavilion Notebook 15-ab293cl Hard Drive Replacement: passo 7, immagine 3 di 3
    • The hard drive is located in the bottom corner of the laptop.

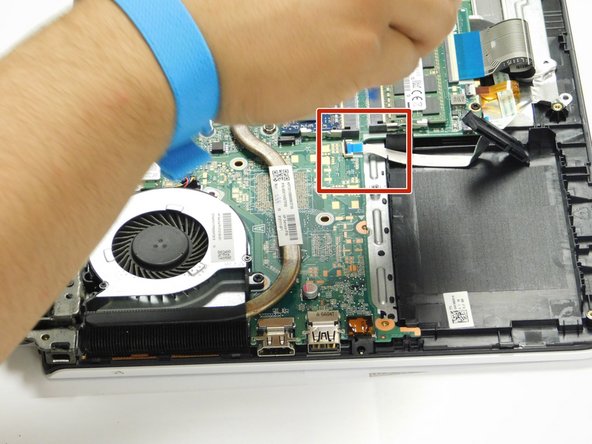
    • Gently lift up the hard drive and pry off the white tab to release the hard drive.

  8. HP Pavilion Notebook 15-ab293cl Hard Drive Replacement: passo 8, immagine 1 di 2 HP Pavilion Notebook 15-ab293cl Hard Drive Replacement: passo 8, immagine 2 di 2
    • Once you release the white tab from the green board, remove the hard drive.

Conclusione

To reassemble your device, follow these instructions in reverse order.

Un'altra persona ha completato questa guida.

Efren Solis

Membro da: 09/10/18

228 Reputazione

1 Guida realizzata

Team

Gateway, Team S1-G2, Luster Fall 2018 Membro di Gateway, Team S1-G2, Luster Fall 2018

GCC-LUSTER-F18S1G2

4 Membri

4 Guide realizzate

0 Commenti

Aggiungi Commento

Visualizza Statistiche:

Ultime 24 Ore: 1

Ultimi 7 Giorni: 17

Ultimi 30 Giorni: 65

Tutti i Tempi: 1,997