Salta al contenuto principale

HP Pavilion 15-p046nr CMOS Battery Replacement

Cosa ti serve

  1. HP Pavilion 15-p046nr CMOS Battery Replacement, Battery: passo 1, immagine 1 di 3 HP Pavilion 15-p046nr CMOS Battery Replacement, Battery: passo 1, immagine 2 di 3 HP Pavilion 15-p046nr CMOS Battery Replacement, Battery: passo 1, immagine 3 di 3
    • Flip the laptop over so the bottom is facing up.

    • Place your finger on the top left-hand slide button with the lock symbol.

    • Moving the slide does require some force.

    • Slide the button to the right so that an unlocked symbol is visible.

  2. HP Pavilion 15-p046nr CMOS Battery Replacement: passo 2, immagine 1 di 3 HP Pavilion 15-p046nr CMOS Battery Replacement: passo 2, immagine 2 di 3 HP Pavilion 15-p046nr CMOS Battery Replacement: passo 2, immagine 3 di 3
    • Place your finger or thumb on the top right-hand slide with the battery symbol visible.

    • Slide the button to the left.

    • Moving the slide will require some force.

    • Lift the battery off the computer with your thumb.

    • You will not need to slide the right button with the battery to reinstall the battery.

  3. HP Pavilion 15-p046nr CMOS Battery Replacement, Integrated Keyboard: passo 3, immagine 1 di 3 HP Pavilion 15-p046nr CMOS Battery Replacement, Integrated Keyboard: passo 3, immagine 2 di 3 HP Pavilion 15-p046nr CMOS Battery Replacement, Integrated Keyboard: passo 3, immagine 3 di 3
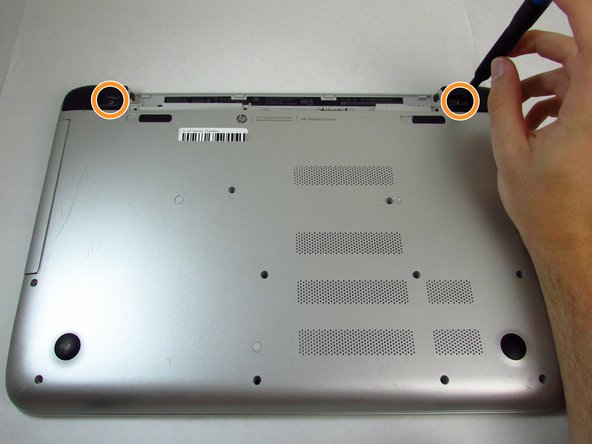
    • Remove screw covers from the hinge covers on the upper left and right side.

    • Unscrew one 7 mm screw from each hinge cover using the Phillips #00 screwdriver.

    • Remove hinge covers by pulling up and out on the top of the cover.

  4. HP Pavilion 15-p046nr CMOS Battery Replacement: passo 4, immagine 1 di 3 HP Pavilion 15-p046nr CMOS Battery Replacement: passo 4, immagine 2 di 3 HP Pavilion 15-p046nr CMOS Battery Replacement: passo 4, immagine 3 di 3
    • Remove thirteen 7 mm screws from the back panel using the Phillips #00 screwdriver.

    • Remove three 5 mm screws from the back panel using the Phillips #00 screwdriver.

    • Grab the disk drive on the left side and pull the disk drive out completely.

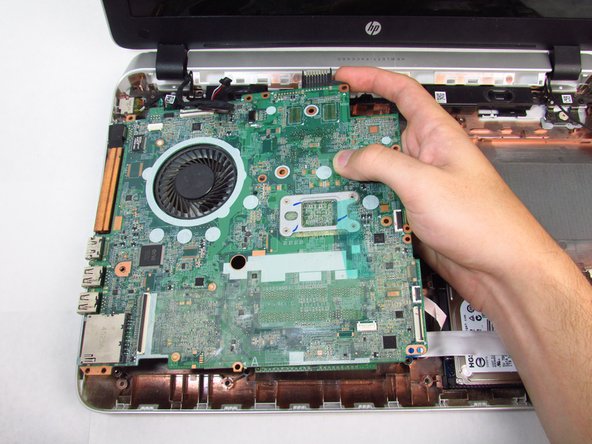
    • Flip the laptop over and open the display.

  5. HP Pavilion 15-p046nr CMOS Battery Replacement: passo 5, immagine 1 di 2 HP Pavilion 15-p046nr CMOS Battery Replacement: passo 5, immagine 2 di 2
    • Run the plastic opening tool along the entire edge of the keyboard to separate the keyboard from the base of the laptop.

    • Gently lift the keyboard tray up.

    • Use care to lift the keyboard off of the device. The keyboard is still attached by ribbon cables.

  6. HP Pavilion 15-p046nr CMOS Battery Replacement: passo 6, immagine 1 di 2 HP Pavilion 15-p046nr CMOS Battery Replacement: passo 6, immagine 2 di 2
    • Use the tip of the blue plastic opening tool to gently flip-up the grey locking flap of the two ribbon cables connecting the keyboard to the device.

    • Make sure to only lift the flap and not the connector socket because the socket easily breaks off.

    • Grab the ribbon cable and gently pull away from the socket.

    • To reinstall, insert the ribbon cable into the connector and close the flap on the black line.

  7. HP Pavilion 15-p046nr CMOS Battery Replacement: passo 7, immagine 1 di 3 HP Pavilion 15-p046nr CMOS Battery Replacement: passo 7, immagine 2 di 3 HP Pavilion 15-p046nr CMOS Battery Replacement: passo 7, immagine 3 di 3
    • Lift the keyboard up and away from the device.

    • Removing the keyboard exposes the motherboard and its sensitive components. Ensure no tools or items are set on the motherboard or it could cause damage.

  8. HP Pavilion 15-p046nr CMOS Battery Replacement, Motherboard: passo 8, immagine 1 di 3 HP Pavilion 15-p046nr CMOS Battery Replacement, Motherboard: passo 8, immagine 2 di 3 HP Pavilion 15-p046nr CMOS Battery Replacement, Motherboard: passo 8, immagine 3 di 3
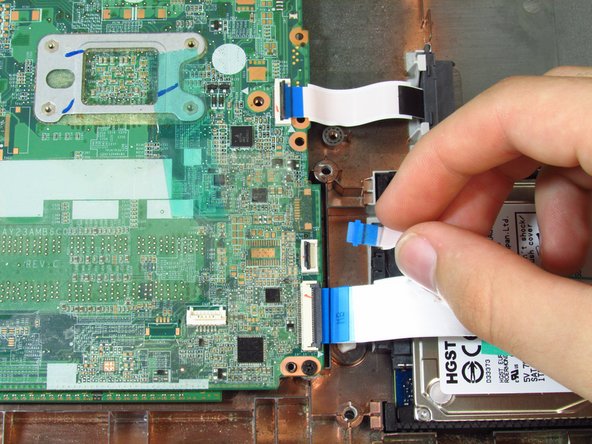
    • Use the tip of the blue plastic opening tool to gently flip-up the grey locking flap of the three ribbon cables on the bottom right corner of the motherboard.

    • Make sure to only lift the flap and not the connector socket because the socket easily breaks off.

    • Grab each ribbon cable and gently pull away from the socket.

    • To reinstall, insert the ribbon cable into the connector and close the flap on the black line.

    • Move the ribbon cables away from the motherboard.

  9. HP Pavilion 15-p046nr CMOS Battery Replacement: passo 9, immagine 1 di 2 HP Pavilion 15-p046nr CMOS Battery Replacement: passo 9, immagine 2 di 2
    • To disconnect the speakers, carefully pull on the cables that connect to the motherboard from the speaker system.

    • Be careful not to yank or jerk the cables because they can be easily broken.

    • Move the speaker cables away from the motherboard.

  10. HP Pavilion 15-p046nr CMOS Battery Replacement: passo 10, immagine 1 di 2 HP Pavilion 15-p046nr CMOS Battery Replacement: passo 10, immagine 2 di 2
    • Use the tip of the blue plastic opening tool or your fingernail to gently flip-up the grey locking flap of the webcam ribbon cable.

    • Make sure to only lift the flap and not the connector socket because the socket easily breaks off.

    • Grab the ribbon cable cable and gently pull away from the socket.

  11. HP Pavilion 15-p046nr CMOS Battery Replacement: passo 11, immagine 1 di 3 HP Pavilion 15-p046nr CMOS Battery Replacement: passo 11, immagine 2 di 3 HP Pavilion 15-p046nr CMOS Battery Replacement: passo 11, immagine 3 di 3
    • Unscrew one 6 mm screw on the wireless card with the Phillips #00 screwdriver.

    • The wireless card will angle upwards when the screw is removed.

    • Gently pull the wireless card away from the motherboard with the same angle that it rests.

  12. HP Pavilion 15-p046nr CMOS Battery Replacement: passo 12, immagine 1 di 3 HP Pavilion 15-p046nr CMOS Battery Replacement: passo 12, immagine 2 di 3 HP Pavilion 15-p046nr CMOS Battery Replacement: passo 12, immagine 3 di 3
    • In the upper left corner of the motherboard, unscrew one captive screw from the charger port cover with the Phillips #00 screwdriver.

    • "Captive screws" are those which will cannot be removed, but will instead remain within their screw hole after being disengaged.

    • Remove the charger port cover.

    • Carefully pull upwards on the charger port to disconnect it.

    • The charger port will stay attached to the device.

  13. HP Pavilion 15-p046nr CMOS Battery Replacement: passo 13, immagine 1 di 3 HP Pavilion 15-p046nr CMOS Battery Replacement: passo 13, immagine 2 di 3 HP Pavilion 15-p046nr CMOS Battery Replacement: passo 13, immagine 3 di 3
    • Remove the four 6 mm screws from the motherboard using the Phillips #00 screwdriver.

    • Gently lift the motherboard directly up from the holding slots and remove the motherboard from the device.

    • Be careful not to put too much pressure on the motherboard while lifting it up, as there are many fragile circuits and chips on it.

    • Remove the motherboard from the device once it's clear of all cables and slots.

    • Be sure that all cables are clear before reinstalling the motherboard as to not catch any cables beneath.

  14. HP Pavilion 15-p046nr CMOS Battery Replacement, CMOS Battery: passo 14, immagine 1 di 1
    • Flip the motherboard over to reveal the backside.

  15. HP Pavilion 15-p046nr CMOS Battery Replacement: passo 15, immagine 1 di 3 HP Pavilion 15-p046nr CMOS Battery Replacement: passo 15, immagine 2 di 3 HP Pavilion 15-p046nr CMOS Battery Replacement: passo 15, immagine 3 di 3
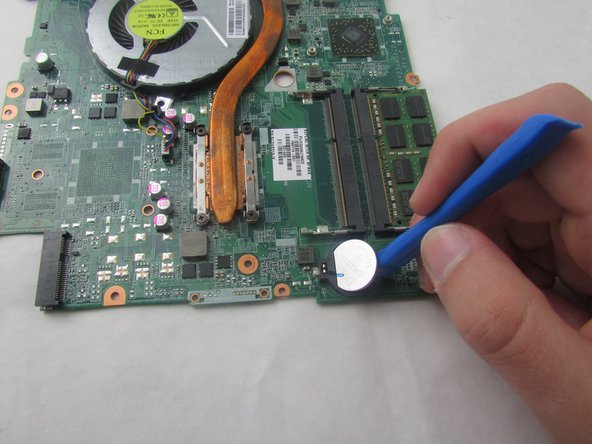
    • Push the blue plastic opening tool into the CMOS battery casing along the groove towards the center of the motherboard. The battery should shift to the left.

    • Do not use a metal tool since it can cause damage to the delicate motherboard and its components or puncture the battery.

    • Lift upwards on the CMOS battery using the opening tool and the battery will pop out of its holding.

    • Remove the CMOS battery from the motherboard.

Conclusione

To reassemble your device, follow these instructions in reverse order.

Un'altra persona ha completato questa guida.

0 Commenti

Aggiungi Commento

Visualizza Statistiche:

Ultime 24 Ore: 1

Ultimi 7 Giorni: 17

Ultimi 30 Giorni: 77

Tutti i Tempi: 7,321