Salta al contenuto principale

HP Pavilion 14-b120dx Audio Port/USB Drive Replacement

Cosa ti serve

  1. HP Pavilion 14-b120dx Audio Port/USB Drive Replacement, Battery: passo 1, immagine 1 di 1
    • Power down the laptop and detach the charging cord (failure to do so can result in electrical shock).

  2. HP Pavilion 14-b120dx Audio Port/USB Drive Replacement: passo 2, immagine 1 di 3 HP Pavilion 14-b120dx Audio Port/USB Drive Replacement: passo 2, immagine 2 di 3 HP Pavilion 14-b120dx Audio Port/USB Drive Replacement: passo 2, immagine 3 di 3
    • Flip the laptop upside down so that the bottom is facing you.

    • Push the slide on the right toward the center of the laptop, releasing the battery latch.

    • Lift the battery up and away from the laptop.

  3. HP Pavilion 14-b120dx Audio Port/USB Drive Replacement, Keyboard: passo 3, immagine 1 di 3 HP Pavilion 14-b120dx Audio Port/USB Drive Replacement, Keyboard: passo 3, immagine 2 di 3 HP Pavilion 14-b120dx Audio Port/USB Drive Replacement, Keyboard: passo 3, immagine 3 di 3
    • Insert the plastic opening tool between the keyboard and the palm rest.

    • Pry upwards until the keyboard section detaches from the laptop.

    • Repeat this around the edge of the entire keyboard.

    • Sections will make loud snapping noises as they detach from the palm rest - this is normal.

  4. HP Pavilion 14-b120dx Audio Port/USB Drive Replacement: passo 4, immagine 1 di 2 HP Pavilion 14-b120dx Audio Port/USB Drive Replacement: passo 4, immagine 2 di 2
    • Lift the keyboard slowly up until the connecting cable is exposed.

    • Carefully lift the flap on the ZIF connector using a fingernail or plastic opening tool. This will release the cable.

    • Detach the cable.

  5. HP Pavilion 14-b120dx Audio Port/USB Drive Replacement, Palm Rest: passo 5, immagine 1 di 2 HP Pavilion 14-b120dx Audio Port/USB Drive Replacement, Palm Rest: passo 5, immagine 2 di 2
    • Unscrew the 10 6.0 mm screws under the keyboard housing with a Philips #0 head screwdriver.

  6. HP Pavilion 14-b120dx Audio Port/USB Drive Replacement: passo 6, immagine 1 di 3 HP Pavilion 14-b120dx Audio Port/USB Drive Replacement: passo 6, immagine 2 di 3 HP Pavilion 14-b120dx Audio Port/USB Drive Replacement: passo 6, immagine 3 di 3
    • Insert the plastic opening tool into the seam between the palm rest and the laptop.

    • Pry upwards until the palm rest separates from the laptop.

    • Repeat this process around the entire computer.

    • These steps will be similar to the ones you took to remove the keyboard. Again, you will hear snapping noises.

  7. HP Pavilion 14-b120dx Audio Port/USB Drive Replacement: passo 7, immagine 1 di 1
    • Lift upwards to remove the palm rest.

  8. HP Pavilion 14-b120dx Audio Port/USB Drive Replacement, Audio Port and USB drive: passo 8, immagine 1 di 2 HP Pavilion 14-b120dx Audio Port/USB Drive Replacement, Audio Port and USB drive: passo 8, immagine 2 di 2
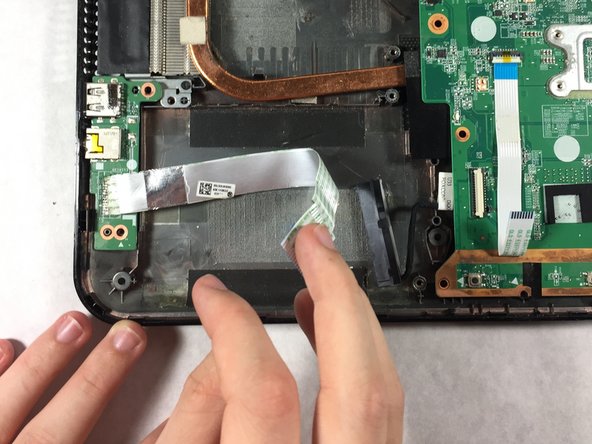
    • Carefully disconnect the cable connecting the ports to the motherboard from the right side.

  9. HP Pavilion 14-b120dx Audio Port/USB Drive Replacement: passo 9, immagine 1 di 3 HP Pavilion 14-b120dx Audio Port/USB Drive Replacement: passo 9, immagine 2 di 3 HP Pavilion 14-b120dx Audio Port/USB Drive Replacement: passo 9, immagine 3 di 3
    • Remove the two 6.0 mm screws from the ports.

  10. HP Pavilion 14-b120dx Audio Port/USB Drive Replacement: passo 10, immagine 1 di 2 HP Pavilion 14-b120dx Audio Port/USB Drive Replacement: passo 10, immagine 2 di 2
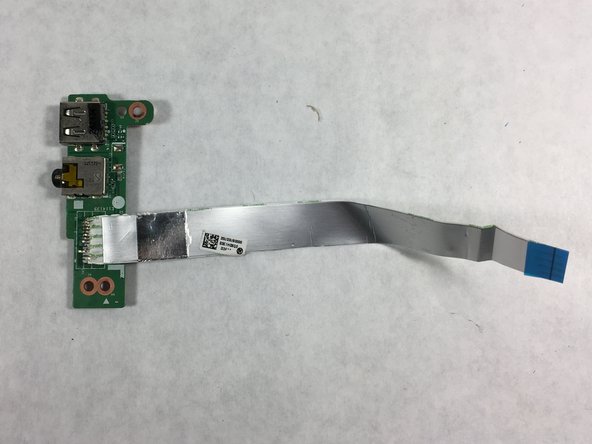
    • Push the ports to the left and lift upward to remove them safely.

Conclusione

To reassemble your device, follow these instructions in reverse order.

Altre 2 persone hanno completato questa guida.

Erin Lavalla

Membro da: 10/18/16

458 Reputazione

4 Guide realizzate

Team

UMass Dartmouth, Team 4-4, Catania Fall 2016 Membro di UMass Dartmouth, Team 4-4, Catania Fall 2016

UMASSD-CATANIA-F16S4G4

3 Membri

6 Guide realizzate

2 Commenti

where can I find the replacement part?

edwin abraham - Replica

Hello, first I just wanted to say thank you so much for writing these guides! You’re a super hero…. now then, I find myself in quite a pickle. I have an HP 15-b123cl with a screen that’s broken. I need to resolder one of the connectors. I have a picture that will show you which connector I need to fix, but I can’t post a picture in this comment section… all I need is a picture of the display connector on the top left of the motherboard. I even checked ifixit for some way of messaging you directly, but no luck :(… all I can think to do is give you my personal email address and hope that you send me something! Anyways… THANKS ERIN

Ethan

ejstepanianATgmail.com

Ethan Stepanian - Replica

Aggiungi Commento

Visualizza Statistiche:

Ultime 24 Ore: 0

Ultimi 7 Giorni: 0

Ultimi 30 Giorni: 4

Tutti i Tempi: 774