Salta al contenuto principale

HP Omen 15-5002xx Motherboard Replacement

Cosa ti serve

  1. HP Omen 15-5002xx Motherboard Replacement, Back Cover: passo 1, immagine 1 di 2 HP Omen 15-5002xx Motherboard Replacement, Back Cover: passo 1, immagine 2 di 2
    • Flip the laptop upside down so the backside is facing up.

    • Use a spudger or your fingers to remove the thin rubber strips that are attached from the edges of the laptop.

    • Remember where each thin rubber came from and set them off to the side.

    • Unscrew all 14 screw with the J00 JIS Screwdriver.

  2. HP Omen 15-5002xx Motherboard Replacement, Battery: passo 2, immagine 1 di 1
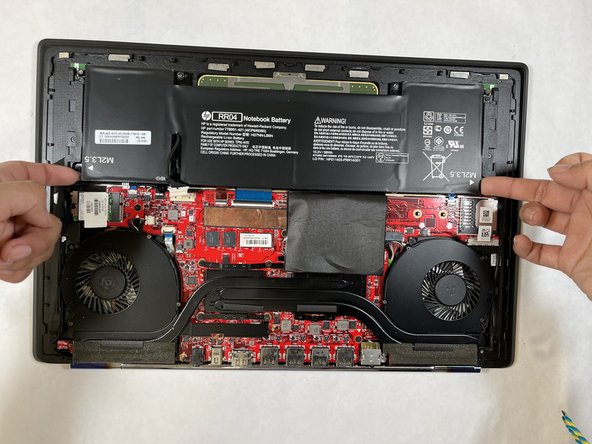
    • Open the case slowly from opposite sides of the laptop.

    • Use the J00 JIS screwdriver to remove eight screws securing the battery.

  3. HP Omen 15-5002xx Motherboard Replacement: passo 3, immagine 1 di 2 HP Omen 15-5002xx Motherboard Replacement: passo 3, immagine 2 di 2
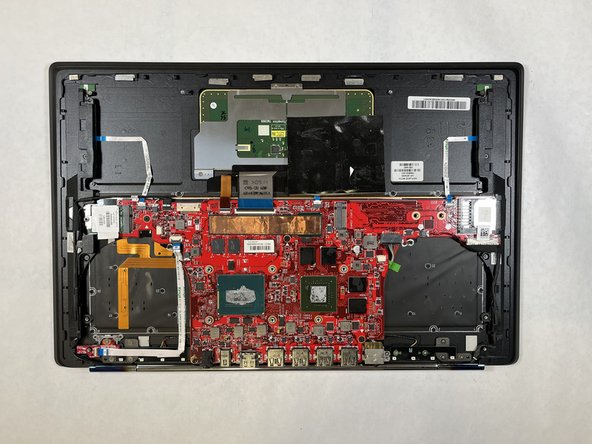
    • Carefully remove the battery connector that is attached to the motherboard by slowly sliding it towards the battery with two fingers.

    • Remove the battery by lifting it up and out.

  4. HP Omen 15-5002xx Motherboard Replacement, Fan: passo 4, immagine 1 di 1
    Attrezzo utilizzato in questo passaggio:
    Flathead 1.5 mm Screwdriver
    $5.49
    Compra
    • Remove the twelve big screws with the J00 JIS screwdriver.

    • Remove all eight small screws with the 1.5 flathead screwdriver.

  5. HP Omen 15-5002xx Motherboard Replacement: passo 5, immagine 1 di 2 HP Omen 15-5002xx Motherboard Replacement: passo 5, immagine 2 di 2
    • Carefully detach the fan connector that is attached to the motherboard by slowly sliding the connector out with two fingers.

    • Remove the battery carefully.

  6. HP Omen 15-5002xx Motherboard Replacement, Wi-Fi Card: passo 6, immagine 1 di 1
    • Use the Phillips #00 to remove one screw securing the Wi-Fi Card.

  7. HP Omen 15-5002xx Motherboard Replacement: passo 7, immagine 1 di 1
    • Carefully remove the Wi-Fi Card by slowly sliding the card sideways away from the motherboard.

  8. HP Omen 15-5002xx Motherboard Replacement, Motherboard: passo 8, immagine 1 di 1
    Attrezzo utilizzato in questo passaggio:
    Flathead 1.5 mm Screwdriver
    $5.49
    Compra
    • Use the 1.5 flathead screwdriver and remove the twelve screws from the motherboard.

  9. HP Omen 15-5002xx Motherboard Replacement: passo 9, immagine 1 di 3 HP Omen 15-5002xx Motherboard Replacement: passo 9, immagine 2 di 3 HP Omen 15-5002xx Motherboard Replacement: passo 9, immagine 3 di 3
    • Disconnect the four cables attached to the motherboard.

  10. HP Omen 15-5002xx Motherboard Replacement: passo 10, immagine 1 di 2 HP Omen 15-5002xx Motherboard Replacement: passo 10, immagine 2 di 2
    • Disconnect the remaining four connectors from the motherboard.

    • Remove the motherboard.

Conclusione

To reassemble your device, follow these instructions in reverse order.

Team

Gateway, Team 1-1, Saknee Fall 2021 Membro di Gateway, Team 1-1, Saknee Fall 2021

GCC-SAKNEE-F21S1G1

5 Membri

6 Guide realizzate

0 Commenti

Aggiungi Commento

Visualizza Statistiche:

Ultime 24 Ore: 1

Ultimi 7 Giorni: 2

Ultimi 30 Giorni: 19

Tutti i Tempi: 1,148