Salta al contenuto principale

HP Envy dv7t-7200 Optical Disc Drive Replacement

Cosa ti serve

  1. HP Envy dv7t-7200 Optical Disc Drive Replacement, Battery: passo 1, immagine 1 di 1
    • Turn the power off and disconnect all cables and cords from the laptop.

    • Place the computer on its top on a flat surface with the hinges facing away from you.

  2. HP Envy dv7t-7200 Optical Disc Drive Replacement: passo 2, immagine 1 di 3 HP Envy dv7t-7200 Optical Disc Drive Replacement: passo 2, immagine 2 di 3 HP Envy dv7t-7200 Optical Disc Drive Replacement: passo 2, immagine 3 di 3
    • Slide the battery release latch to the left which is located on the right-hand side of the battery.

  3. HP Envy dv7t-7200 Optical Disc Drive Replacement: passo 3, immagine 1 di 1
    • Tilt the battery away from you and lift out.

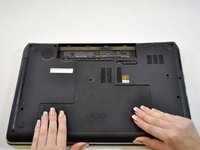
  4. HP Envy dv7t-7200 Optical Disc Drive Replacement, Service Cover: passo 4, immagine 1 di 1
    • Using a Phillips #01 screwdriver, remove the Phillips PM2.5×5.5 screw on the service cover.

    • This screw does not come out of the service cover completely once loosened.

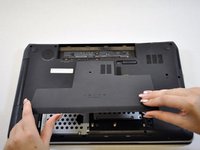
  5. HP Envy dv7t-7200 Optical Disc Drive Replacement: passo 5, immagine 1 di 2 HP Envy dv7t-7200 Optical Disc Drive Replacement: passo 5, immagine 2 di 2
    • Slide the service cover toward the front of the laptop.

    • Lift the service cover to remove it from the laptop.

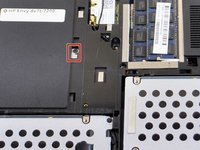
  6. HP Envy dv7t-7200 Optical Disc Drive Replacement, Optical Disc Drive: passo 6, immagine 1 di 1
    • Remove the Phillips PM2.5×4.0 screw that attaches the optical drive to the laptop.

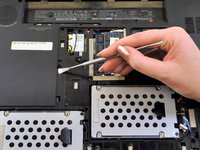
  7. HP Envy dv7t-7200 Optical Disc Drive Replacement: passo 7, immagine 1 di 2 HP Envy dv7t-7200 Optical Disc Drive Replacement: passo 7, immagine 2 di 2
    • Press the tab with a metal spudger that is located next to the screw to release the optical drive.

  8. HP Envy dv7t-7200 Optical Disc Drive Replacement: passo 8, immagine 1 di 2 HP Envy dv7t-7200 Optical Disc Drive Replacement: passo 8, immagine 2 di 2
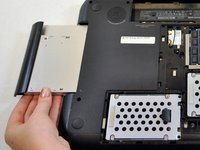
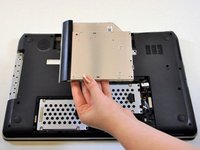
    • Slide the disk drive out of the laptop.

Conclusione

To reassemble your device, follow these instructions in reverse order.

Un'altra persona ha completato questa guida.

Krystal

Membro da: 10/16/17

882 Reputazione

8 Guide realizzate

Team

UW Tacoma, Team S3-G3, Liner Fall 2017 Membro di UW Tacoma, Team S3-G3, Liner Fall 2017

UWT-LINER-F17S3G3

5 Membri

8 Guide realizzate

0 Commenti

Aggiungi Commento

Visualizza Statistiche:

Ultime 24 Ore: 0

Ultimi 7 Giorni: 0

Ultimi 30 Giorni: 1

Tutti i Tempi: 112