Salta al contenuto principale

HP Envy Touchsmart m6-k125dx Mouse Touch Pad Replacement

Cosa ti serve

  1. HP Envy Touchsmart m6-k125dx Mouse Touch Pad Replacement, Back Panel: passo 1, immagine 1 di 2 HP Envy Touchsmart m6-k125dx Mouse Touch Pad Replacement, Back Panel: passo 1, immagine 2 di 2
    • Turn the laptop over so that the bottom is facing up

    • Using the J0 screwdriver, unscrew all 12 M2.5x5.5 screws from the back panel.

  2. HP Envy Touchsmart m6-k125dx Mouse Touch Pad Replacement: passo 2, immagine 1 di 1
    • Carefully remove the back panel to reveal the inner components.

  3. HP Envy Touchsmart m6-k125dx Mouse Touch Pad Replacement, Mouse Touch Pad: passo 3, immagine 1 di 2 HP Envy Touchsmart m6-k125dx Mouse Touch Pad Replacement, Mouse Touch Pad: passo 3, immagine 2 di 2
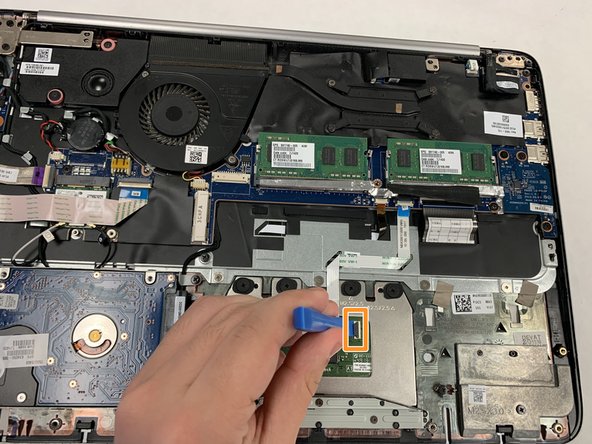
    • The mouse touch pad is located in the bottom middle section of the back of the laptop.

    • Lift the black ZIF tab and gently pull the ribbon cable free.

  4. HP Envy Touchsmart m6-k125dx Mouse Touch Pad Replacement: passo 4, immagine 1 di 1
    • There are four M2.5X2.5 screws that need to be removed in order to take the mouse touch pad out.

    • Unscrew all four M2.5X2.5 screws with a JIS #0 screwdriver.

  5. HP Envy Touchsmart m6-k125dx Mouse Touch Pad Replacement: passo 5, immagine 1 di 1
    • Flip the laptop over and open it.

    • Gently press on the two top corners of the mouse touch pad, snapping it down and out.

    • Remove through the bottom of the laptop and replace.

Conclusione

To reassemble your device, follow these instructions in reverse order.

Aaron Burns

Membro da: 04/06/19

97 Reputazione

1 Guida realizzata

Team

IUPUI, Team S14-G14, Wilson Spring 2019 Membro di IUPUI, Team S14-G14, Wilson Spring 2019

IUPUI-WILSON-S19S14G14

4 Membri

3 Guide realizzate

0 Commenti

Aggiungi Commento

Visualizza Statistiche:

Ultime 24 Ore: 0

Ultimi 7 Giorni: 0

Ultimi 30 Giorni: 0

Tutti i Tempi: 198