Salta al contenuto principale

HP Envy Touchsmart m6-k125dx Hard Drive Replacement

Cosa ti serve

  1. HP Envy Touchsmart m6-k125dx Hard Drive Replacement, Back Panel: passo 1, immagine 1 di 2 HP Envy Touchsmart m6-k125dx Hard Drive Replacement, Back Panel: passo 1, immagine 2 di 2
    • Turn the laptop over so that the bottom is facing up

    • Using the J0 screwdriver, unscrew all 12 M2.5x5.5 screws from the back panel.

  2. HP Envy Touchsmart m6-k125dx Hard Drive Replacement: passo 2, immagine 1 di 1
    • Carefully remove the back panel to reveal the inner components.

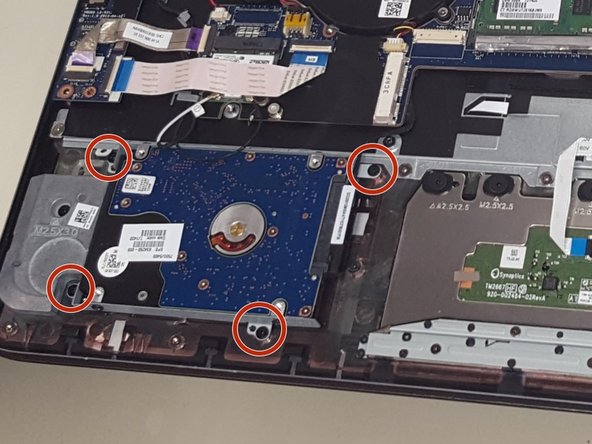
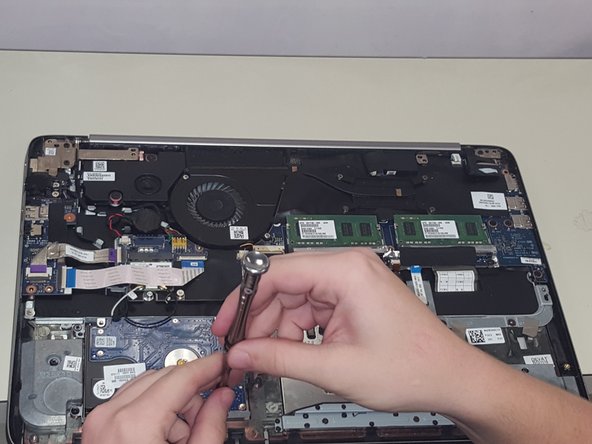
  3. HP Envy Touchsmart m6-k125dx Hard Drive Replacement, Hard Drive: passo 3, immagine 1 di 3 HP Envy Touchsmart m6-k125dx Hard Drive Replacement, Hard Drive: passo 3, immagine 2 di 3 HP Envy Touchsmart m6-k125dx Hard Drive Replacement, Hard Drive: passo 3, immagine 3 di 3
    • Using the JIS screwdriver along with the J000 head, unscrew the four Phillips PM2.5x5.5 screws, and place them aside.

  4. HP Envy Touchsmart m6-k125dx Hard Drive Replacement: passo 4, immagine 1 di 1
    • Carefully detach the Hard Drive Adapter, and remove the Hard Drive from the laptop.

    • Make sure not to pull from the cord; pull from the head of the adapter.

Conclusione

To reassemble your device, follow these instructions in reverse order.

Altre 4 persone hanno completato questa guida.

0 Commenti

Aggiungi Commento

Visualizza Statistiche:

Ultime 24 Ore: 2

Ultimi 7 Giorni: 2

Ultimi 30 Giorni: 6

Tutti i Tempi: 1,131