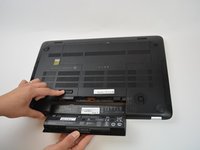
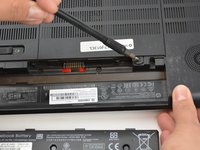
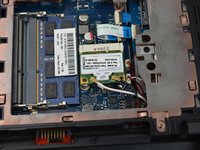
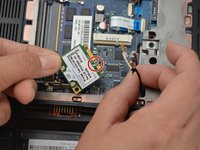
Salta al contenuto principale

HP Envy 17-J013CL WLAN Module Replacement

Cosa ti serve

  1. HP Envy 17-J013CL WLAN Module Replacement, Battery: passo 1, immagine 1 di 1
    • Lay the laptop with the battery facing towards you.

    • Remember to disconnect the AC cable and other power sources from the device before replacing/repairing parts.

  2. HP Envy 17-J013CL WLAN Module Replacement: passo 2, immagine 1 di 1
    • Grab hold of the small battery slider and apply pressure to the right.

    • The laptop itself will push the battery out for you once the switch slides all the way to the right.

  3. HP Envy 17-J013CL WLAN Module Replacement: passo 3, immagine 1 di 3 HP Envy 17-J013CL WLAN Module Replacement: passo 3, immagine 2 di 3 HP Envy 17-J013CL WLAN Module Replacement: passo 3, immagine 3 di 3
    • Pull the battery out and let go of the battery slider.

  4. HP Envy 17-J013CL WLAN Module Replacement, Back Panel: passo 4, immagine 1 di 2 HP Envy 17-J013CL WLAN Module Replacement, Back Panel: passo 4, immagine 2 di 2
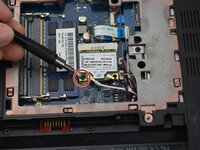
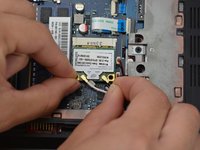
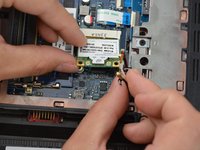
    • Use a PH1-screwdriver to loosen the 7mm screw. The screw will not fully come out as it is held by a washer underneath but will come out enough to open it.

  5. HP Envy 17-J013CL WLAN Module Replacement: passo 5, immagine 1 di 1
    • Gently pull the back panel off starting from the battery side towards the back.

    • Pull it back as it snaps out of the holding sockets.

    • It is preferred to use both hands when pulling the back panel off to prevent bending it out of shape.

  6. HP Envy 17-J013CL WLAN Module Replacement, WLAN Module: passo 6, immagine 1 di 2 HP Envy 17-J013CL WLAN Module Replacement, WLAN Module: passo 6, immagine 2 di 2
    • Locate the WLAN module.

  7. HP Envy 17-J013CL WLAN Module Replacement: passo 7, immagine 1 di 2 HP Envy 17-J013CL WLAN Module Replacement: passo 7, immagine 2 di 2
    • Use a PH1-screwdriver to remove the 7mm screw from the motherboard.

  8. HP Envy 17-J013CL WLAN Module Replacement: passo 8, immagine 1 di 2 HP Envy 17-J013CL WLAN Module Replacement: passo 8, immagine 2 di 2
    • Lift the black and white wire from the module. Removing the wires from the ends will have a distinct popping noise.

    • Remember to put the white wire on the left side of the module and the black wire on the right side. Failure to do so may cause issues.

  9. HP Envy 17-J013CL WLAN Module Replacement: passo 9, immagine 1 di 2 HP Envy 17-J013CL WLAN Module Replacement: passo 9, immagine 2 di 2
    • Gently pull out the module away from the motherboard.

    • Make sure to put the module back in the correct orientation designated by the little arch in the end of the module.

Conclusione

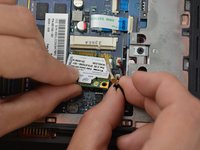
To reassemble your device, follow these instructions in reverse order.

Un'altra persona ha completato questa guida.

Matt McBride

Membro da: 02/02/17

845 Reputazione

6 Guide realizzate

Team

USF Tampa, Team 16-6, Blackwell Spring 2017 Membro di USF Tampa, Team 16-6, Blackwell Spring 2017

USFT-BLACKWELL-S17S16G6

3 Membri

6 Guide realizzate

0 Commenti

Aggiungi Commento

Visualizza Statistiche:

Ultime 24 Ore: 0

Ultimi 7 Giorni: 1

Ultimi 30 Giorni: 3

Tutti i Tempi: 333