Salta al contenuto principale

HP EliteOne 800 G1 RAM Replacement

  1. HP EliteOne 800 G1 RAM Replacement, Removing the Back Cover: passo 1, immagine 1 di 3 HP EliteOne 800 G1 RAM Replacement, Removing the Back Cover: passo 1, immagine 2 di 3 HP EliteOne 800 G1 RAM Replacement, Removing the Back Cover: passo 1, immagine 3 di 3
    • Place computer with the screen down on a flat surface.

    • Push the two locking latches to the unlocked position.

    • Push the cover toward the top of the computer and lift up.

  2. HP EliteOne 800 G1 RAM Replacement, RAM: passo 2, immagine 1 di 2 HP EliteOne 800 G1 RAM Replacement, RAM: passo 2, immagine 2 di 2
    • Notice the 2 latches on either side of the RAM stick.

    • Press latches outward and RAM stick will flip up to about a 30 degree angle.

  3. HP EliteOne 800 G1 RAM Replacement: passo 3, immagine 1 di 1
    • Gently pull the RAM stick up at an angle. You may need to wiggle the stick up and down or side to side in order to get it loose.

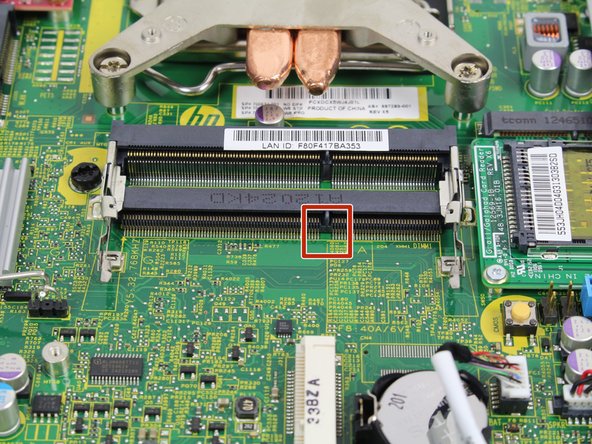
  4. HP EliteOne 800 G1 RAM Replacement: passo 4, immagine 1 di 2 HP EliteOne 800 G1 RAM Replacement: passo 4, immagine 2 di 2
    • When replacing the RAM stick, take note of where the small notch on the stick is and where there is a similar notch on the slot. Make sure you position the new stick so that the notches line up.

Conclusione

To reassemble your device, follow these instructions in reverse order.

Altre 2 persone hanno completato questa guida.

Team

Cal Poly, Team 1-24, Maness Fall 2015 Membro di Cal Poly, Team 1-24, Maness Fall 2015

CPSU-MANESS-F15S1G24

4 Membri

14 Guide realizzate

0 Commenti

Aggiungi Commento

Visualizza Statistiche:

Ultime 24 Ore: 1

Ultimi 7 Giorni: 4

Ultimi 30 Giorni: 32

Tutti i Tempi: 2,919