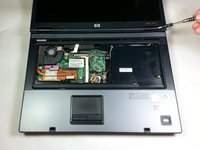
Salta al contenuto principale

HP Compaq 6710b Power Button Panel Replacement

Cosa ti serve

  1. HP Compaq 6710b Power Button Panel Replacement, Keyboard: passo 1, immagine 1 di 3 HP Compaq 6710b Power Button Panel Replacement, Keyboard: passo 1, immagine 2 di 3 HP Compaq 6710b Power Button Panel Replacement, Keyboard: passo 1, immagine 3 di 3
    • Turn off computer before starting.

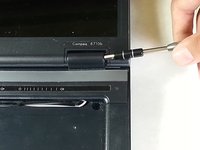
    • Flip to the backside of the laptop.

    • Using a Phillips #1 screwdriver, unscrew the 5mm screw and take off the shown cover.

    • Using the same screwdriver, unscrew the 8mm screws.

    • The screws may not completely fall out of the laptop, just ensure they are unscrewed as far as they will go.

  2. HP Compaq 6710b Power Button Panel Replacement: passo 2, immagine 1 di 1
    • Flip over the laptop to the top side, and open the laptop.

    • Slide the locking tabs down using a blue plastic opening tool or your fingernail.

  3. HP Compaq 6710b Power Button Panel Replacement: passo 3, immagine 1 di 2 HP Compaq 6710b Power Button Panel Replacement: passo 3, immagine 2 di 2
    • Using the plastic prying tool, lift the keyboard gently towards you.

    • Don't take the keyboard completely off because it is still attached with a ribbon cable to the computer.

  4. HP Compaq 6710b Power Button Panel Replacement: passo 4, immagine 1 di 1
    • Pull up on both sides of the black locking tab of the connector.

    • The keyboard should now be free of the computer.

  5. HP Compaq 6710b Power Button Panel Replacement, Power Button Panel: passo 5, immagine 1 di 1
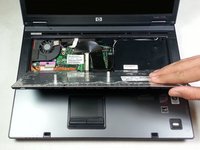
    • Put a finger under each side of the plastic lock on the ribbon cable and pull up.

  6. HP Compaq 6710b Power Button Panel Replacement: passo 6, immagine 1 di 3 HP Compaq 6710b Power Button Panel Replacement: passo 6, immagine 2 di 3 HP Compaq 6710b Power Button Panel Replacement: passo 6, immagine 3 di 3
    • Using a flathead screwdriver, get under each plastic hinge cover until they pop.

    • Lift the right edge of plastic strip covering the power button and gently pull it up until the whole strip comes free.

Conclusione

To reassemble your device, follow these instructions in reverse order.

Altre 4 persone hanno completato questa guida.

Khulan Orgil

Membro da: 04/14/15

1.135 Reputazione

6 Guide realizzate

Team

Cal Poly, Team 4-2, Maness Spring 2015 Membro di Cal Poly, Team 4-2, Maness Spring 2015

CPSU-MANESS-S15S4G2

4 Membri

6 Guide realizzate

0 Commenti

Aggiungi Commento

Visualizza Statistiche:

Ultime 24 Ore: 1

Ultimi 7 Giorni: 6

Ultimi 30 Giorni: 14

Tutti i Tempi: 3,279