Salta al contenuto principale

HP Chromebook 11a-nb0013dx Speakers Replacement

Cosa ti serve

  1. HP Chromebook 11a-nb0013dx Speakers Replacement, Speakers: passo 1, immagine 1 di 2 HP Chromebook 11a-nb0013dx Speakers Replacement, Speakers: passo 1, immagine 2 di 2
    • Position your closed computer on a flat surface, with the back facing up.

    • Identify eight 8 mm Philips #1 screws on the back of your computer.

    • After identifying all the screws, remove them with the Philips #0 Screwdriver.

  2. HP Chromebook 11a-nb0013dx Speakers Replacement: passo 2, immagine 1 di 2 HP Chromebook 11a-nb0013dx Speakers Replacement: passo 2, immagine 2 di 2
    • Identify the 4 rubber feet on the back of the laptop.

    • Remove them with a metal spudger or an opening tool.

  3. HP Chromebook 11a-nb0013dx Speakers Replacement: passo 3, immagine 1 di 1
    • Flip over your computer and open it.

    • Using a plastic pick, level up the edges of the keyboard by sliding the pick along the gap.

    • Apply downward pressure to separate the bottom of the Chromebook and the keyboard.

    • Do the same for all 4 sides of the keyboard until it starts to lift.

    • You should hear popping sounds as you slide the plastic pick along the edge.

  4. HP Chromebook 11a-nb0013dx Speakers Replacement: passo 4, immagine 1 di 1
    • Gently lift up the keyboard from the bottom.

  5. HP Chromebook 11a-nb0013dx Speakers Replacement: passo 5, immagine 1 di 2 HP Chromebook 11a-nb0013dx Speakers Replacement: passo 5, immagine 2 di 2
    • Identify the zero insertion force (ZIF) connector.

    • Now, disconnect the cable by using the tip of the iFixit opening tool or your fingernail to flip up the small locking flap.

    • You can now gently pull out the cable.

    • No force is needed to plug in or remove the cable

  6. HP Chromebook 11a-nb0013dx Speakers Replacement: passo 6, immagine 1 di 2 HP Chromebook 11a-nb0013dx Speakers Replacement: passo 6, immagine 2 di 2
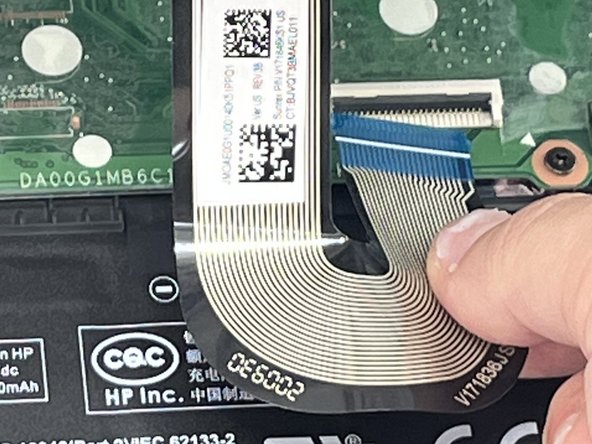
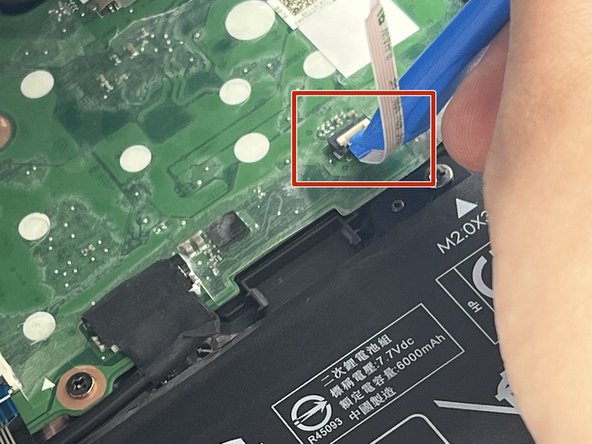
    • Identify the second cable and the ZIF connector attatching the cable to the motherboard. Then, unclip it with the iFixit opening tool.

    • To do this, use the iFixit opening tool to flip up the small locking flap located on the ZIF connector.

    • Proceed by gently pulling the cable straight out of the connector to disconnect the cable.

    • Be careful, the cord is very fragile!

  7. HP Chromebook 11a-nb0013dx Speakers Replacement: passo 7, immagine 1 di 1
    • Once the white cord is removed, this is what it should look like. At this point, you should be able to completely take off the keyboard.

  8. HP Chromebook 11a-nb0013dx Speakers Replacement: passo 8, immagine 1 di 3 HP Chromebook 11a-nb0013dx Speakers Replacement: passo 8, immagine 2 di 3 HP Chromebook 11a-nb0013dx Speakers Replacement: passo 8, immagine 3 di 3
    • Lift up the adhesive holding the battery connector.

    • Then, pull the battery connector straight towards you.

    • Remove the speaker cable from the battery.

  9. HP Chromebook 11a-nb0013dx Speakers Replacement: passo 9, immagine 1 di 1
    • Lift the speakers off and remove them.

Conclusione

To reassemble your device, follow these instructions in reverse order.

0 Commenti

Aggiungi Commento

Visualizza Statistiche:

Ultime 24 Ore: 0

Ultimi 7 Giorni: 1

Ultimi 30 Giorni: 3

Tutti i Tempi: 65