Salta al contenuto principale

HP Chromebook 11 G5 Battery Replacement

Cosa ti serve

  1. HP Chromebook 11 G5 Battery Replacement, Keyboard: passo 1, immagine 1 di 1
    • Remove four large rubber pads from the bottom of the device to reveal screws using the pointed end of a spudger.

  2. HP Chromebook 11 G5 Battery Replacement: passo 2, immagine 1 di 1
    • Remove two smaller rubber pads from the bottom of the device to reveal screws using the pointed end of a spudger.

  3. HP Chromebook 11 G5 Battery Replacement: passo 3, immagine 1 di 1
    • Remove the 4mm eleven screws using a Phillips #00 screwdriver.

  4. HP Chromebook 11 G5 Battery Replacement: passo 4, immagine 1 di 1
    • Flip the device upright and open the screen as far back as possible.

  5. HP Chromebook 11 G5 Battery Replacement: passo 5, immagine 1 di 1
    • Wedge the flat-end of a metal spudger between the base of the device and the keyboard assembly while applying downward pressure. Slide the spudger across the entirety of the gap until the two components separate.

    • There will be audible popping sounds caused by the separation of the base of the device and the keyboard assembly as you wedge them apart.

    • Do not insert the spudger into the gap deeper than necessary as it may snag on the internal components.

  6. HP Chromebook 11 G5 Battery Replacement: passo 6, immagine 1 di 1
    • Gently lift the keyboard assembly slightly above the base of the device.

  7. HP Chromebook 11 G5 Battery Replacement: passo 7, immagine 1 di 1
    • Disconnect the two ribbon cables connected to the motherboard by using the pointed end of a spudger to lift the plastic connector lids to allow the ribbon cables to be gently removed by hand.

  8. HP Chromebook 11 G5 Battery Replacement: passo 8, immagine 1 di 1
    • Gently remove the keyboard assembly by hand from the base of the device.

  9. HP Chromebook 11 G5 Battery Replacement, Battery: passo 9, immagine 1 di 1
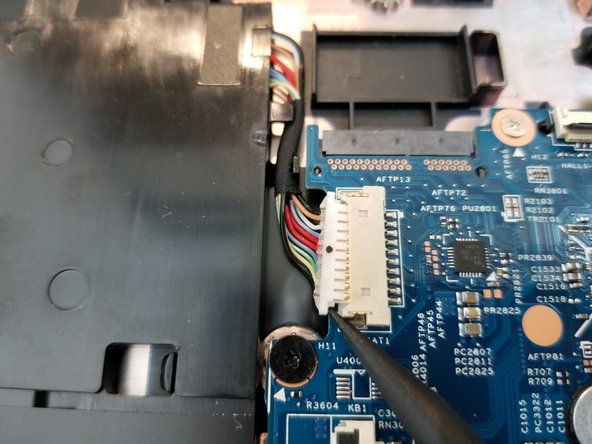
    • Remove the two wires from the top of the WLAN module by pulling them gently with a spudger or your hand and snapping the wires out of place.

  10. HP Chromebook 11 G5 Battery Replacement: passo 10, immagine 1 di 2 HP Chromebook 11 G5 Battery Replacement: passo 10, immagine 2 di 2
    • Remove the battery connector by pushing both edges outward using the sharp end of the spudger.

  11. HP Chromebook 11 G5 Battery Replacement: passo 11, immagine 1 di 2 HP Chromebook 11 G5 Battery Replacement: passo 11, immagine 2 di 2
    • Remove the ribbon cable from the connector board by lifting the cover with the sharp end of the spudger and gently pulling the cable out with your hand.

    • Ribbon cables can be fragile and extra care must be taken when pulling the cable out of the connector.

  12. HP Chromebook 11 G5 Battery Replacement: passo 12, immagine 1 di 1
    • Remove the two 3mm silver screws from the battery using a Phillips #00 screwdriver.

    • Remove the black 4mm screw with the Phillips #00 screwdriver.

    • Remove the battery by hand.

    • Be cautious when removing the battery as two WLAN cables run along the top edge of it.

Conclusione

To reassemble your device, follow these instructions in reverse order.

Altre 4 persone hanno completato questa guida.

0 Commenti

Aggiungi Commento

Visualizza Statistiche:

Ultime 24 Ore: 0

Ultimi 7 Giorni: 1

Ultimi 30 Giorni: 13

Tutti i Tempi: 1,104