Salta al contenuto principale

HP Chromebook 11 G3 Touchpad Replacement

Cosa ti serve

  1. HP Chromebook 11 G3 Touchpad Replacement, Keyboard Mount: passo 1, immagine 1 di 2 HP Chromebook 11 G3 Touchpad Replacement, Keyboard Mount: passo 1, immagine 2 di 2
    • Flip the laptop upside down so that the lid lies flat on the table.

    • Remove the nine 6mm Phillips #00 screws that line the border.

  2. HP Chromebook 11 G3 Touchpad Replacement: passo 2, immagine 1 di 2 HP Chromebook 11 G3 Touchpad Replacement: passo 2, immagine 2 di 2
    • Remove the two rubber feet closest to the hinge using tweezers.

    • Remove the two 6mm Phillips #00 screws revealed under these rubber feet.

    • The rubber feet may tear while removal; preventing this can be difficult, but it won’t harm the laptop. If desired, replace these rubber feet during reassembly.

  3. HP Chromebook 11 G3 Touchpad Replacement: passo 3, immagine 1 di 1
    • Flip the laptop so it is in the upright position.

    • Open the lid.

    • Unsnap the keyboard mount along the border of the laptop using a plastic opening tool.

    • This may require more force than expected. Hearing loud clicks as the plastic opening tool slides along the seam is normal.

  4. HP Chromebook 11 G3 Touchpad Replacement: passo 4, immagine 1 di 3 HP Chromebook 11 G3 Touchpad Replacement: passo 4, immagine 2 di 3 HP Chromebook 11 G3 Touchpad Replacement: passo 4, immagine 3 di 3
    • Tilt the keyboard mount up.

    • Use a spudger to flip up the two ZIF connector retaining flaps for the ribbon cables that connect the keyboard mount to the motherboard.

    • Gently remove both ribbon cables.

  5. HP Chromebook 11 G3 Touchpad Replacement: passo 5, immagine 1 di 1
    • Lift the keyboard mount out of the laptop.

  6. HP Chromebook 11 G3 Touchpad Replacement, Touchpad: passo 6, immagine 1 di 3 HP Chromebook 11 G3 Touchpad Replacement, Touchpad: passo 6, immagine 2 di 3 HP Chromebook 11 G3 Touchpad Replacement, Touchpad: passo 6, immagine 3 di 3
    • Flip the keyboard mount upside down.

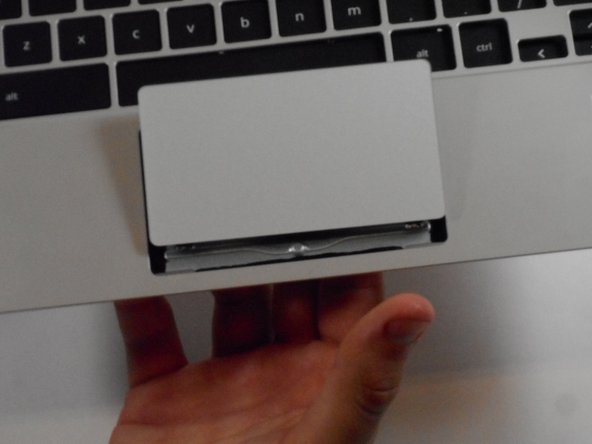
    • Use tweezers to lift the tape on the bottom of the touchpad to expose the connector.

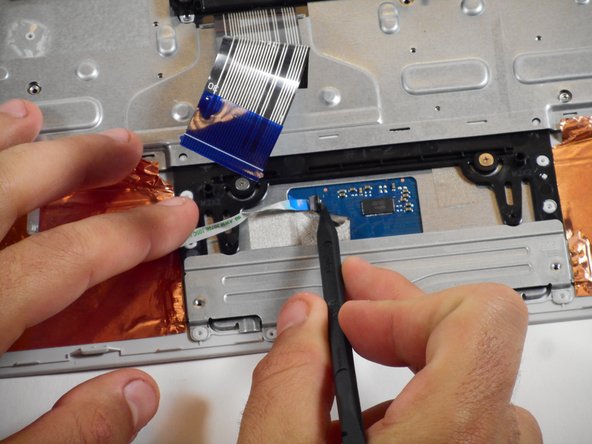
    • With a spudger, push up the ZIF retaining flip.

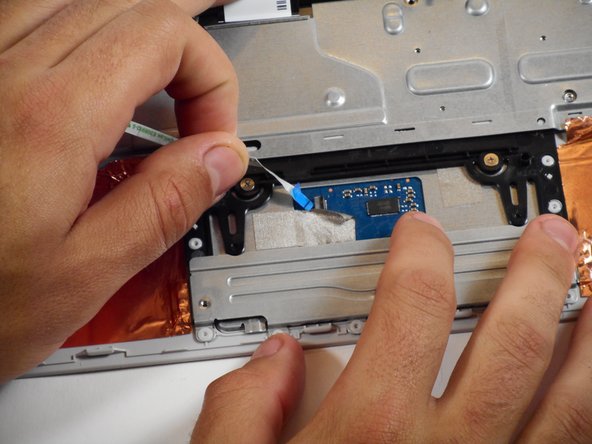
    • Pull out the small ribbon cable.

  7. HP Chromebook 11 G3 Touchpad Replacement: passo 7, immagine 1 di 2 HP Chromebook 11 G3 Touchpad Replacement: passo 7, immagine 2 di 2
    • Remove the two Phillips #00 2mm screws that secure the touchpad to the black plastic housing.

    • Flip the keyboard mount to the upright position.

    • From beneath, push the touchpad up through the top of the keyboard mount to remove it.

Conclusione

To reassemble your device, follow these instructions in reverse order.

Altre 2 persone hanno completato questa guida.

Rahul Goyal

Membro da: 04/26/17

1.369 Reputazione

10 Guide realizzate

Team

Cal Poly, Team S23-G3, Livingston Spring 2017 Membro di Cal Poly, Team S23-G3, Livingston Spring 2017

CPSU-LIVINGSTON-S17S23G3

4 Membri

12 Guide realizzate

0 Commenti

Aggiungi Commento

Visualizza Statistiche:

Ultime 24 Ore: 0

Ultimi 7 Giorni: 3

Ultimi 30 Giorni: 8

Tutti i Tempi: 1,335