Introduzione
This guide is helpful if you need to replace a dead or damaged battery. Be careful when removing the battery to not bend or puncture it because it may contain hazardous chemicals.
Cosa ti serve
-
-
Using a Torx T4 screwdriver, remove the four 5 mm screws on the back panel.
-
-
-
-
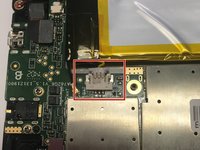
Using a spudger or your fingers, disconnect the power cable by sliding the connector out of the socket on the motherboard.
-
-
Attrezzo utilizzato in questo passaggio:Plastic Cards$2.99
-
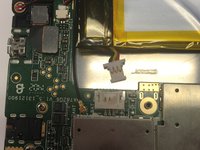
Using a plastic card or a nylon spudger, carefully pry the battery from the adhesive on the tablet.
-


To reassemble your device, follow these instructions in reverse order.
Team

University of Alabama, Team S1-G1, Bedsole Spring 2019 Membro di University of Alabama, Team S1-G1, Bedsole Spring 2019
UA-BEDSOLE-S19S1G1
4 Membri
6 Guide realizzate